[Tutorial] Integrating Google H5 Ads with Phaser Editor 2D
June 29, 2022 - Posted in tutorials
![[Tutorial] Integrating Google H5 Ads with Phaser Editor 2D](https://phasereditor2d.com/blog/content/images/20220629085811-google-ads-phaser-editor.png)
Hi,
In this article, I will explain how to show Google H5 Ads (beta) in a Phaser game.
The Ad Placement API supports interstitial and rewarded ads. I cover both types in this tutorial.
I made an example for showing the basic concepts and as a guide for this tutorial. You can download it from GitHub.
Project structure
Phaser is a framework and you have multiple ways of setting up the structure of your project. Phaser Editor 2D provides a couple of project templates that allow you a quick setup of your game. For this tutorial (and the underlying example), I used the Webpack/TypeScript template. This way you can install dependencies, like Phaser (or even the editor), using NPM.
The example
The example is very simple, it has a Preload scene for loading the game assets and the ads resources.
When the loading is done, it shows the Home scene. This scene shows a play button for starting the gameplay, the Level scene. Before starting playing, it shows an interstitial ad.
The Level scene or the gameplay is all about a running character, picking items, and jumping obstacles. If the character touches an obstacle, the game is over, and it shows a dialog for showing the score, continuing playing the level, or going to the Home scene.
If you select to continue playing the game, it shows a rewarded ad that you have to watch until the end, else you are redirected to Home.
Setting up the Google H5 Ads SDK
The Google H5 Ads SDK is not installed as a node package else it is loaded into the game directly from the Google servers, using a script tag.
In the index.html file of the game, you add the script tag in the head of the document:
    <script async data-adbreak-test="on" data-ad-frequency-hint="30s"
        src="https://pagead2.googlesyndication.com/pagead/js/adsbygoogle.js?client=YOUR-PUB-ID-HERE"
        crossorigin="anonymous">
    </script>
First, you need to create a Google AdSense account and get a Publisher ID.
Note in the previous code, you should replace the YOUR-PUB-ID-HERE text with the Publisher ID you get from your AdSense account.
Next to the previous script tag, you should initialize the Google H5 Ads SDK:
<script>
        window.adsbygoogle = window.adsbygoogle || [];
        var adBreak = adConfig = function (o) { adsbygoogle.push(o); }
</script>
Look it defines the adBreak() and adConfig() functions are used in the game code.
Learn more about setting up the Google H5 Ads SDK
Preloading the ads
The majority of the HTML5 games first do a preloading of the assets at the very beginning of the game. In Phaser games, the common is to use a Preload scene for preload and show the progress of the assets loading.
The Google H5 Ads SDK also allows the downloading and caching of the ads resources. You can force this preloading of the ads in your game. In the example, we do this in the Preload scene.
You can force the preload by calling the adConfig() function:
adConfig({
	preloadAdBreaks: "on",
	onReady: () => {

		console.log("Ads preloaded!");

		this.progressBar.setProgress(1);

		this.scene.start("Home");
	},
});
The onReady parameter references a callback that is executed when the ads are loaded. In the example above, the onReady callback shows the complete progress of the loading:
this.progressBar.setProgress(1);
And starts the Home scene of the game.
The this.progressBar variable references an instance of the ProgressBar prefab:
Learn more about Google H5 Ads preloading.
Interstitial ads
What is an interstitial ad?
From the Google Ad Placement docs:
An interstitial ad is a full-screen ad that can show at different moments within your game, such as when the player starts the game, or after the player completes a level. It pauses the game, covers the entire document, and the player can choose to click the ad (in which case the ad shows in a different tab of their browser) or to dismiss it which allows them to proceed with the game.
In our example, we show an interstitial ad in the Home scene, right away when you click the Play button. You can show the ad with this code:
adBreak({
	type: "start",
	name: "test-interstitial",
	adBreakDone: () => {

		// go to the Level scene
		this.start("Level");
	}
});
Learn more about the ad placement types.
The type parameter indicates the type of ad. The name is optional and contains a description of the ad. The addBreakDone parameter references a callback that is executed when the user closes the ad. So, in the adBreakDone callback you start the Level scene.
However, in the editor, I did it in a slightly different way. I created an AdButton component that you can add to any image.

The AdButton component has an On adBreakDone parameter that accepts verbatim code. That code is executed when the adBreakDone callback of the addBreak() function is called. You can see that behavior in the AdButton component implementation:
// this method is executed when
// the user touches the gameObject of the component
private showAdd() {

	adBreak({
		type: "start",
		name: "test-interstitial",
		adBreakDone: (placementInfo:any) => {

			// When the ad is done, it executes
			// the callback referenced
			// by `onAdBreakDone` parameter

			if (this.onAdBreakDone) {

				this.onAdBreakDone();
			}
		}
	});
}
If you look into the Home scene code, the AdButton component is created like this:
editorCreate() {

	...
	const btnPlayAdButton = new AdButton(btnPlay);
	btnPlayAdButton.onAdBreakDone = () => this.startGame();
	...

}

private startGame() {

	this.scene.start("Level");
}
This video shows the workflow:
Rewarded ads
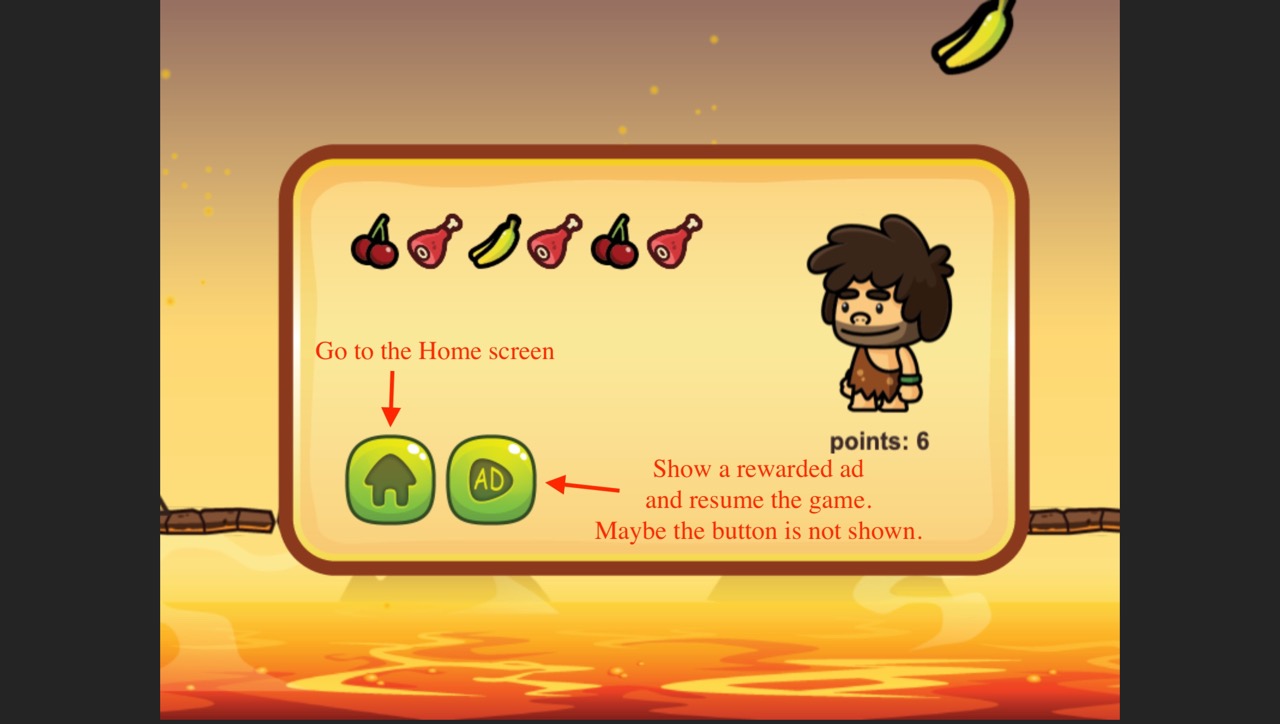
When the character collides with an obstacle, the game stops. It shows the game over dialog with the score and the options to:
- Go to the Home screen.
- Get an extra life and resume the game.
The second option requires you to watch a rewarded ad. If you watch the ad until the end, then you get the reward and can continue playing the game at the same point and with the same score you had before you lost. That’s the concept of rewarded ads, if you watch it, you get a reward.
Rewarded ads are not always available, it depends on the frequency you request them. So it is possible that the option to continue playing the game is not shown.
To show a rewarded ad, you can the adBreak() function like this:
adBreak({
	type: "reward",
	name: "test-reward",
	beforeReward: (showAdFn: any) => {

		// set visible the button

		// keep a reference to the showAdFn function
	},
	adViewed: () => {

		// ad viewed, resume the game!
	},
	adDismissed: () => {

		// ad dismissed, go to the Home screen
	}
});
The beforeReward callback provides the showAdFn function that you should call for showing the ad. Also, you should set visible the button and register a listener to the button so you call showAdFn when the button is touched.
The adViewed callback is executed when you watch the complete ad, so the game provides you a reward, like resume the play.
The adDismissed callback is executed if you close the ad before it is complete. So you don’t get the reward and are redirected to the Home screen.
Like I did with the AdButton, I encapsulated the rewarded ads logic in a RewardAdButton component.
You can add the component to an image object and provides the On adViewed and On adDismissed callbacks:
As I did with the interstitial ad, the rewarded ads logic is encapsulated in a RewardedAdButton component:
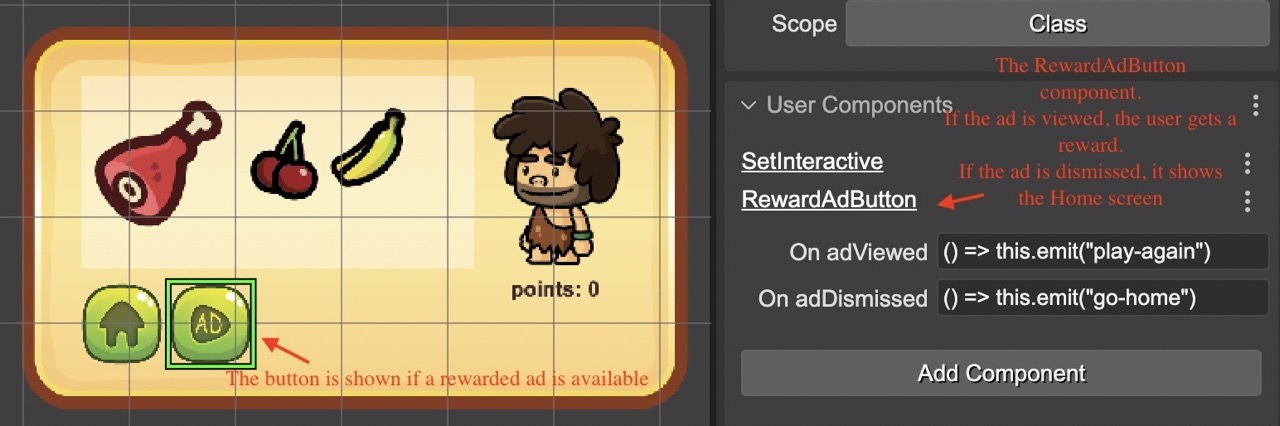
The dialog is encapsulated in the GameOverDialog prefab, and it emits the play-again & go-home events. The Level scene listens to these events and performs the final actions.
These are the most important parts of the RewardAdComponent implementation:
showAdButton() {

	// hide the button (this.gameObject)
	this.gameObject.visible = false;

	this.showAdFn = undefined;

	adBreak({
		type: "reward",
		name: "test-reward",
		beforeReward: (showAdFn: any) => {

			// gets the showAdFn function and display the "replay" button

			this.gameObject.visible = true;

			this.showAdFn = showAdFn;
		},
		adViewed: () => {

			// ad viewed! execute the onAdViewed callback

			if (this.onAdViewed) {

				this.onAdViewed();
			}
		},
		adDismissed: () => {

			// ad missed, execute the onAdViewed() callback

			if (this.onAdDismissed) {

				this.onAdDismissed();
			}
		},
		adBreakDone: (placementInfo: any) => {

			// ad break done, do nothing
		}
	});
}

protected awake(): void {

	// initialize the component

	this.gameObject.visible = false;

	// when the gameObject is touched it executes
	// the showAdFn set in the adBreak() call
	this.gameObject.on("pointerdown", () => {

		if (this.showAdFn) {

			this.showAdFn();
		}
	});
}
The following video shows the rewarded ads behavior:
Conclusion
Integrating Google H5 Ads into Phaser Editor 2D is not hard. I recommend reading the official documentation of the SDK and playing with the example shown in this tutorial. I plan to create a project template for a quick start with the Google H5 Ads, and who knows, maybe I can create some reusable components or a dedicated plugin.
Keep in contact!
Arian