Commenting the Sunny Land Woods demo (Tutorial)
March 21, 2019 - Posted in tutorials

Hi,
This article is not a typical step by step tutorial, else a series of comments about how we migrated the Sunny Land Woods demo to Phaser 3, using the Phaser Editor 2D tools. Sunny Land Woods (originally created by Luis Zuno) is a beautiful retro-style platformer game that includes a level full of animated enemies and items. Internally, it uses tilemaps, arcade physics, and custom (reusable) objects, so it is a great resource to learn how you can use these techniques in the visual tools of Phaser Editor 2D.
To see the final result, you can create a project based on the Sunny Land Woods (Tilemap - Factory - Pixel Art) template (File → New → Phaser Example Project). You need Phaser Editor v2.0.3.
Play or download the original demo
Index
- The project structure
- Common files and folders present in “all” the Phaser Editor 2D projects
- Files and folders created for the Sunny Land Woods game
- The Asset Pack files
- The animations
- The scenes
- The Boot scene
- The Preload scene
- The TitleScreen scene
- The GameOverScreen scene
- The Level scene
- Background
- The map
- The tree elements (leaves and branches)
- The pickable items
- The enemies
- The player
- Conclusion
new Phaser.Sprite();
The project structure {#the-project-structure}
We can split a Phaser Editor game project structure into two groups: the common files and folders that are present in “all” the Phaser Editor 2D projects and the files and folders that are created to implement a particular game.
Common files and folders present in “all” the Phaser Editor 2D projects {#common-files-and-folders-present-all-projects}
For simplicity, we are describing only the files and folders inside the WebContent folder. The WebContent folder contains all the files of the game, the runtime files. There is another folder, Design, that is not included in the game and contains files used by tools, to create the game assets. For example, images that are packed in an atlas, or SVG files that are exported to PNG images.
Files & Folders under WebContent |
Description | Include in the Game Production Build |
|---|---|---|
jsconfig.json |
It is a configuration file used by the Language Server Protocol (LSP), who allows a smart coding experience. The LSP was created by Microsoft and other companies and its reference implementation is Visual Studio Code. In Phaser Editor, we use a third-party plugin (Wild Web Developer who allows using this protocol to edit web files. | No |
typings/ |
That folder contains the Phaser TypeScript Definitions (phaser.d.ts). It is a file provided by the Phaser team and is used by the LSP (that is an abstraction of the TypeScript Server) to provides intellisense in the JavaScript editor. You can place other definition files here, especially if you are using other JavaScript libraries. |
No |
lib/ |
The folder contains the phaser.js file. You can add other libraries. That folder is excluded in the jsconfig.json file, so the files there are not analyzed by the smart-coding tooling. If the library provides a TypeScript definition file you can place it in the typings folder. This folder has to be included in the production build of the game, but you may want to use a minified (or custom) Phaser runtime. Or probably the better is to point to a Phaser runtime hosted in a CDN. In that case, you can exclude this folder from the production build. |
Yes |
index.html |
The entry point of the game. It loads the Phaser runtime (lib/phaser.js) and the script that creates and start the game (mains.js). |
Yes |
main.js |
The “boot” JavaScript file that creates a Phaser.Game instance and starts the first scene (Boot). |
Yes |
assets/ |
The folder that contains all the resources of the game. Usually, these assets are packed into some-pack.json files and loaded by demand (images, sounds, animations, scripts). For that reason, you can find there JavaScript files, like those generated by the Scene Compiler. You may want to load the levels by demand, and in Phaser Editor the levels are compiled into JavaScript files. |
Partially |
Files and folders created for the Sunny Land Woods game {#files-and-folders-created-for-demo}
Files & Folders under WebContent |
Description | Include in the Game Production Build |
|---|---|---|
assets/atlas/assets/environment/assets/maps/assets/sounds/assets/sprites/ |
Those folders contains all the images, maps, texture atlas and sound resources. It follows the same layout of the original demo. | Yes |
assets/preload-pack.json |
It is a standard Phaser Asset Pack file that contains the assets required by the Preload scene. | Yes |
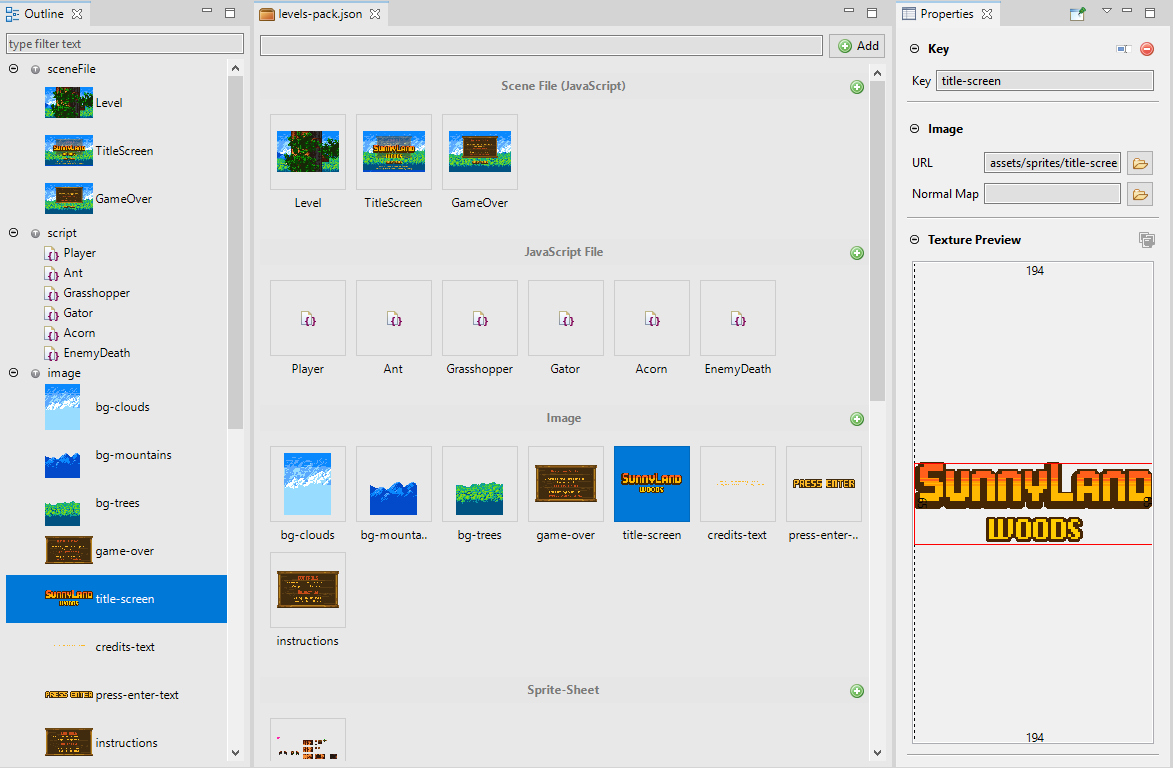
assets/levels-pack.json |
This Pack file contains the keys of all the assets required by the other scenes of the game (TitleScreen, Level and GameOverScreen). | Yes |
animations.json |
A standard Phaser Animations Configuration file. It contains all the sprite animations used in the game. | Yes |
assets/scenes/ |
The Scene (.scene) files and the Scene Compiler output (.js) files. Plus some custom Phaser types like Ant.js, Gator.js, Grasshopper.js, etc… |
Only the .js files |
fake-assets/ |
In this folder, we place some assets that we use the Scene Editor, but are not needed by the game at runtime. | No |
The Asset Pack files {#the-asset-pack-file}
In the original Sunny Land Woods demo, the assets are loaded using the different Phaser.Loader.LoaderPlugin methods:
this.load.image('title', 'assets/sprites/title-screen.png');
this.load.image('game-over', 'assets/sprites/game-over.png');
this.load.image('enter', 'assets/sprites/press-enter-text.png');
this.load.image('credits', 'assets/sprites/credits-text.png');
this.load.image('instructions', 'assets/sprites/instructions.png');
// environment
this.load.image('bg-clouds', 'assets/environment/bg-clouds.png');
this.load.image("bg-mountains", 'assets/environment/bg-mountains.png');
this.load.image("bg-trees", 'assets/environment/bg-trees.png');
// tileset
this.load.image('tileset', 'assets/environment/tileset.png');
this.load.tilemap('map', 'assets/maps/map.json', null, Phaser.Tilemap.TILED_JSON);
// atlas sprite
this.load.atlasJSONArray('atlas', 'assets/atlas/atlas.png', 'assets/atlas/atlas.json');
this.load.atlasJSONArray('atlas-props', 'assets/atlas/atlas-props.png', 'assets/atlas/atlas-props.json');
// audio
this.load.audio('music', ['assets/sounds/the_valley.ogg']);
this.load.audio('kill', ['assets/sounds/enemy-death.ogg']);
this.load.audio('hurt', ['assets/sounds/hurt.ogg']);
this.load.audio('item', ['assets/sounds/item.ogg']);
this.load.audio('jump', ['assets/sounds/jump.ogg']);
But in Phaser Editor we use Asset Pack files. An Asset Pack file is a standard Phaser configuration file that allows defining all the asset configurations in a JSON file, so you only need to load that file and all the declared assets are loaded automatically. For this demo, we created the preload-pack.json and levels-pack.json files. The original code was changed to a single line:
this.load.pack("levels-pack", "assets/levels-pack.json");
You can create and edit them with the Asset Pack Editor.
The animations {#the-animations}
The demo uses Sprite Animations to animate different objects. In the original Phaser 2 code, the animations was created by “hand”, adding some lines of codes. Something like this:
temp.animations.add('acorn', Phaser.Animation.generateFrameNames('acorn-', 1, 3, '', 0), 12, true);
this.animations.add('fly', Phaser.Animation.generateFrameNames('gator-', 1, 4, '', 0), 10, true);
this.animations.add('idle', Phaser.Animation.generateFrameNames('player-idle-', 1, 8, '', 0), animVel - 4, true);
this.animations.add('run', Phaser.Animation.generateFrameNames('player-run-', 1, 6, '', 0), animVel + 3, true);
this.animations.add('jump', Phaser.Animation.generateFrameNames('player-jump-', 1, 4, '', 0), 20, false);
this.animations.add('hurt', Phaser.Animation.generateFrameNames('player-hurt-', 1, 2, '', 0), animVel, true);
this.animations.add('duck', Phaser.Animation.generateFrameNames('player-crouch-', 1, 4, '', 0), animVel, true);
this.animations.add('idle', Phaser.Animation.generateFrameNames('grasshopper-idle-', 1, 4, '', 0), 10, true);
this.animations.add('jump', Phaser.Animation.generateFrameNames('grasshopper-jump-', 1, 2, '', 0), 10, true);
this.animations.add('fall', Phaser.Animation.generateFrameNames('grasshopper-fall-', 1, 2, '', 0), 10, true);
this.animations.add('walk', Phaser.Animation.generateFrameNames('ant-', 1, 8, '', 0), 10, true);
this.animations.add('fly', Phaser.Animation.generateFrameNames('gator-', 1, 4, '', 0), 10, true);
var anim = this.animations.add("death", Phaser.Animation.generateFrameNames("enemy-death-", 1, 4, '', 0), 15, false);
In Phaser 3, you can create the animations using an Animations Configuration file, and in Phaser Editor we did an editor for it.
The Animations Editor allows you to create the animations very quickly, you only have to drop the textures into the editor and, based on the frame names, it will create the different animations. Then you can select the animations and edit its properties like Frame Rate, Repeat, etc… You can select many animations and change their settings at the same time.
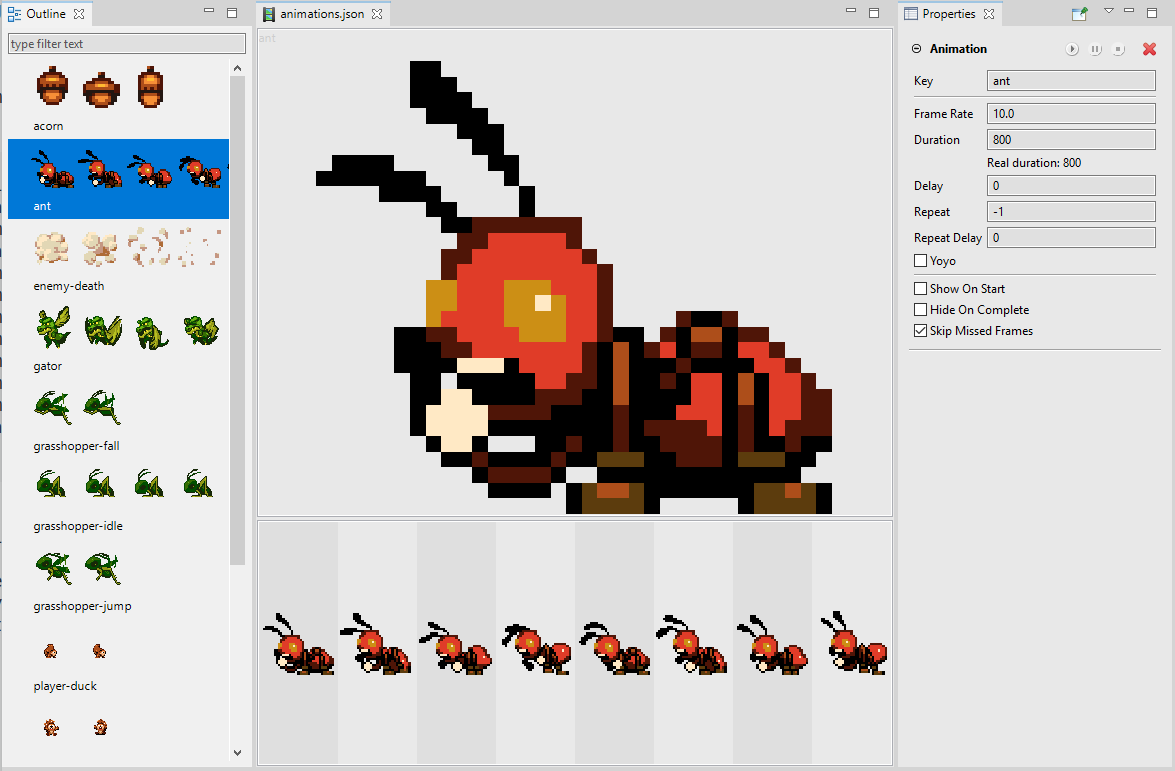
The animations are saved in the assets/animations.json file and included in the levels-pack.json file, you don’t need to write a single line of code to load and create them.
The scenes {#the-scenes}
The game is divided in five scenes: Boot, Preload, TitleScreen, Level and GameOver. Except for the Boot scene, all the other scenes are created using the Scene Editor of the IDE. The Scene Editor is a visual tool that allows to layout and set the properties of the game objects. The editor creates custom scene files (*.scene) to store the scene data but compiles it to readable JavaScript source, that the user can extend by inserting user code. It means each scene is formed by .scene file and a .js file (like Level.scene and Level.js). The .scene files are not needed by the game at runtime, you can exclude them from the production build.
The Boot scene {#the-boot-scene}
The Boot scene is the first scene executed by the game. It is in the main.js file, that is loaded via a <script> tag in the index.html file. The purpose of this scene is to load some assets required by the Preloader scene: the assets/loading.png image (used to display a progress bar) and the Preload.js file. These assets are packed in the assets/preload-pack.json file.
In Phaser Editor we pack the scripts, the code of the scenes or any other object, in a Pack file and load them by demand like the other assets. Of course, this is optional, many tools of the editor need the Pack file but you can avoid to load them at runtime and do the loading in your way. Actually, it is a good idea to
“strip” the pack files in the “build scripts” of your game. You can take all the script and sceneFile files, concatenate them in a single file and minimize it, then generate a new Pack file to load only the minified script file. We are thinking to write a tutorial about it in the future.
The Preload scene {#the-preload-scene}
The Preload scene loads the assets (packed in the levels-pack.json file) needed by the other scenes of the game and shows a bar with the progress of the loading. This is a scene that you will find in a lot of games made with Phaser, and follows a common pattern:
- It loads all the assets needed by the game.
- It shows the loading progress using a sprite with a bar, or a text. That sprite is created in the
preloadmethod of the scene and is updated on aprogressevent emitted by the loader. - When the loading is done (you can know it when the
createorupdatemethod is called), it starts the next scene, that use to be a Welcome screen with a play button.
This scene was created by the Scene Editor, so you have the assets/Preload.scene and the assets/Preload.js files. If you open the Preload.scene file, you will see it only has the loading bar. Remember, the Preload.js and the loading.png files as loaded in the previous Boot scene.
By default, the Scene Compiler generates a create method with the code that creates the objects, but in this case, we need to create the objects in the preload method. To solve this, we say to the compiler to use a different method name (_create) and we call it in the preload method:
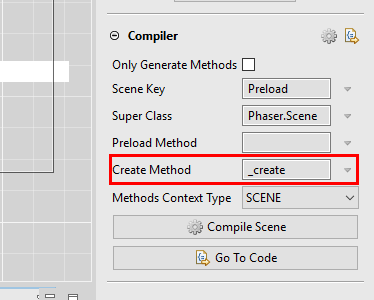
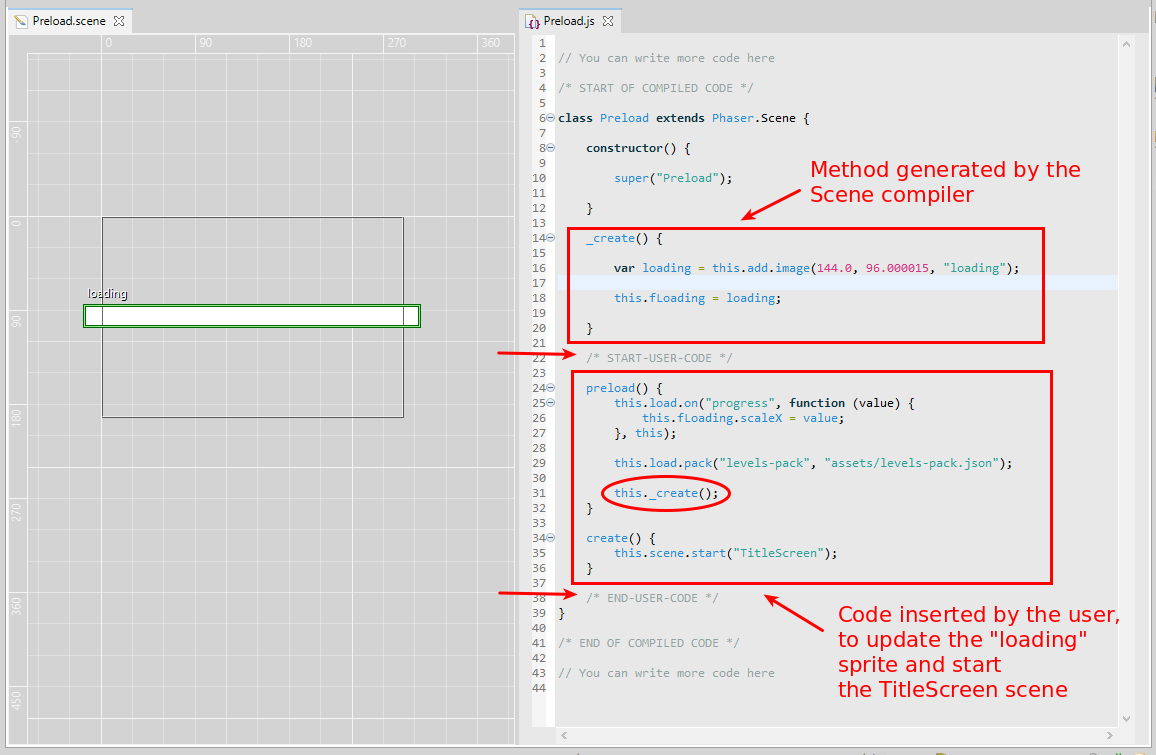
Then, in the create method, we start the next scene: TitleScreen. The option of saying the compiler to use different names for the methods is simple and powerful, it gives you more freedom to write the layout you wish in your scenes. Even, you have the option to say the compiler to generate only the methods, so you can write the whole code with your own style.
The TitleScreen scene {#the-titlescreen-scene}
The TitleScreen scene is very simple, it shows the name of the game and the instructions. It was created with the Scene Editor, so there are the assets/TitleScreen.scene and assets/TitleScreen.js files. Note there is not any loading code, because all the assets, including the TitleScreen.js file, were loaded in the Preload scene. It starts the Level scene when you press ENTER.

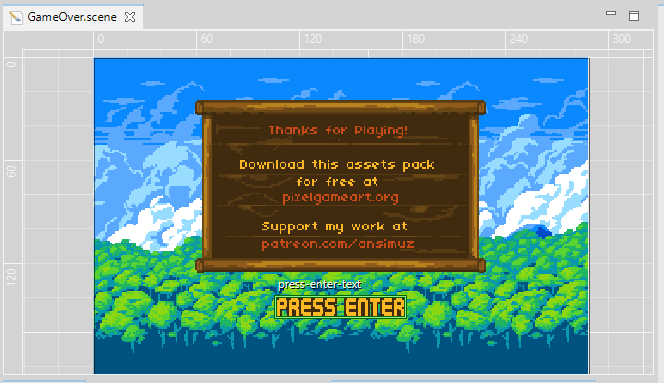
The GameOverScreen scene {#the-gameoverscreen-scene}
The GameOverScreen scene is pretty similar to the TitleScreen scene. It is shown when you lose in the Level scene and redirects you to the TittleScreen.
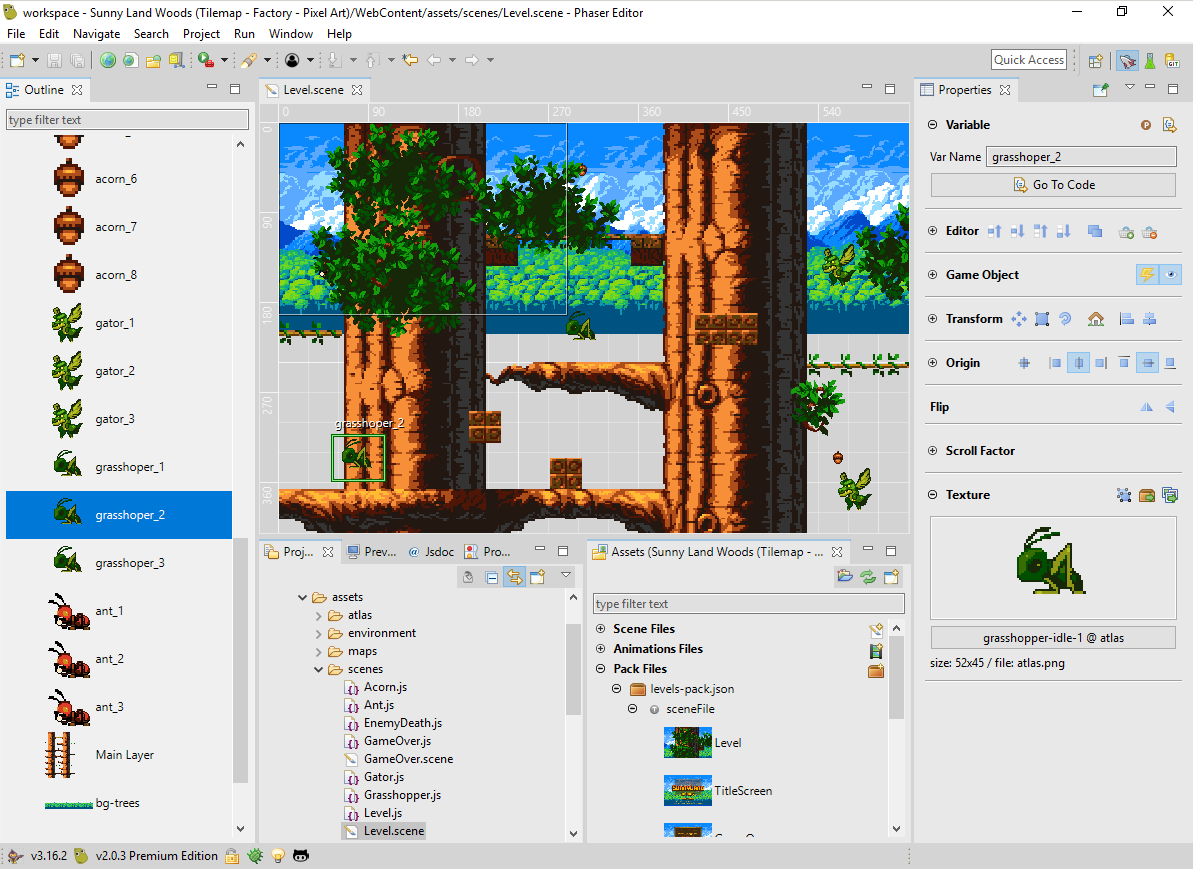
The Level scene {#the-level-scene}
The Level scene is where everything happens. It was created with the Scene Editor, so you have two files, the assets/Level.scene and assets/Level.js. However, there are other files involved in this scene, those are the custom Game Object types of some of the level objects: items (Acorn.js), enemies (Gator.js, Ant.js, Grasshopper.js) and the player (Player.js). All these files are packed in the levels-pack.json file and loaded in the Preload scene as script keys.
We can group the Level scene objects in this way:
- The background images.
- The tree where the player walks and jumps. It is a map created in Tiled and loaded in the game as a Tilemap object.
- It includes an invisible collision layer.
- The tree’s leaves and branches: static images that are not part of the map, but belongs to the tree.
- The pickable items: animated sprites that the player should take.
- The enemies: animated sprites that should be avoided and can be destroyed by the player. There are some different type of enemies: gators, ants and grasshoppers.
- The player.
Let’s see all of them in more details.
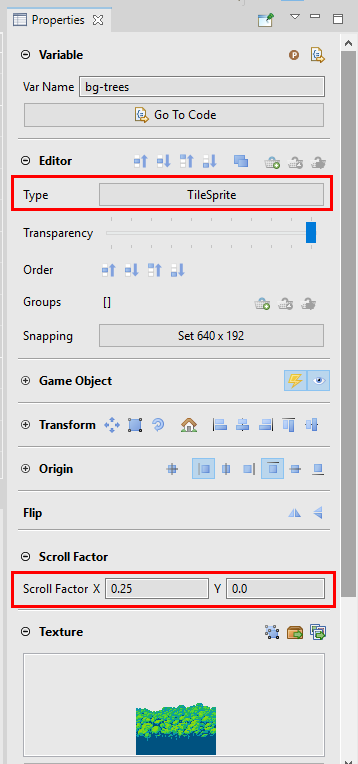
Background {#the-background}
The background of the level is formed by three images: bg-clouds, bg-montains and bg-trees. The images are scrolled when the camera moves around, simulating a parallax effect. In the original version, it creates tile sprite objects, fixed them to the camera, and changes the tilePosition.x property in the update method. In Phaser 3, there is a scrollFactor property that can be used to get the same effect. So, what we do in the editor is:
- The bg_montains and bg_trees objects are created as tile sprites.
- The tile sprites are resized to fill the whole map width.
- We change the Scroll Factor X of the objects.
The map {#the-map}
To migrate the map created in the original game is the most interesting part of the demo. The original game uses a tilemap (made in the Tiled editor) to create the world, that, in this case, is a huge tree. It is interesting because the Scene Editor is very basic and yet does not support tilemap objects, but it supports Phaser Factories.
This is what we did:
- We opened the map in the Tiled editor and exported the Main Layer layer as a PNG image (
Main Layer.png).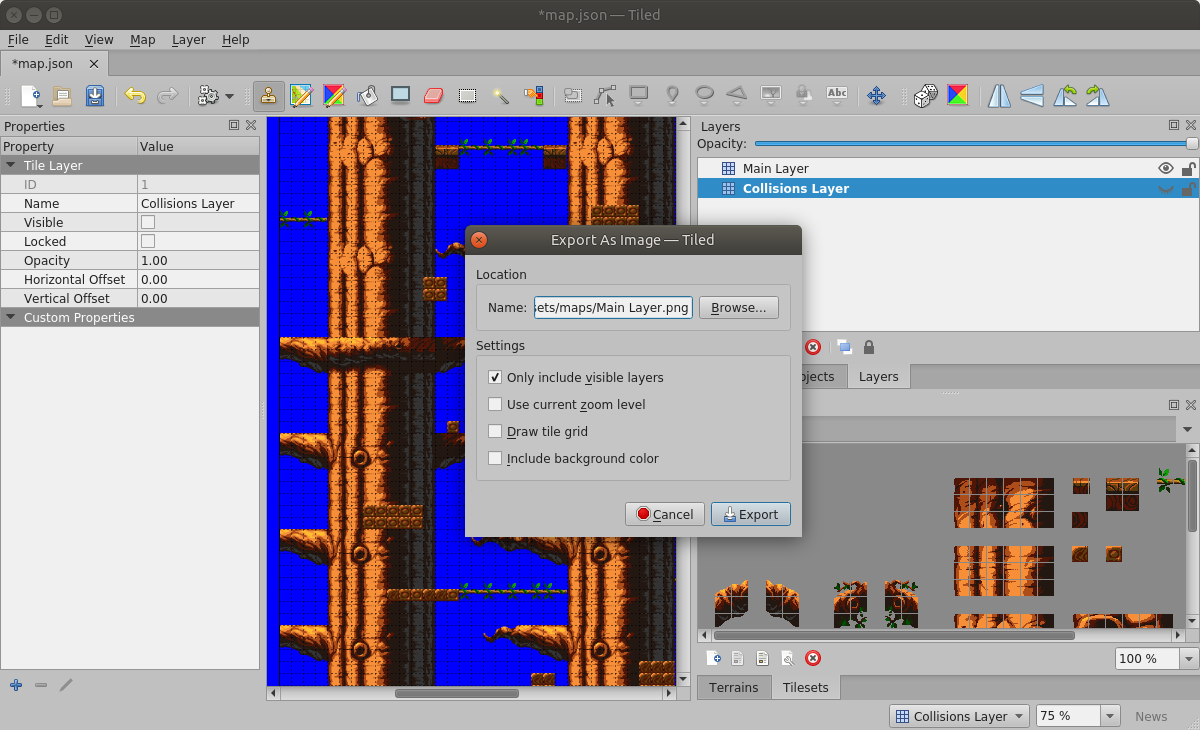
- We added the image (
fake-assets/Main Layer.png) to thefake-assets/fake-pack.jsonfile. That is a Pack file that we use only with the purpose of simulating a tilemap in the Scene Editor, but it is never loaded in the game. The wholefake-assets/folder could be excluded in the production build of the game.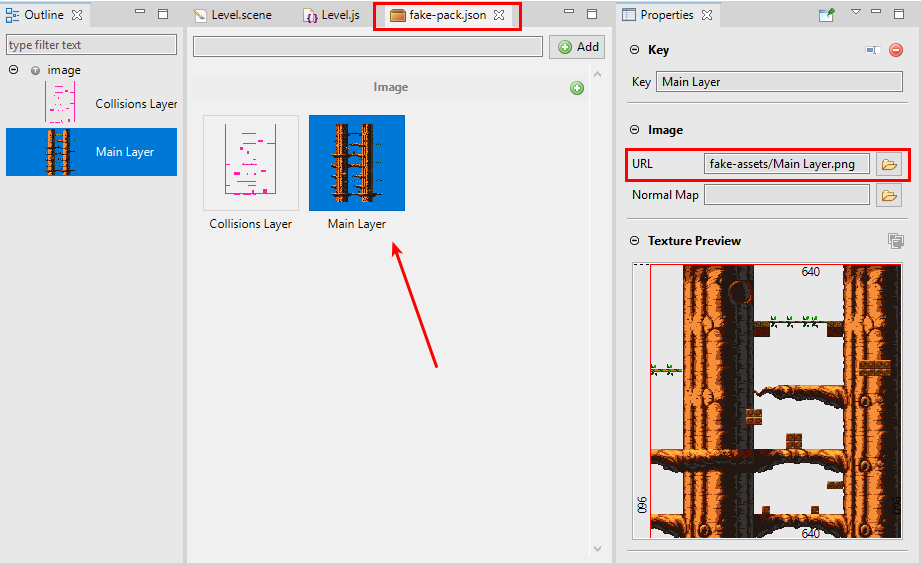
- We added the
Main Layer.pngimage to the scene, in the same place of the original map, so, it gives us a perfect reference to place the other objects of the level. - We assigned the factory myTilemap to the Main Layer image object.
- We registered a custom myTilemap factory to the Phaser GameObjectFacotry, and in this factory, we create the tilemap and layers.
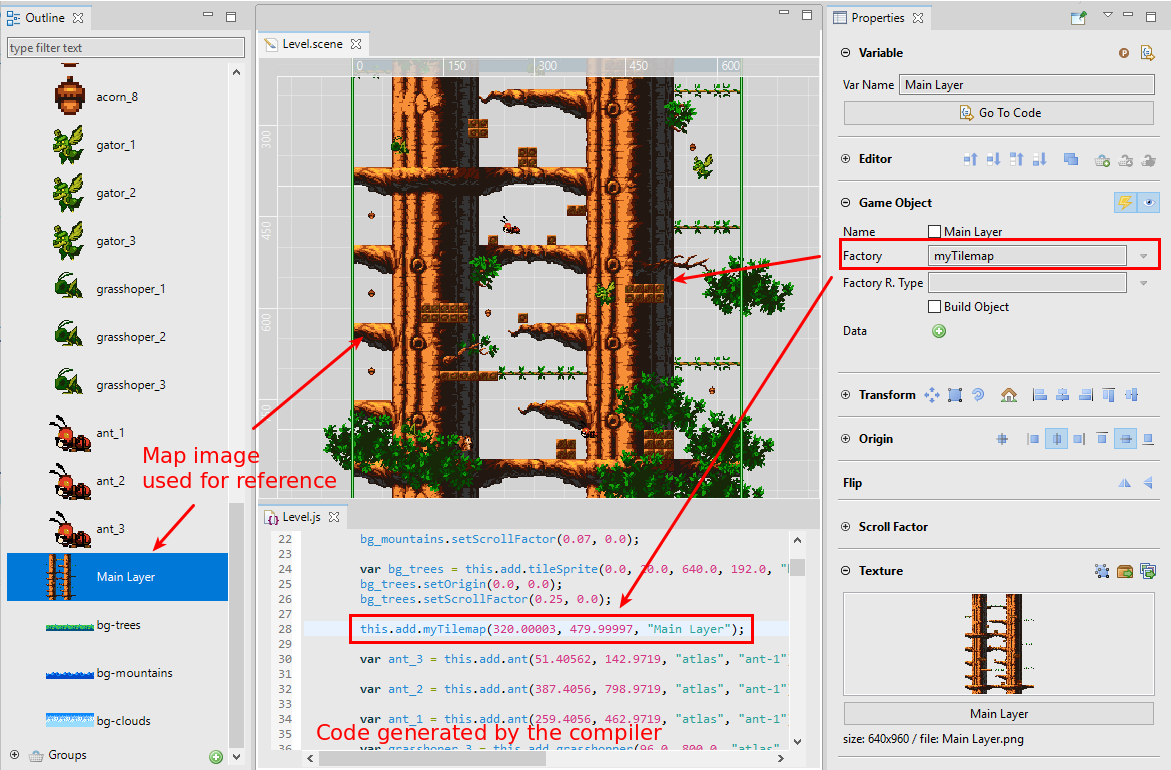
the myTilemap factory is registered at the end of the Level.js file:
Phaser.GameObjects.GameObjectFactory.register("myTilemap", function() {
    this.scene.createTilemap();
});
Look it calls the createTilemap() of the scene. In that method, we create the tilemap manually, very similar to how it is written in the original demo. It is the interesting part, the Scene Editor does not support tilemap objects (yet), but we added an image as a reference and create the tilemap manually, via custom Phaser factory. The simulated tilemap in the scene allows us to add the other objects in the right position. You can use this technique to create any other type of game object that is not supported by the Scene Editor, like particles, spine animations, etc…
In the next sections, we are going to see more about factories. By the way, the IDE provides a wizard to creates factories very quickly: File → New → Factory Code File.
You can learn more about Phaser factories here: Industrial Revolution - Phaser Factories Guide
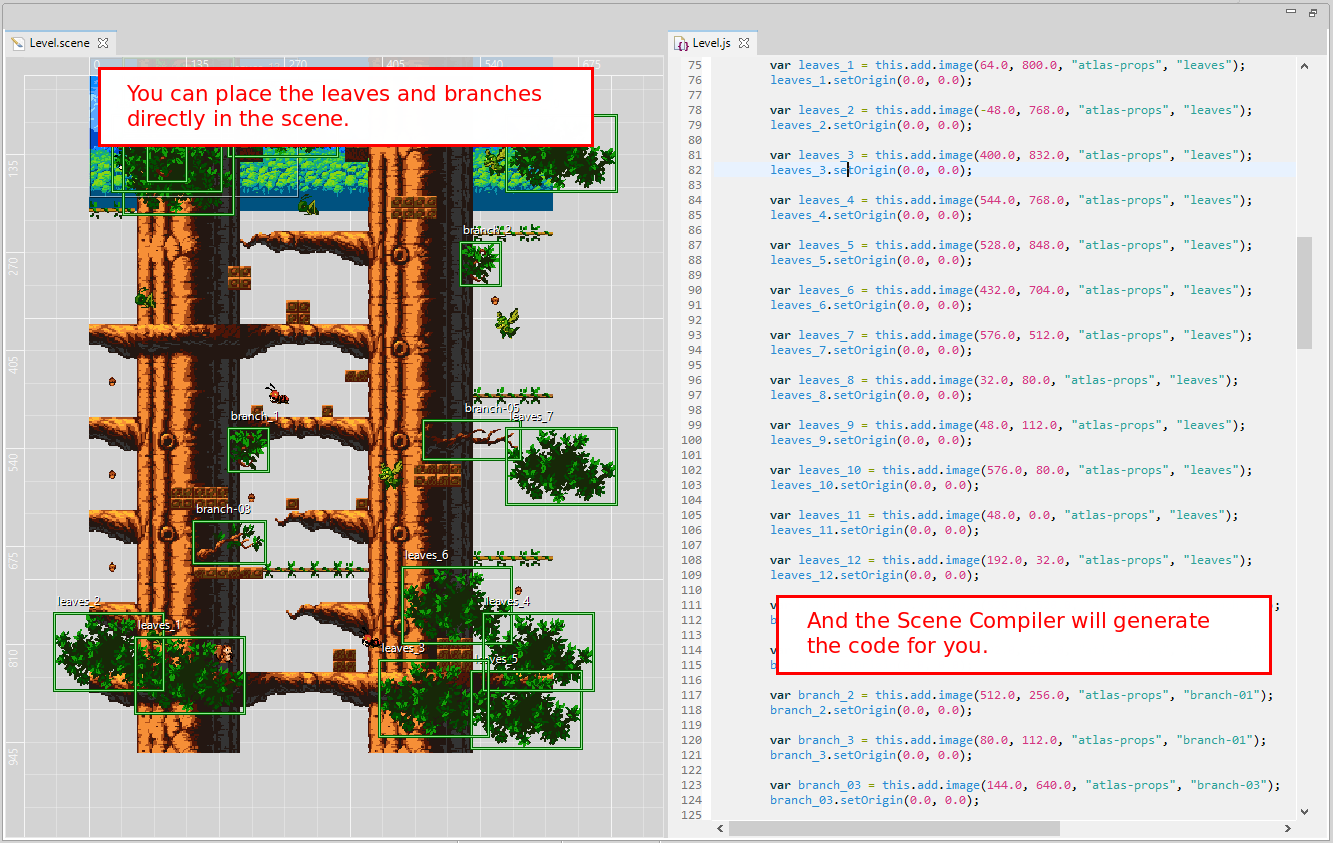
The tree elements (leaves and branches) {#the-tree-elements}
In the original demo, the tree is created using a tilemap, but there are other parts of the tree that do not fit in a tilemap. A tilemap is a 2D array of tiles with a fixed size, but often you need to add other elements to the map with a different size. In the original Sunny Land Woods demo, the leaves and branches of the tree have different sizes and are added manually to the world:
decorWorld: function () {
    this.addProp(4 * 16, 50 * 16, 'leaves');
    this.addProp(-3 * 16, 48 * 16, 'leaves');
    //
    this.addProp(25 * 16, 52 * 16, 'leaves');
    //
    this.addProp(34 * 16, 48 * 16, 'leaves');
    this.addProp(33 * 16, 53 * 16, 'leaves');
    //
    this.addProp(27 * 16, 44 * 16, 'leaves');
    this.addProp(36 * 16, 32 * 16, 'leaves');
    // this.addProp(2 * 16, 16 * 16, 'leaves');
    this.addProp(2 * 16, 5 * 16, 'leaves');
    this.addProp(3 * 16, 7 * 16, 'leaves');
    this.addProp(36 * 16, 5 * 16, 'leaves');
    this.addProp(3 * 16, 0 * 16, 'leaves');
    this.addProp(12 * 16, 2 * 16, 'leaves');
    //
    this.addProp(33 * 16, 33 * 16, 'branch-05', true);
    //
    this.addProp(12 * 16, 32 * 16, 'branch-01');
    this.addProp(31 * 16, 21 * 16, 'branch-01');
    this.addProp(5 * 16, 7 * 16, 'branch-01');
    //
    this.addProp(9 * 16, 40 * 16, 'branch-03');
}

addProp: function (x, y, item, flip) {
    var temp = game.add.image(x, y, 'atlas-props', item);
    if (flip) {
        temp.anchor.set(0.5);
        temp.scale.x = -1;
    }
}
You have to write a lot of code and have to figure out the exact position of the objects. A tool like Tiled helps a lot, to create maps, but it is just a part of the world. With the Scene Editor, you can place the leaves and branches by dropping the textures in the scene. It is an important productivity boost, especially on large levels.
The pickable items {#the-pickable-items}
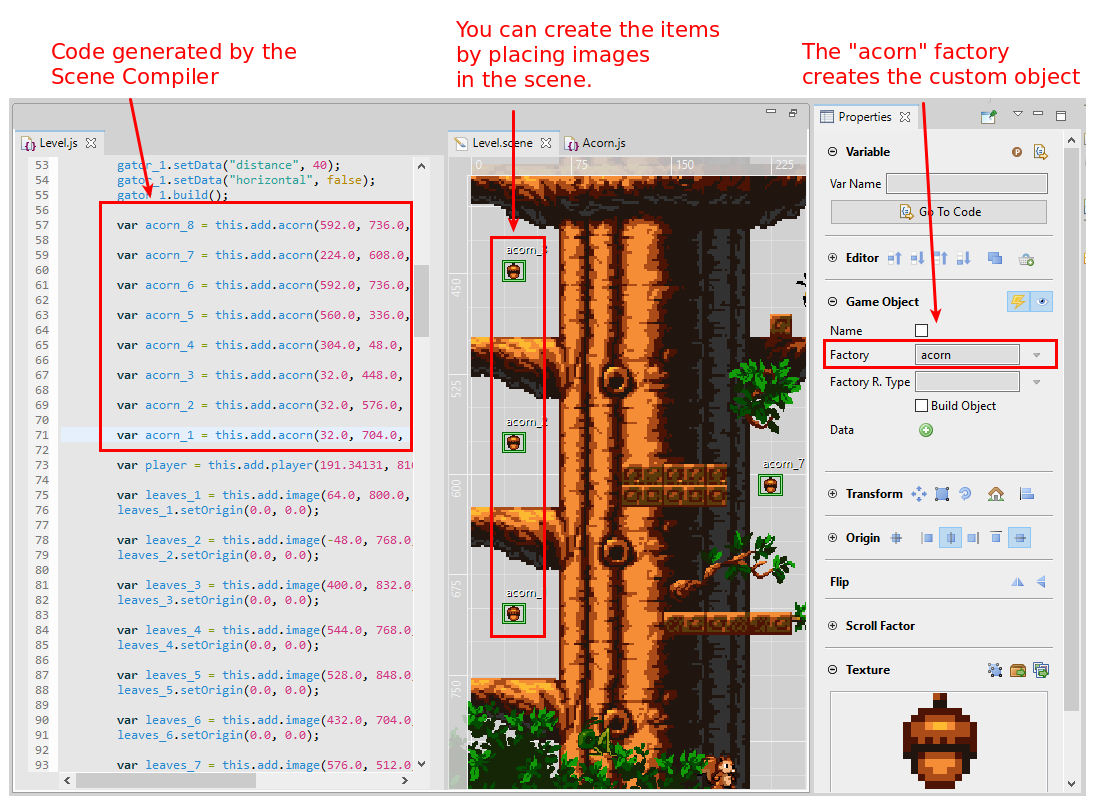
In many games based on tilemap worlds, the pickable items have a fixed size and are part of the tilemap, but in this demo, like the enemies and the player, they have a different size. For that reason, in the original demo, the pickable objects are added manually, written directly on the game code:
populate: function () {
    ...
    this.createAcorn(37, 46);
    this.createAcorn(14, 38);
    this.createAcorn(37, 46);
    this.createAcorn(35, 21);
    this.createAcorn(19, 3);
    this.createAcorn(2, 28);
    this.createAcorn(2, 36);
    this.createAcorn(2, 44);
}

createAcorn: function (x, y) {
    x *= 16;
    y *= 16;
    var temp = game.add.sprite(x, y, 'atlas', 'acorn-1');
    temp.anchor.setTo(0.5);
    game.physics.arcade.enable(temp);
    //add animations
    temp.animations.add('acorn', Phaser.Animation.generateFrameNames('acorn-', 1, 3, '', 0), 12, true);
    temp.animations.play('acorn');
    items_group.add(temp);
}
Each item is added using a createAcorn() helper method. This method creates a sprite, enables it for physics and creates/play the sprite animation.
In Phaser Editor we did something similar, we registered an acorn factory to create the sprite, add it to the physics system and play the animation (you don’t need to create the animations, Phaser creates them automatically when the animations.json file is loaded):
Phaser.GameObjects.GameObjectFactory.register("acorn", function (x, y, texture, frame) {

    /** @type {Phaser.Scene} */
    var scene = this.scene;

    var sprite = scene.add.sprite(x, y, texture, frame);
    scene.physics.add.existing(sprite);
    sprite.play("acorn");

    return sprite;
});
It is coded in the Acorn.js file, that is added as script to the levels-pack.json file.
The next step is to add the objects to the scene and set to them the factory acorn. In a huge level or in a game with a lot of levels this technique can help a lot.
Finally, we created a Phaser group named itemsGroup to include all the pickable objects. This group is used later to create a physics overlap test between the pickable items and the player:
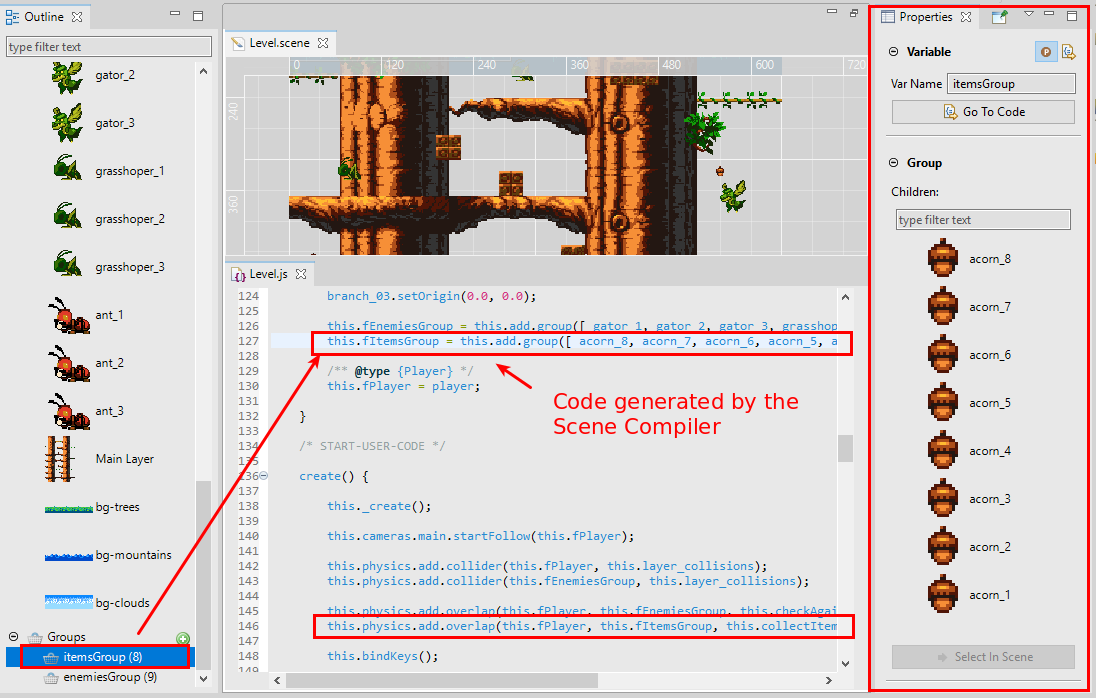
The enemies {#the-enemies}
The enemies objects are similar to the pickable items. In the original demo, they are created manually in the code, without a visual tool to help to position them. In Phaser Editor, we create the objects in the Scene Editor and place them in the right places.
Each enemy has its own factory, gator, ant and grasshoper. For each factory we create a new JavaScript file and add them to the levels-pack.js, to be loaded automatically. Let’s focus on the gator factory.
The gator factory is registered at the end of the file assets/Gator.js:
Phaser.GameObjects.GameObjectFactory.register("gator", function(x, y, texture, frame) {

    var sprite = new Gator(this.scene, x, y, texture, frame);

    this.scene.sys.updateList.add(sprite);
    this.scene.sys.displayList.add(sprite);

    return sprite;
});
Note it creates a custom sprite named Gator. It is a class that extends Phaser.GameObjects.Sprite. It is a common practice in Phaser games to extends a game object type, to add a custom behavior and initialize custom properties. The Gator objects are animated sprites that can fly a certain distance in a horizontal or vertical direction. If you look into the Gator code, there are two custom properties: distance and horizontal. Those properties are used to assign a specific behavior to different instances of Gator. As you can see in the game, the gators are moving in different directions.
In the Scene Editor, there is a way to set custom properties to the objects, using the Data Manager API of Phaser (Phaser.Data.DataManager). Each object has a DataManager instance that, if you enable it, allows to set custom data to the object. The Scene Editor, in the Game Object section, has a Data property where you can add custom data:
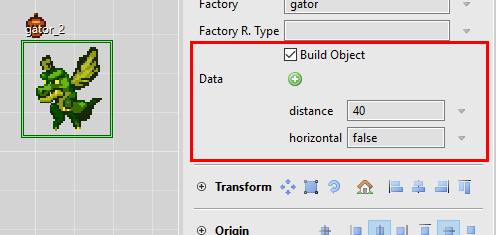
And there is another interesting parameter, the Build Object. If the Build Object button is checked, then a build() method will be applied to the object. This build() method, if used, should be implemented in the class of the object, in this case, in the Gator class. If you look in the Gator code, in the build() method we get the data from the Data Manager and initialize the velocity of the object.

As you can see, the Scene Compiler generated the code to set the custom data and call the build() method. The Gator class access to the custom data using the this.data.values property and initialize its state:
class Gator extends Phaser.GameObjects.Sprite {

    ...

    build() {
        // the Data Manager is in the `data` property.
        this.horizontal = this.data.values.horizontal;
        this.distance = this.data.values.distance;


        // set the velocity in relation to the custom data
        if (this.horizontal) {
            this.body.velocity.x = this.speed;
            this.body.velocity.y = 0;
        } else {
            this.body.velocity.x = 0;
            this.body.velocity.y = this.speed;
        }
    }
}
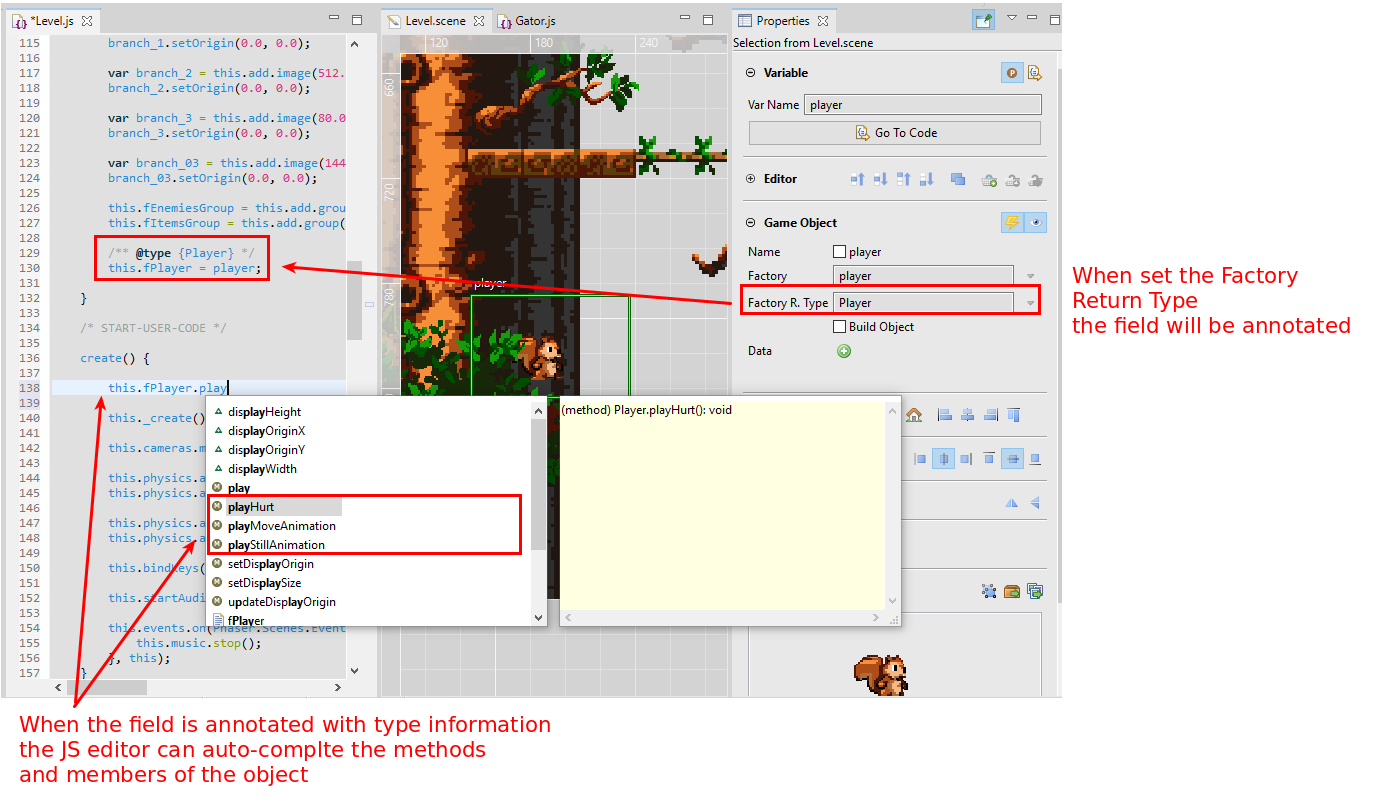
The player {#the-player}
The player is a single object in the scene. To have it as a scene reusable object gives you the advantage to place it in the right place, especially when you have multiple scenes. It is not different from the other objects, it is created using a factory, but there is something new, we set the Factory Return Type to Player.
Player is a custom class that extends Phaser.GameObjects.Sprite, it is together with the factory implementation, in the Player.js file. It is similar to the Gator class we commented in the previous section.
When you set the Factory Return Type of an object, the Scene Compiler will annotate with a JSDoc comment the field generated to reference the object, so it helps the JavaScript editor to computes the type of the variables and provides an accurate auto-completion.
Conclusion {#conclusion}
That’s all. We encourage you to play with the demo and look the code. All details are not covered in this article, we just wanted to show some key features in Phaser Editor that can help you to develop games with Phaser. There are many games similar to the Sunny Land Woods demo, with this article we tried to show the advantages of using a tool like Phaser Editor to target different issues of a game that are not fulfilled by a general purpose tile-map tool.
Phaser Editor v2 is in active development, there are a lot of missing features, especially the Prefab concept, that are present in v1, and really boost the development of games. However, the current factory is a very flexible and standard resource and you can do magic with it.
Keep in contact!
Arian
Tags: phaser-editor-v2, phaser-v3, tutorial, tilemap, scene-editor, Phaser Editor v2, Phaser v3, scene editor