Start with Phaser Editor v2 mini-tutorial
January 10, 2019 - Posted in tutorials
Hi,
This is a small guide you can follow to start a game with the just-released Phaser Editor v2 and Phaser v3.
Watch all the steps in this video
Download and run the editor
The binaries are available on the download page of the Phaser Editor website:
Be careful, because there are two versions there, v1.5.3 and v2.0.0. This tutorial is about v2.0.0. There are binaries for Windows, macOS, and Linux, pick the one of your platform.
Next to the binaries is an MD5 checksum file, that you can use to validate the integrity of the ZIP file.
What you download is a ZIP file with the binaries of the editor. It does not require any installation, just unzip it in a folder where you have to write permissions.
Windows considerations
Phaser Editor v2 uses the Language Server Protocol of VSCode for HTML related files editing. This server is implemented in nodejs, and contains a lot of JavaScript files and node modules that, when you uncompress the ZIP, may create errors of the type “the file name is too long”. For that reason, we strongly recommend extracting the zip file to a folder with a short path, something like D:\TestPhaserEditor.
To execute the editor, click the PhaserEditor2D.exe file.
macOS considerations
Phaser Editor is packed as a macOS app (a folder with the name PhaserEditor2D.app). It is displayed in Finder as an application and not a folder, with the name PhaserEditor2D. To run the editor, just double click on that application.
Maybe the system shows you a security warning because the application is not downloaded from the Apple Store. To force execute the editor, right click on the PhaserEditor2D application and select the option Open, the security warning will be shown again but with the option of continue with the execution.
The first window that shows Phaser Editor is the Workspace selector. By default, macOS shows a path inside the application folder (PhaserEditor2D.app/Contents/Eclipse/workspace), but you can change it to any other place outside the application.
When we build the binaries we set the execution permissions to the files, but if it fails, you can run the script SetExecPermissions.sh in a terminal.
Linux considerations
In Linux, just uncompress the ZIP and run the PhaserEditor2D file. If you have any problem with execution permissions, just run the script SetExecPermissions.sh in a terminal.
Debug
If you find glitches and want to give us a better report, you can execute the editor in debug mode. In Windows, double click on the Debug.bat file. In macOS and Linux open a terminal and run Debug.sh.
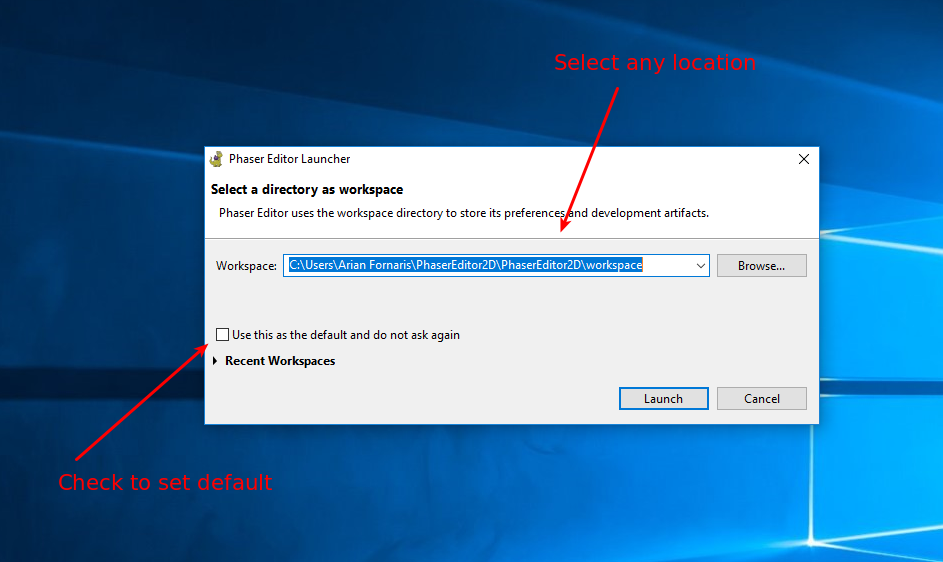
Select the workspace
When you run the editor it shows the launcher window. In the launcher, you must select the path of the workspace. A workspace is a folder where you are going to store the projects and metadata like preferences. You can have as many workspaces as you like, and as many projects into a workspace as you like too. If the workspace folder does not exist it is created.
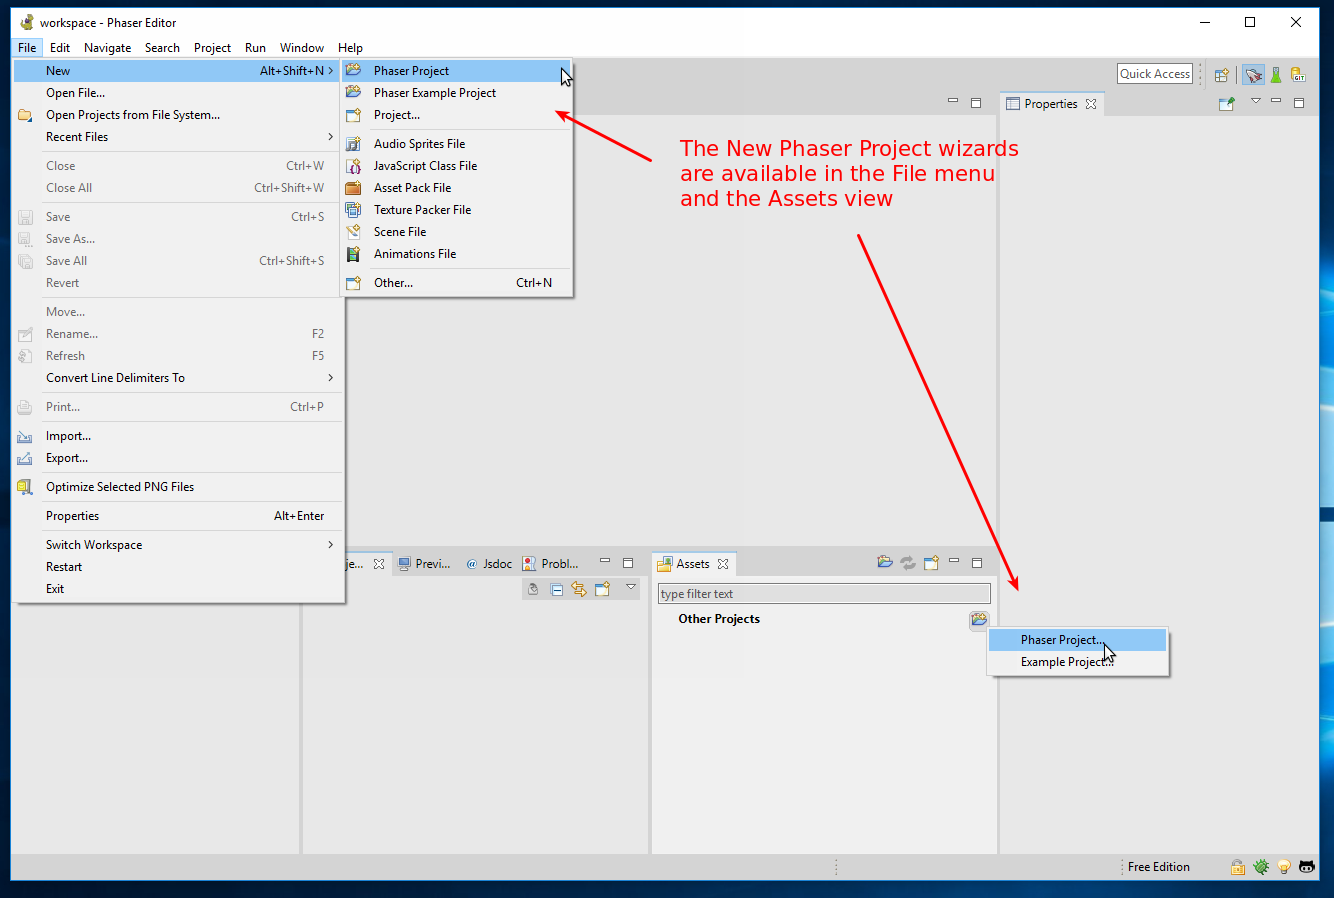
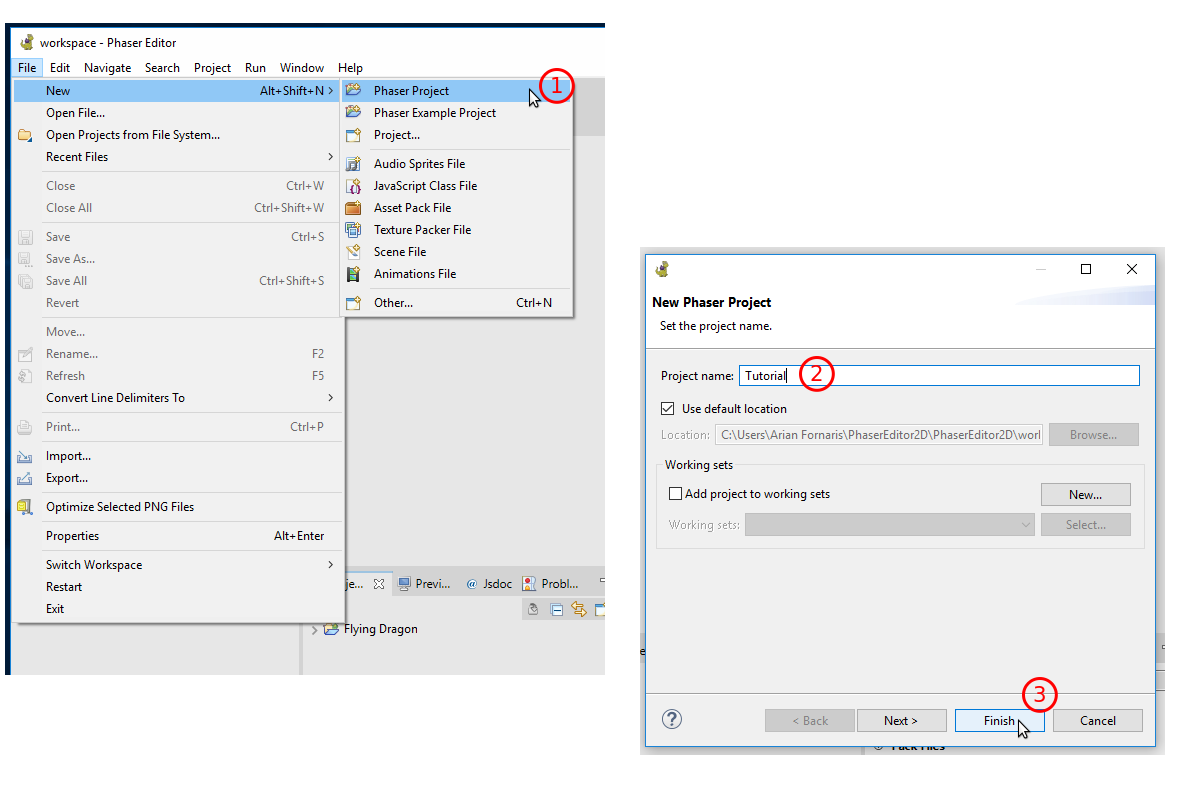
Create a project
When the editor opens a new workspace it shows no project. To start a game you have to create a project. There are two different wizards to create a project: the Phaser Project and the Phaser Example Project.
The Phaser Example Project
If you like to see what the editor can do, you can start by creating a project with the content of an example. There are two types of examples, Phaser Editor Examples, and Official Phaser Examples.
The Phaser Editor Examples are project templates that contain an example made (or adapted) by the Phaser Editor team. It is a quick way to go into the editor features since those examples are created with the different editors of the IDE.
The Official Phaser Examples, as the name says, are the Phaser examples developed by the Phaser team (and community), but wrapped in a Phaser Editor project. These templates are great to learn Phaser, to try the different Phaser features. You can start with any of that templates and then create new Phaser Editor files, like scenes, animations, atlas, etc…
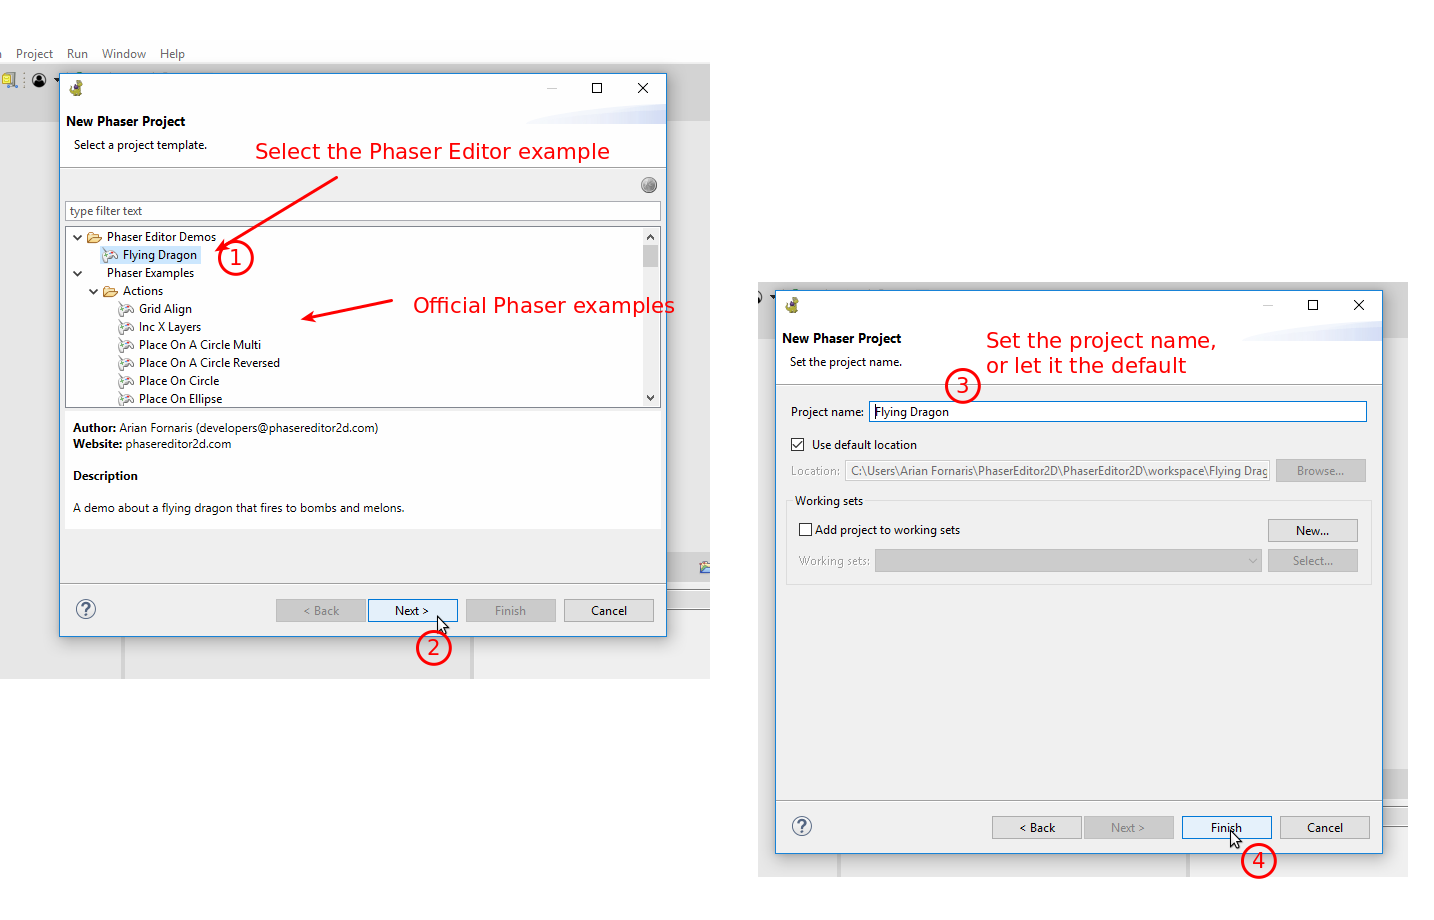
The Phaser Project
Example projects are fine to learn and see what’s inside the IDE, but to create your games probably the best is to create an “empty” project. In this tutorial, we are going to use this wizard, that you can launch, as we said, from the File menu or the Assets window.
Each project template has a main file that is opened when you create the project. Usually, that main file is a scene file. If this case, it opens the Level.scene file.
This is the initial layout:
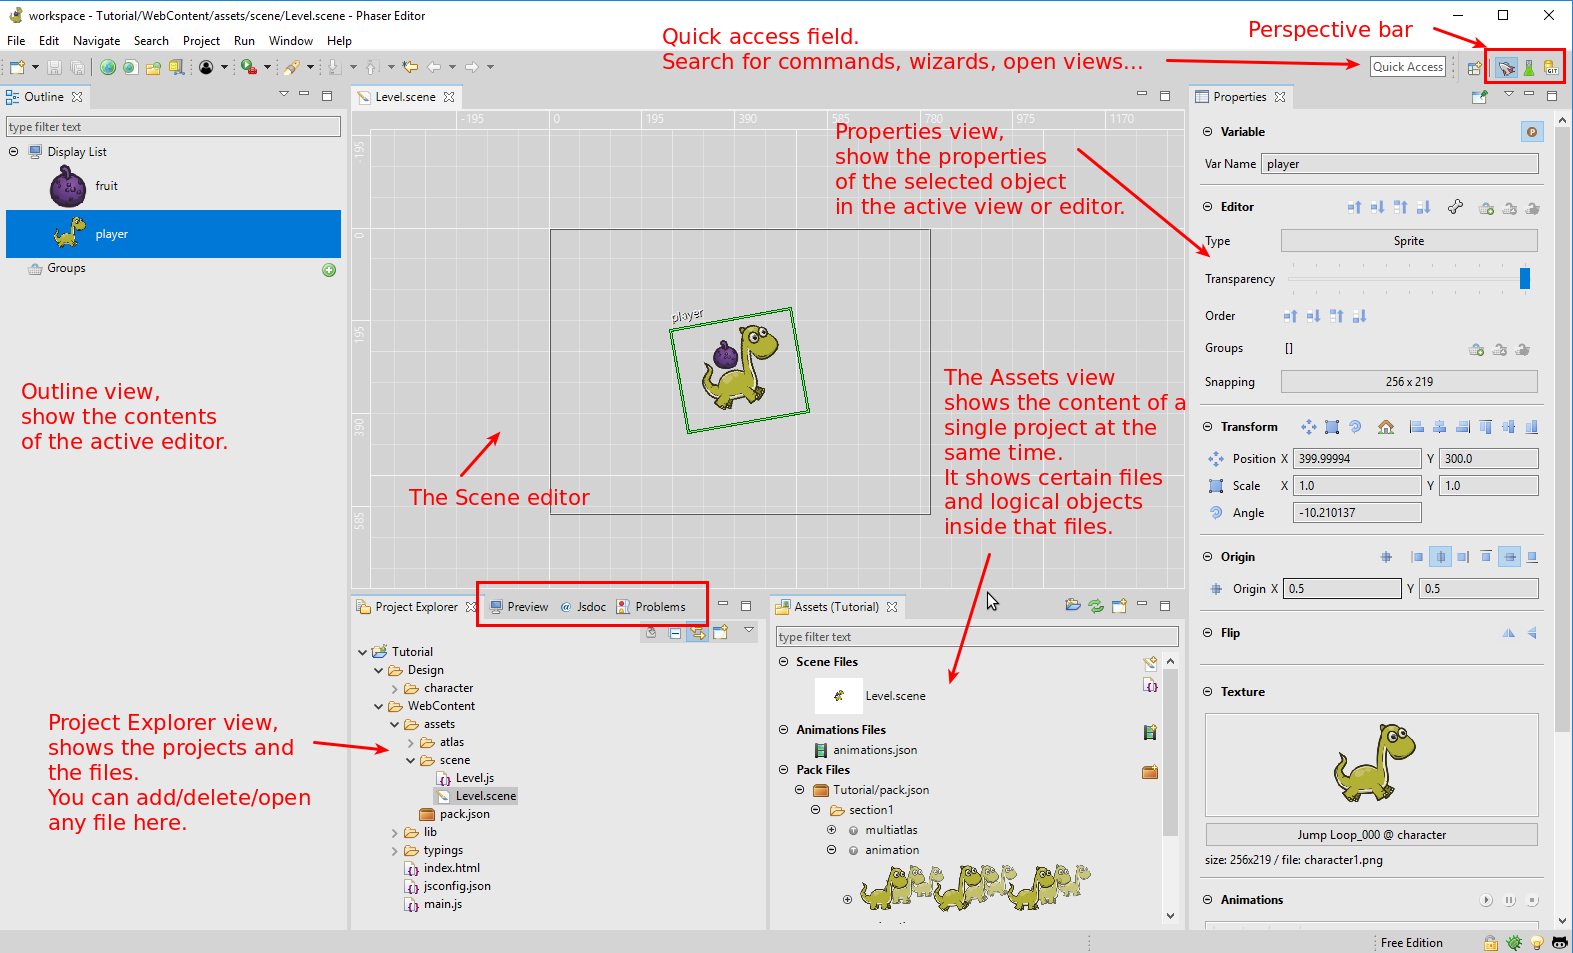
That layout corresponds to the Phaser perspective. A perspective contains a set of views with a certain layout. You can switch to a different perspective, like Phaser Labs and Git, listed in the Perspective bar.
You can drag the views and editors to different places, to change the default layout, and save it to a new perspective. You can reset a perspective too, to the initial layout.
Add an image to the scene
In Phaser Editor, the workflow to add an image to a scene is pretty similar to the workflow you follow when you code the scene manually. The images should be imported into the project. You have to write in the preload method an instruction to load the image file and assign a key. Then, in the create method you write the code to create the image object, using the same key of the preload method.
In Phaser Editor you import the image file in the project, add it to the asset pack, and add the image key to the scene. In future versions, we should provide alternative paths to simplify or automate this workflow.
Let’s see step by step how we recommend to do it in Phaser Editor.
Step 1: Import the image into the project
To import an image into the project, just copy it in your OS and paste it inside any sub-folder inside the WebContent/assets folder of your project. The Project Explorer view shows all the folders and files of your project, it is like the Windows Explorer of the editor, use it to paste or drop the external images (or any other file).
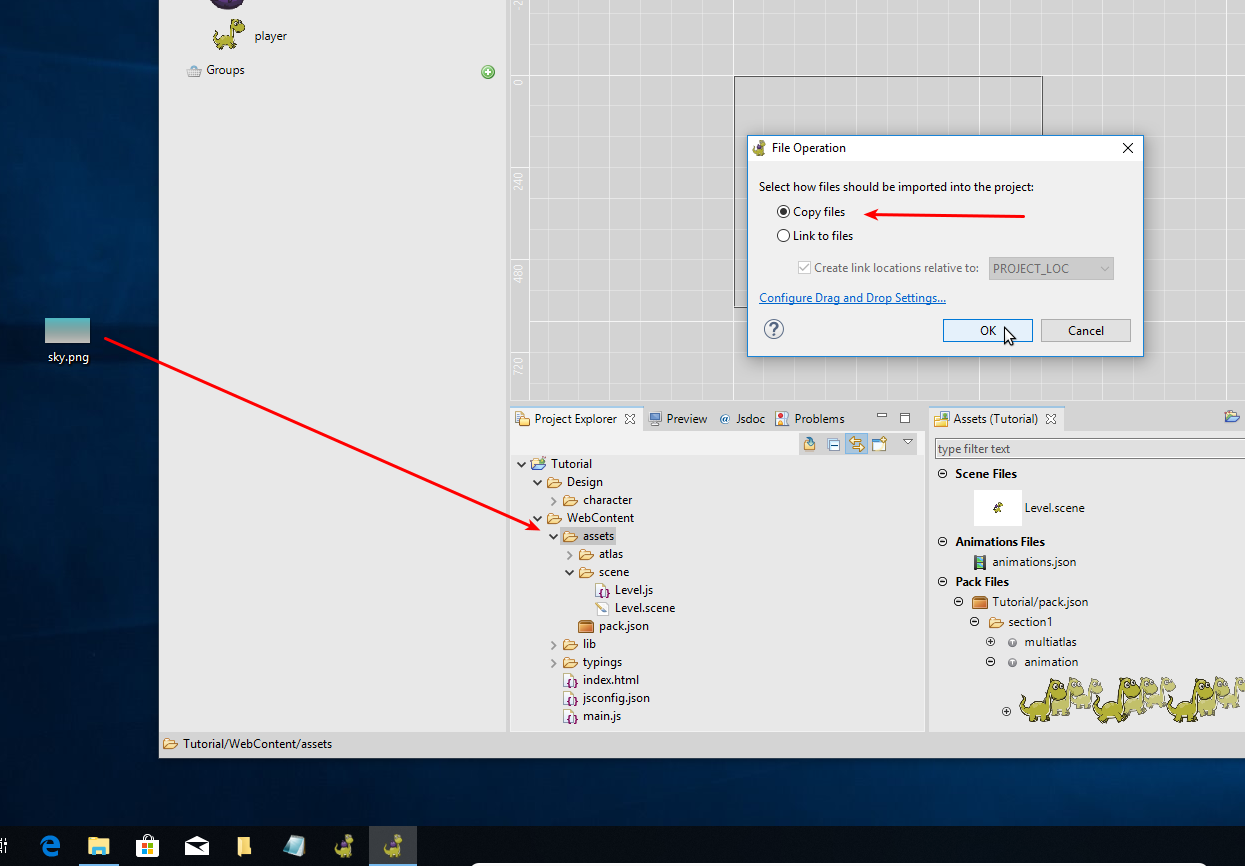
In case you drop a file, the editor asks for the way you want to import the files, by creating a new copy or just create a link. For now, just keep the default option.
Step 2: Add the image to the Asset Pack
Phaser Editor uses the standard Phaser Asset Pack format to pack the assets. This Asset Pack is just a JSON file that contains the properties of the assets, like type (image, atlas, animations), frame size, normal map texture, etc… The objects you can create in the scene editor (Image, Sprite, TileSprite) uses the keys defined in an Asset Pack, it does not link to files, else to Asset Pack keys, just like you do when you code a scene manually.
To the image file to the pack, open the pack.json file. You can find that file in the Project Explorer view, in the WebContent/assets folder, or in the Assets view, the Pack Files section. Just double click the file to open it in the Asset Pack editor.
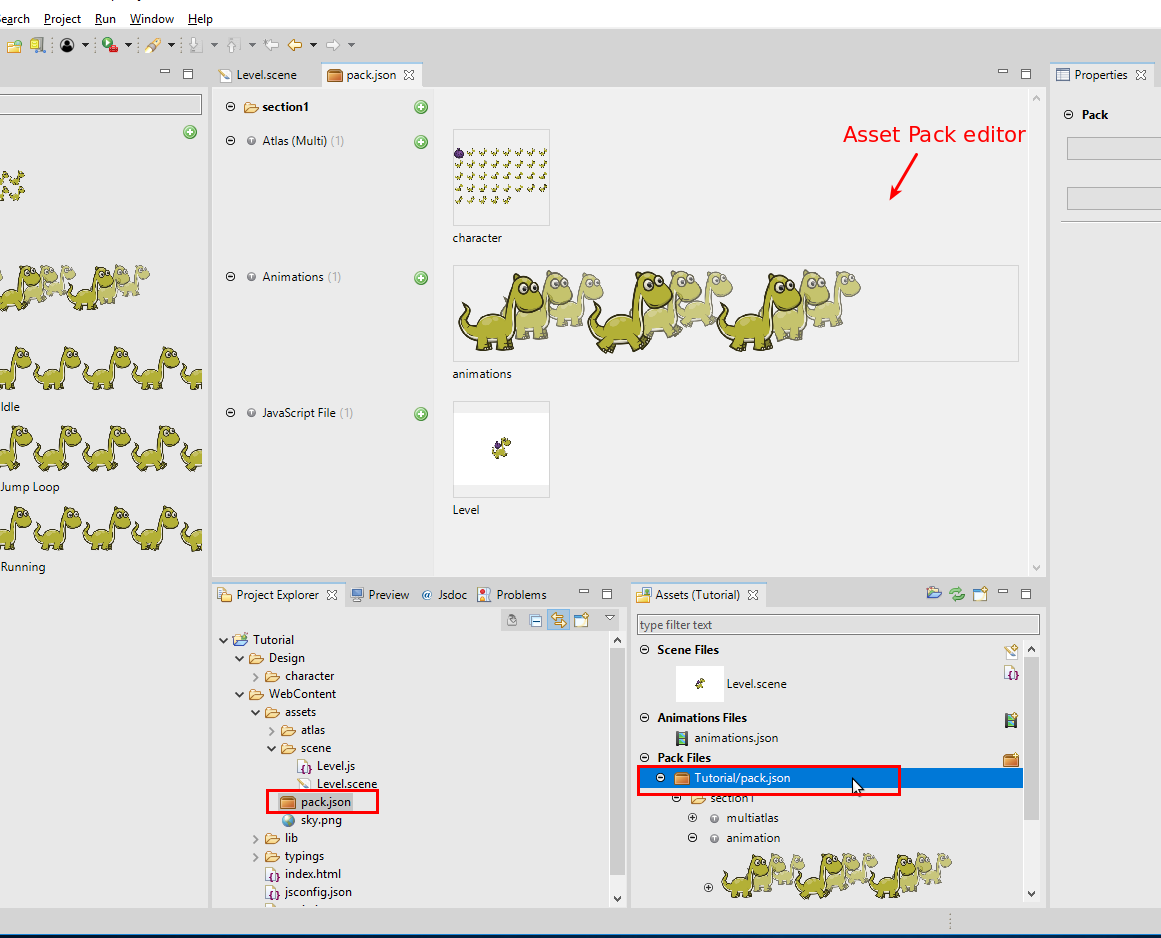
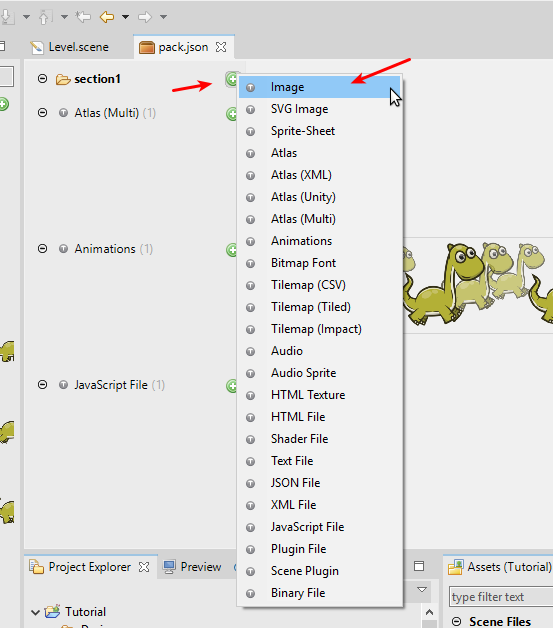
In the Pack, the assets are grouped in sections. To add a new asset, click on the “plus” icon of the section. Alternatively, you can click the “plus” icon of an asset type, to add more files of the same time, but in this example, there is not any previous image, so we should click on the icon of the section. When you click the section “plus”, it shows a menu with all the type of assets you can add: select the Image type.
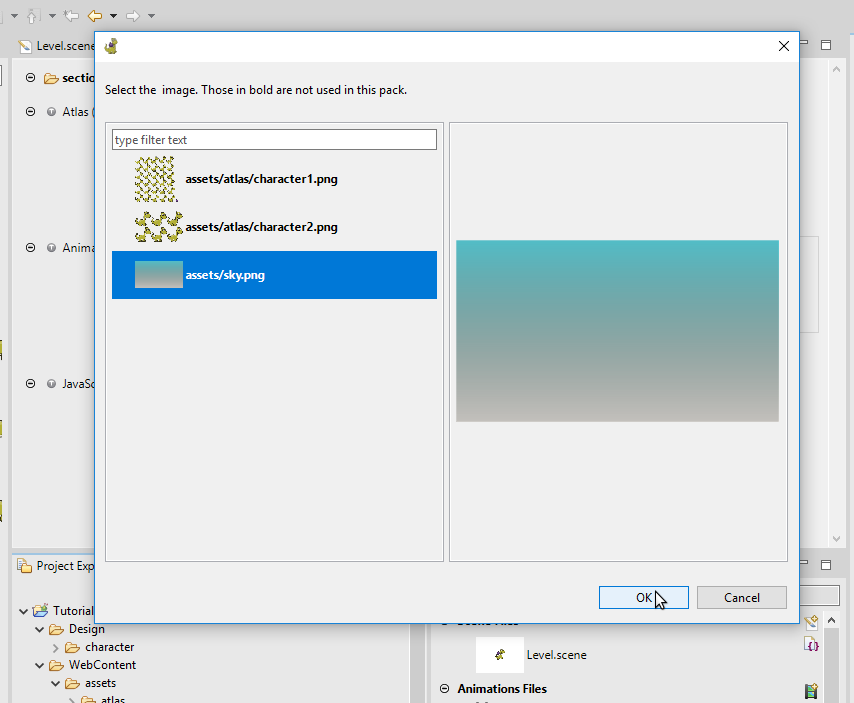
It opens the Image Dialog, where you can select the image file you can add. Select sky__20190110.png.
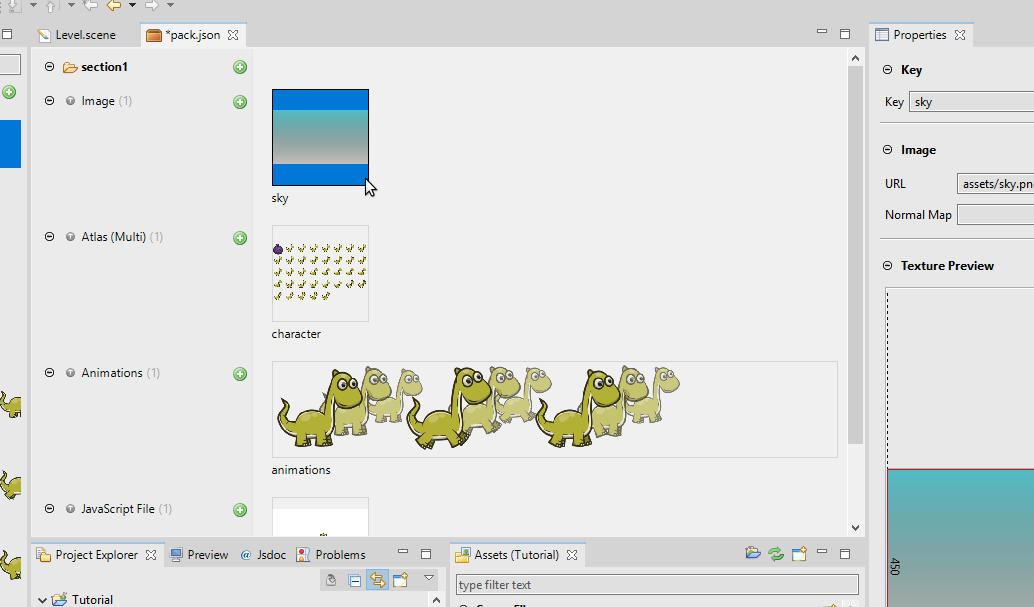
It adds the new sky key in the section1 section of the pack.json Asset Pack.
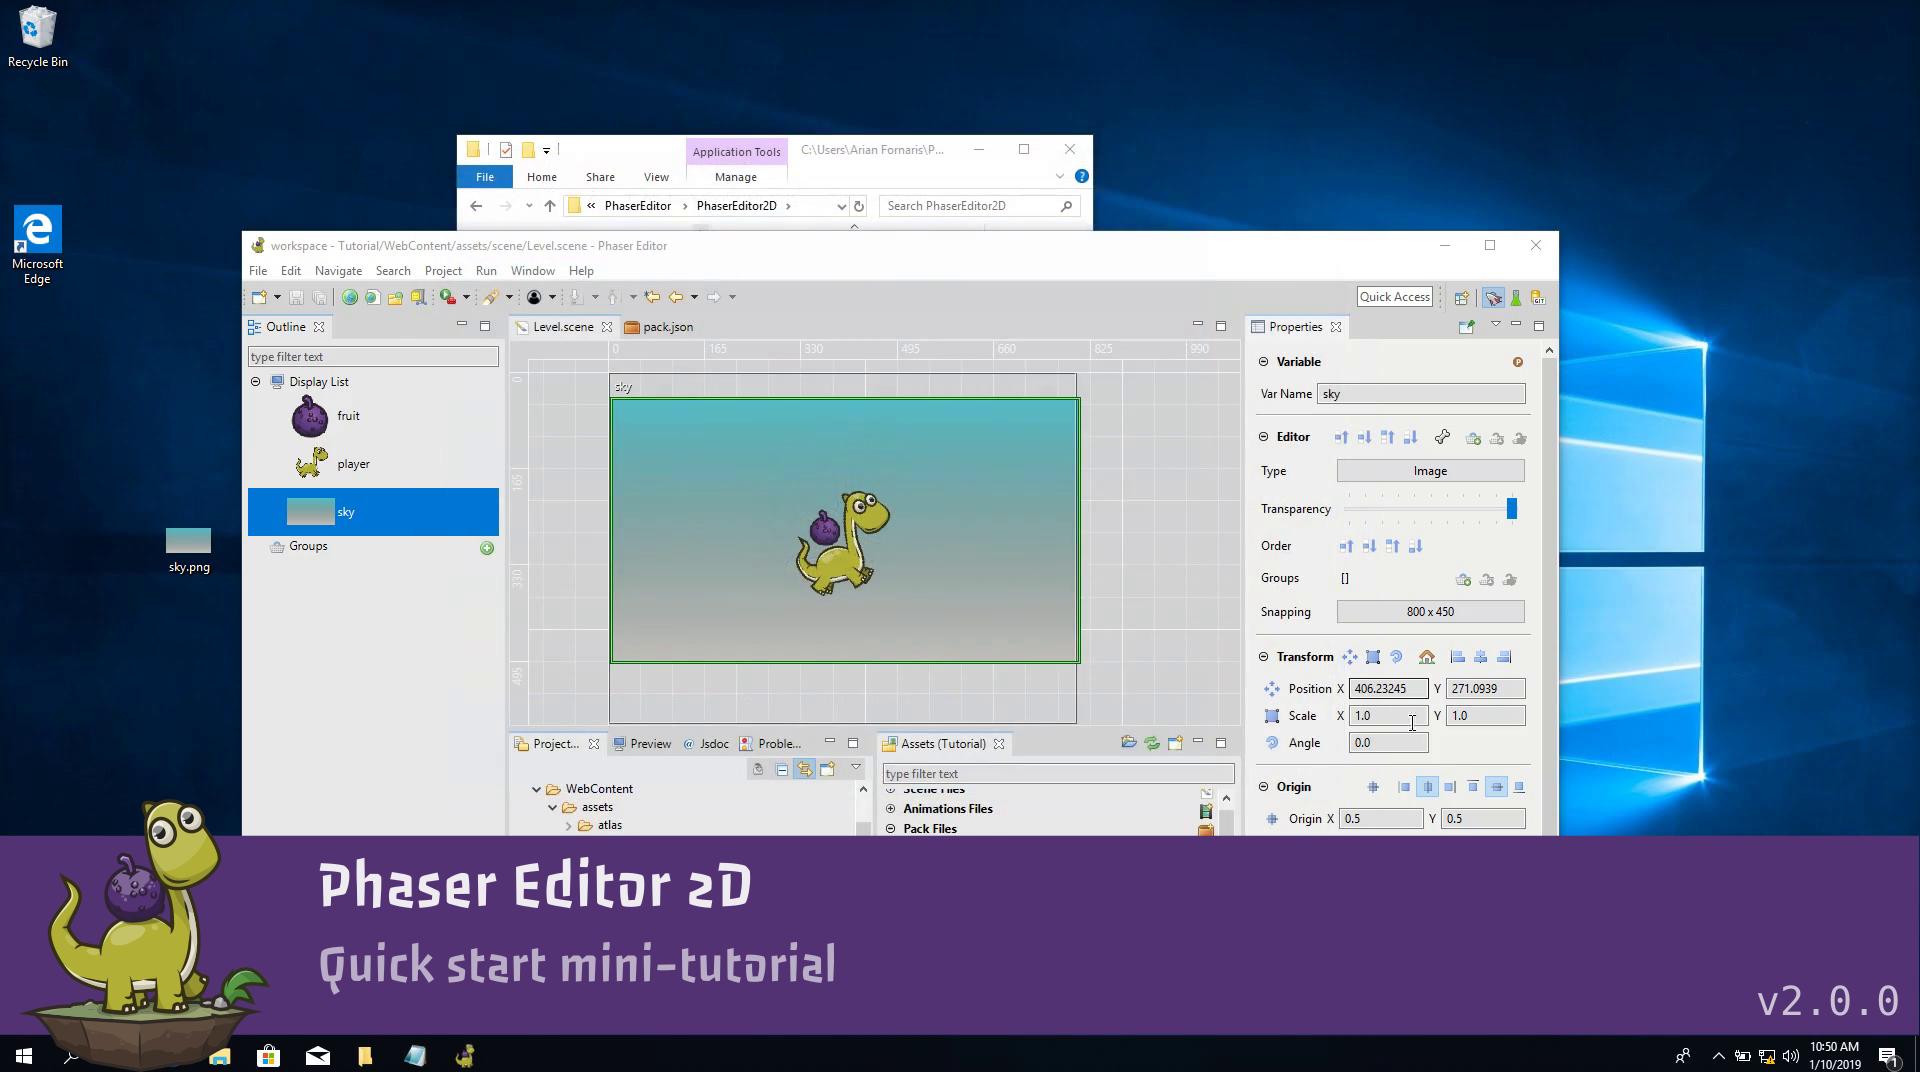
Step 3: Add the image key “sky” to the scene
The Assets view shows the keys of all the packs of the project. Open the Level.scene file, select the sky image in the Assets view and drop it into the scene.
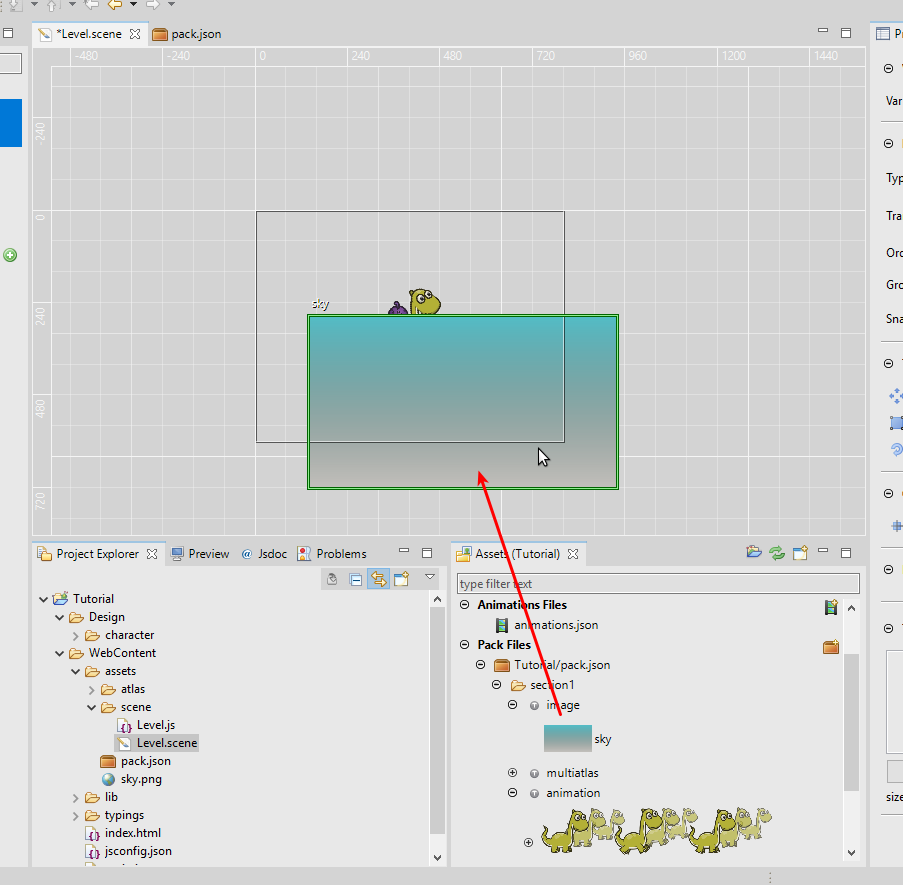
You can press the End key to send the image to the background, and place it in the center position.
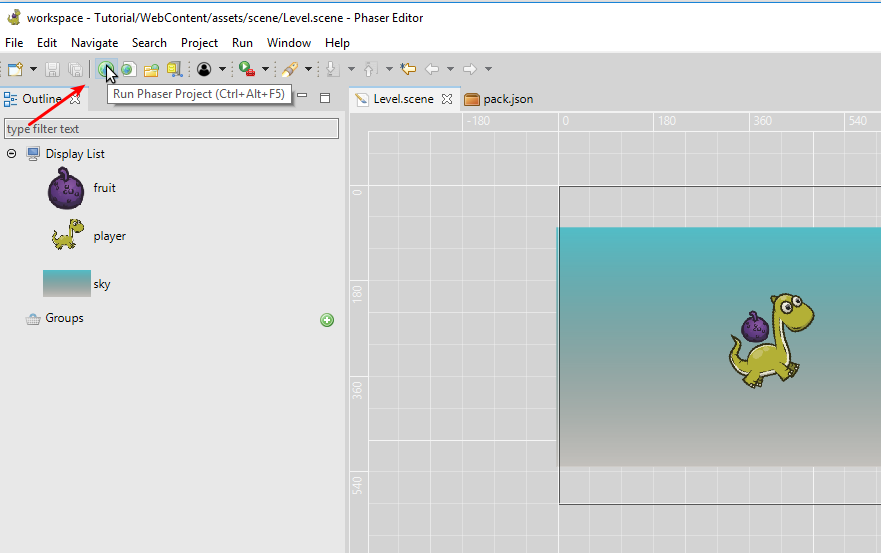
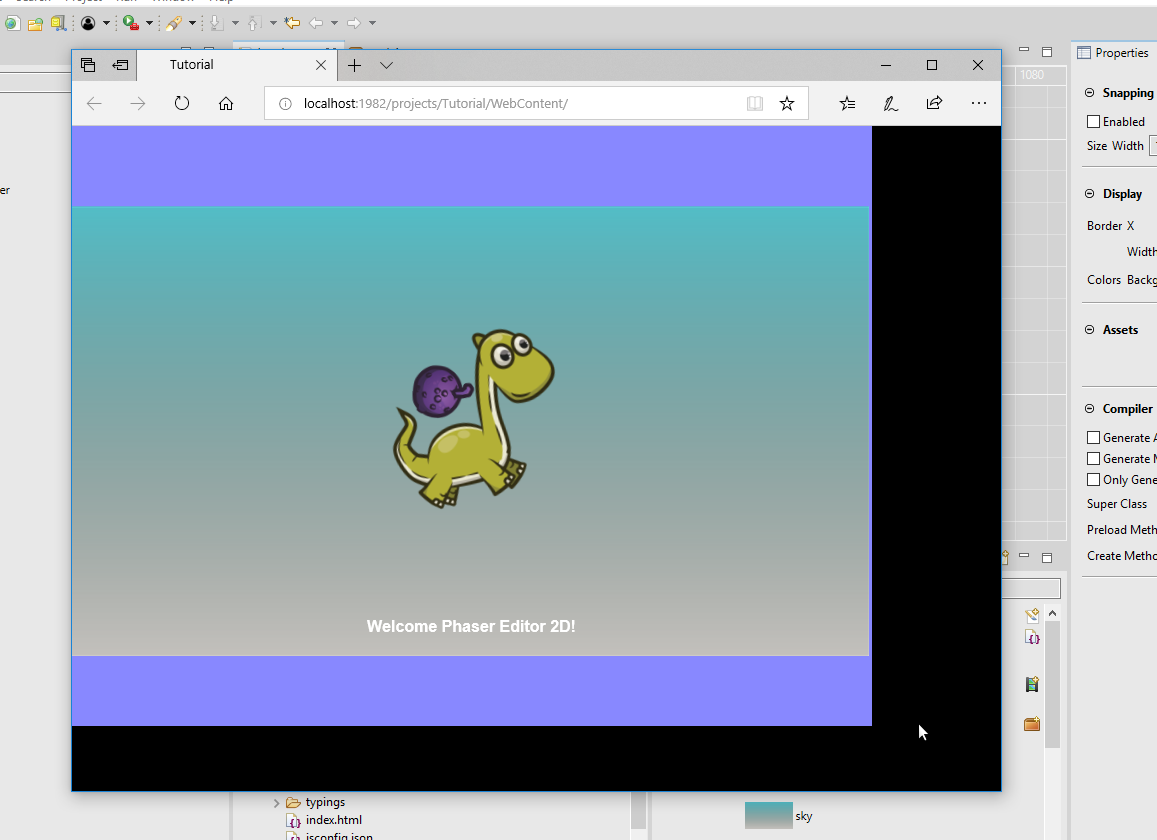
Step 4: Run the game
To run the game click on the “browser” button in the main toolbar, or press Ctrl+Alt+F5. It will open the project in the OS default browser. You can change the default browser in Preferences > Browser.
This was a very simple tutorial, to write the complete documentation is priority number one for us, it should be ready in a few weeks. In the meantime, we should create more mini tutorials and videos.
Keep in contact!
Arian