Phaser Editor v2 development progress (report 5)
January 07, 2019 - Posted in phaser-editor-v2
Hi,
First, Happy New Year!
This is the last Phaser Editor v2 development report because we are very close to publishing the first release. The binaries are ready, but we want to do more testing on all platforms and yet we have to prepare the release notes.
In this development iteration, we touched almost every part of the editor, just to mention: -All the editors migrated to the new Form-based properties editor. -We reimplemented the Pack editor to provide it a better visuallity. -The Texture Packer editor got new parameters. -The Scene editor got a lot of new features.-The Animations editor was updated too. Well, a lot of changes, but what is more important, we are ready to release the first version! It is going to happen very soon.
Image rendering
When we announced the Black Friday and CyberMonday discounts, we mentioned that we were working hard on release the editor in December, but it was not possible. The main reason: we detected a poor performance in rendering big images on Windows. In this new v2, the editor does a lot of image rendering (the whole image, not just the icon like in v1), in the Assets view, the Pack editor, the Animations editor, the Properties, Outline and Preview views, and the Scene editor.
That was very bad news, we had to focus on finding a solution. When we investigated a bit, we found that the Canvas of SWT (the UI toolkit used by Eclipse), is implemented on top of the Windows GDI+ API. GDI+ is an improvement of GDI, but yet it has serious performance issues in tasks like image clipping. In the other platforms, Linux and macOS, the performance was acceptable because SWT is implemented with GTK and Cocoa, toolkits that do much better use of the GPU.
We tried different solutions: re-implement everything again with OpenGL, with JavaFX, with Swing and with a combination of Graphics2D/OpenGL, but no one of that solutions was good enough for us. To try a different UI toolkit inside SWT, it uses an embedded window that, at least in our tests, could have different problems like flickering on repaint or blank bars in the margins when resize. We spent more than a week trying different solutions, for that reason the planned release was delayed two weeks because at the end of December all the family is around you requesting your presence, especially kids.
At the end we found a solution: keep using SWT Canvas but instead of rendering the original images, we render a proxy of the image. A proxy is a scaled-down representant of the original image, or better say, the original frame of a packed texture. When we need to render a texture frame, we look in the proxy cache if it is available, else, we get the original image from the cache, get the portion of the frame and create a new image, then we scale it down and save it in the proxy cache, and render the image scaling-up the proxy.
For now, it is a good solution, the performance was improved a lot, now it does not matter how much big is the original image, it will be reduced to a 512x512 proxy (a technique used by video related software like video editors or Media Assets Managers). The disadvantage is that now you are not going to see your “big” images like the original, it may show certain quality degradation, but for modeling purposes, we think it is not a big deal. The exception is when you create large tile sprites. To render a tile sprite we create a new texture, we render the tile sprite into that texture, save the texture in the cache, and then render the texture in the next paint calls. That texture is scaled-down too, using a new proxy, and quality may be affected.
You can change the default 512px size of a proxy, just add this line to the PhaserEditor2D.ini file:
-DImageProxy.MAX_SIZE=256
You can change 256 and write whatever you need, like 1920.
In future releases, we may provide a more friendly way to change that value, and even, a way to use different qualities for a different type of objects, or specific objects.
By the way, how we did it in Phaser Editor v1? In v1 we just don’t do an intensive use of image rendering, components like the Assets window or the Asset Pack editor just show the icons of the images, and the scene editor used JavaFX, that is GPU accelerated. In v2 we did a complete re-implementation of many of the UI related to images, to add more visuality, readability, and usability (like allow to zoom in/out “everything” and perform quick searches). We decided to not use JavaFX for the scene editor in v2 because i forces image antialiasing, and it makes very ugly your pixel art, and a lot of Phaser games use it.
In future versions, we are going to evaluate to implement some editors (like the Animations editor or a future Skeleton Animator editor) by embedding a browser into the IDE. It could be a good solution, but as I mentioned before, all this embedded stuff always has troubles with paint and resize events.
What about Electron? Why Phaser Editor is not following the path of many other game IDEs and move to the cloud or Electron? There is a single reason, at the time we started this adventure, our previous job was to create Eclipse plugins for a private company, that means that we had a lot of experience making Eclipse products and for us, it was a logic desition to reuse all that know-how and all those features from Eclipse. Maybe in the future we will find the resources (we work full-time on the editor and its sales are our unique source of incomes) to reimplement everything again using just Phaser -yes, we want you to extend the IDE by just using your Phaser skills-, in a record time, but today it is not possible to do that huge jump, we need to grow the editor and the community around it, get more experience in game development, feedback, make everything more stable (even Phaser needs to be more stable). But what is sure, is that we are going to start embedding browsers into the IDE and embedding the IDE into the browsers -you will see nice stuff in February :)-, so we can do a part by part transition or maybe you will like that hybrid monster, let’s see.
Scene editor
Many new features were added to the Scene editor, like the manipulators and Groups.
Tools (or manipulators)
As is usual in this kind of editors, you can edit some properties of the projects in the same scene, using manipulators. We added a couple of manipulators to the scene editor. A key difference with Phaser Editor v1 Canvas is that when you select a tool it will remain active until you unselect it or activate another tool. This means, that you can activate a tool and select different objects at different moments. We think it is the common behavior in other game editors. Another difference is that now you can edit many objects at the same time.
Many of these tools can be activated by pressing a key or key combination, or you can click on the tool icon in the Properties view. All the changes made by a tool can be undo/redo.
TileSprite
Tile sprite objects can be changed by using the tools provided in the Tile Sprite section of the Properties view.
![]()
Tile Size manipulator
The Tile Size tool allows changing the size of the tile sprite. You can click on the tool icon or press the L key. This key can be pressed too on objects with a different type, like Images and Sprites, in that case, the objects are morphed into TileSprites.
![]()
Tile Position manipulator
The Tile Position tool allows to changes the offset of the tiles inside a TileSprite. It does not have a key shortcut. To activate it click on the Tile Position icon.
![]()
Tile Scale manipulator
The Tile Scale tool allows scaling the tiles inside a TileSprite. It does not have a key shortcut. To activate it click on the Tile Scale icon.
![]()
Transform manipulators
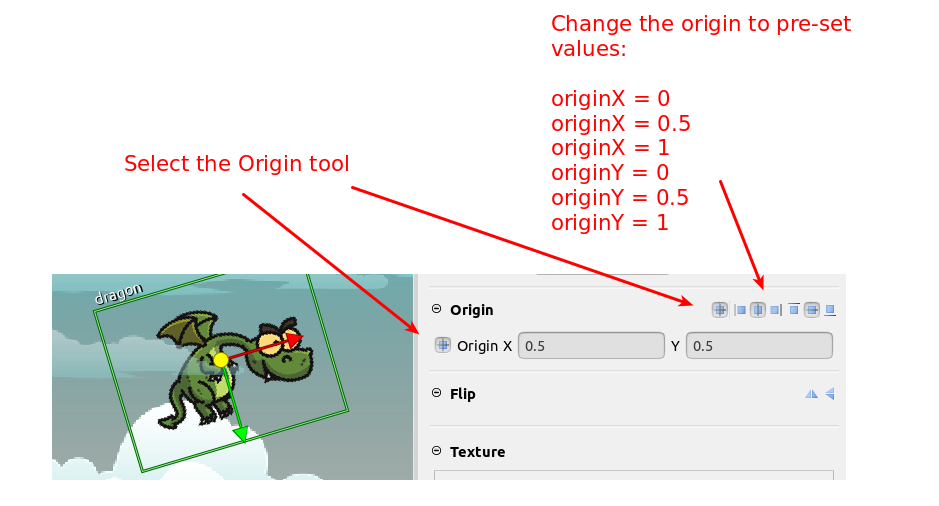
The Transform manipulators work similar to other level designers. The tools can be selected by clicking the icon in the Properties view or by pressing the associated keys: M to change the position, S to change the scale, N to change the angle and O to change the Origin. You can select the coords used by the tools: local coords or global coords.
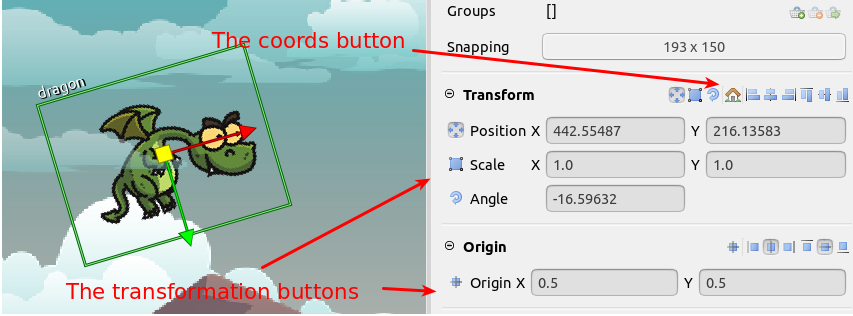
Note in the Origin section we have several buttons. One button to activate the Origin tool and the others are shortcuts to change the origin to a specific value (0, 0.5 or 1). When you change the origin of an object, the local position is updated to keep the global position the same.
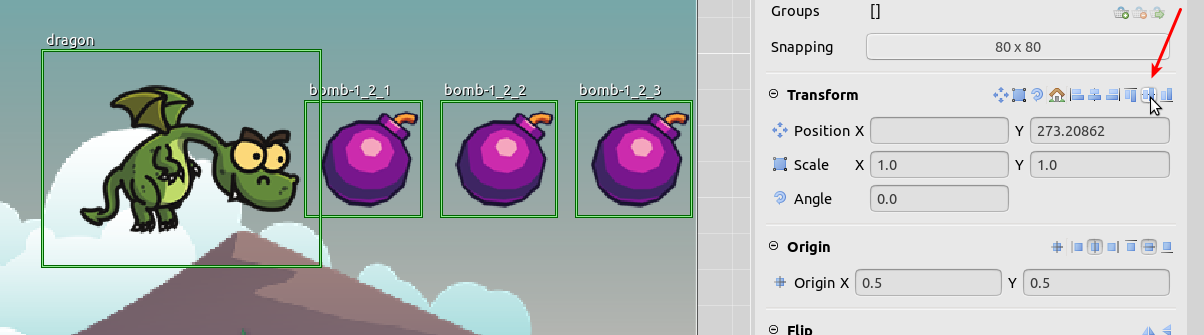
Align buttons
Like in v1, you can align objects to the left, center, right, top and bottom. If you select a single object the align is performed taking as reference the “Borders” defined in the Scene properties. In future releases, we can introduce other align (or layout) functions, like Circular, Grid, Sin, etc… Even we should provide a way for you to define your layout functions.
Display List order
The Scene editor renders the objects in the order they appear in the Display List. Background images are at the beginning of the list and player and enemies objects are at the end of the list. That order gives a sense of depth. You can change it by pressing key shortcuts or the buttons in the Editor section.
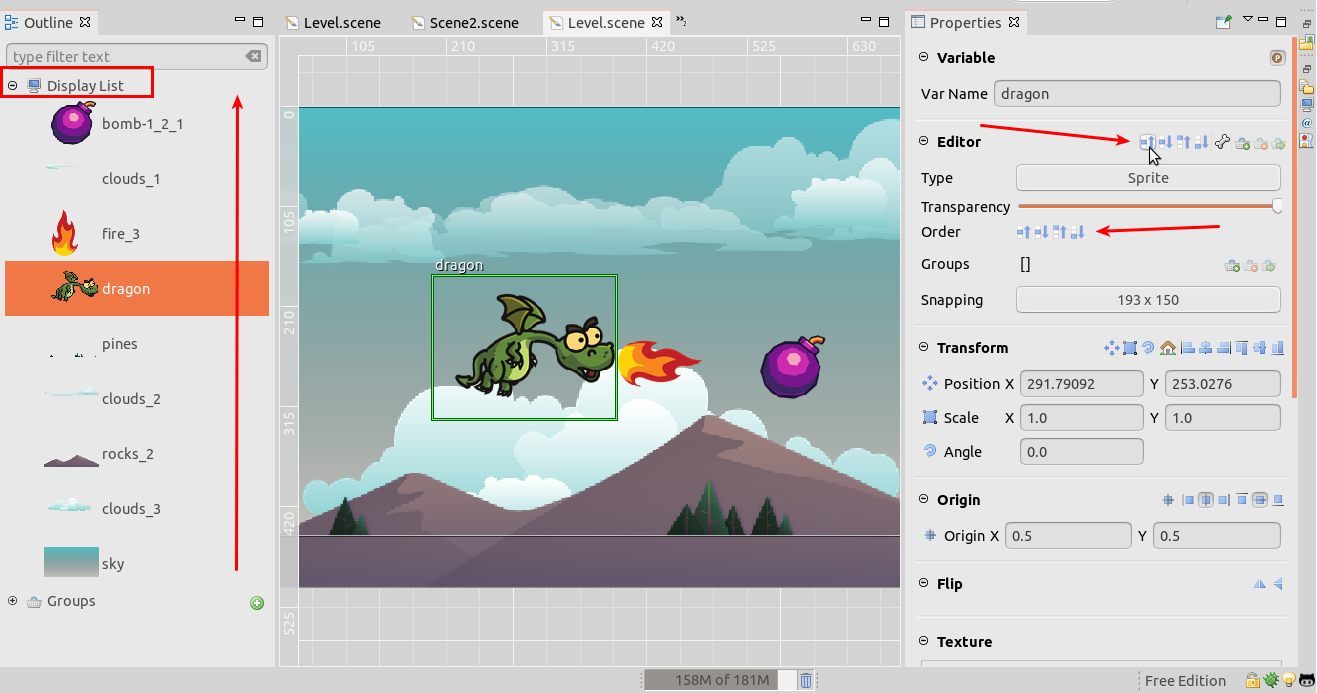
The keys to moving the objects in the Display List are:
- Move Up:
PageUp - Move Down:
PageDown - Move To Top:
Home - Move To Bottom:
End
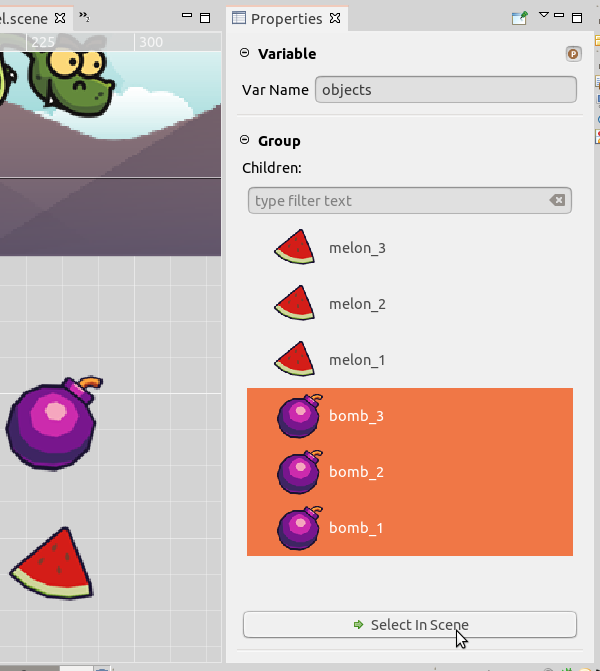
Groups
In Phaser v3 the groups are not display objects, you cannot place them in a scene, or rotate. A Group is more like an object list, that you can use to classify the objects, iterate them, apply an operation to all the objects of the group. An object can belong to many groups, an Alien01 object can belong to the Aliens group, the Enemies group and the Objects group at the same time. It all depends on how you structure your game. You can do a complete taxonomy of your game objects using groups. In smaller games you can use groups instead of other techniques like object type extension (prefabs). In this section, we show you how you can manage the groups in the Scene editor.
Create a Group
Note the Outline view tree has two roots, the Display List and the Groups. To create a new group you can click on the “plus” icon next to the Groups label:
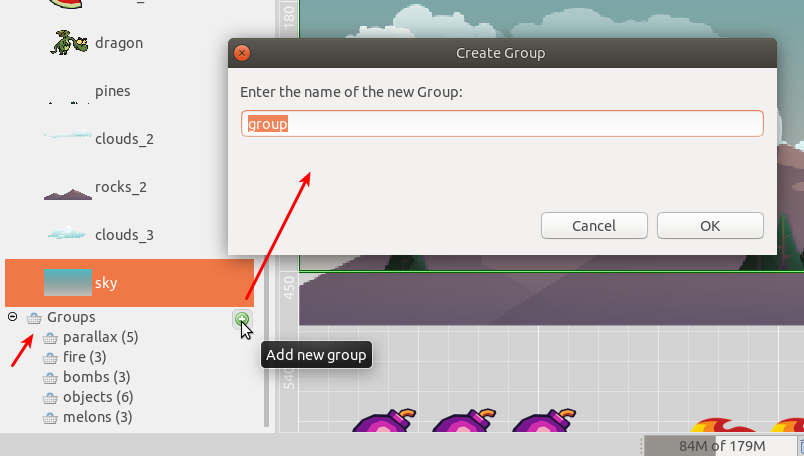
Other way to create a group is using the Group toolbar of the Editor section in the Properties view. When you select an object or many objects, you can press the Add To Group button of the Editor section. It shows a menu with all the groups and the option to add the objects to a new group.
Delete a Group
To delete a group select it in the Outline view and press the Delete key. You can undo and redo that operation.
Edit a Group
When you select a group in the Outline view, the Property view shows the properties of the group. For now you only can edit the name of the group, but in the future you will be able to convert groups to physics groups or set properties for all the objects of a group. In addition to the group name, you will see the list of objects that belongs to the selected group. If you select many groups, then you will see the union of the objects of the groups.
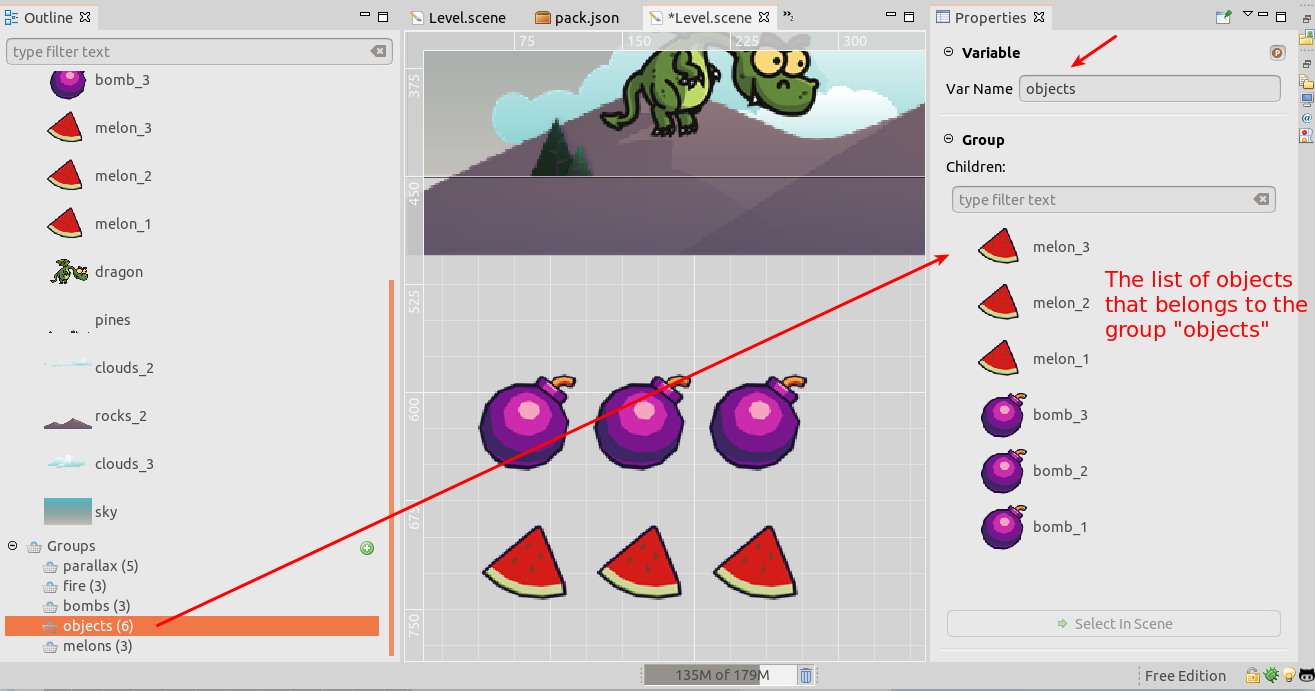
Maybe you want to edit the properties of the children of a group. To do that, you can select them in the Group section and click the Select in Scene button.
Note as soon as you select the children in the scene, the Properties view will show the properties of the objects and not the properties of the group, unless you pin the Properties view to the group.
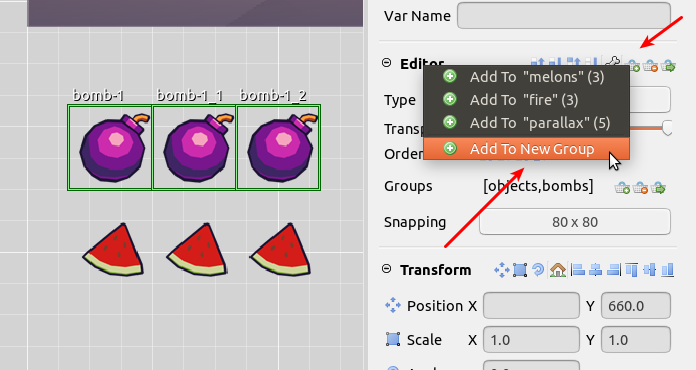
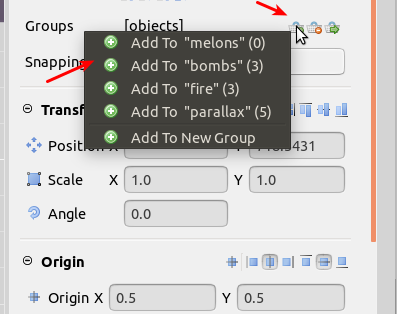
Add objects to an existant Group
To add objects to a group, select the objects in the Scene editor or the Outline view. In the Editor section, click on the Add To Group button, then select the target group:
Remove objects from a Group
To remove objects from a group, select the objects and click on the Remove From Group button in the Editor section. It shows a menu with the list of groups that own the objects, click on the group you want to remove from.
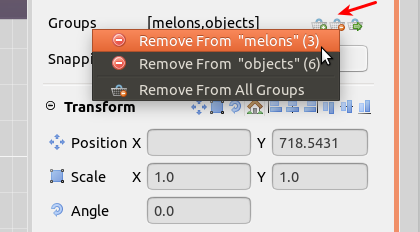
Note you can remove the selected objects from all the groups.
Code generation
The groups code is generated at the end of the code that create the objects. For each group is generated a local variable or an instance field that references the group. By default an instance field is generated, but you can uncheck the “field” button in the Variable section to generate just a local variable. This is an example of how the group code is generated:
this.fMelons = this.add.group([ melon_1, melon_2, melon_3 ]);
this.fObjects = this.add.group([ melon_3, melon_2, melon_1, bomb_3, bomb_2, bomb_1 ]);
this.fBombs = this.add.group([ bomb_1, bomb_2, bomb_3 ]);
this.fFire = this.add.group([ fire_3, fire_2, fire_1 ]);
this.fParallax = this.add.group([ clouds_1, pines, clouds_2, rocks_2, clouds_3 ]);
Scene properties
The scene has several properties that are part of the Phaser API or are specific to the editor. By default, when there is not any object selected in the scene, the Properties view shows the scene properties. You can press the ESC key to remove the selection or click on an empty space. Let’s review all the properties and associated actions.
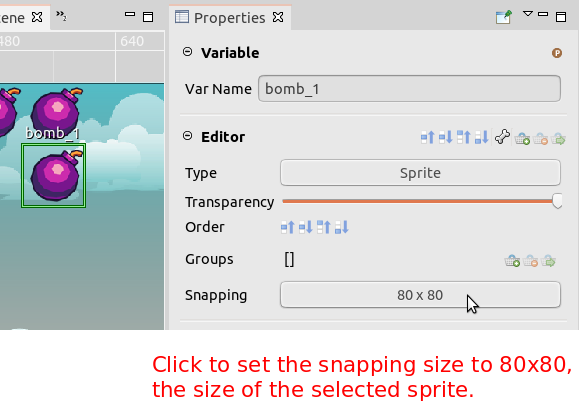
Snapping properties
As in Phaser Editor v2, you can enable a scene snapping mode, that forces to place the objects in a grid. In the Snapping section, you can enable/disable the snapping mode and set the snapping size.
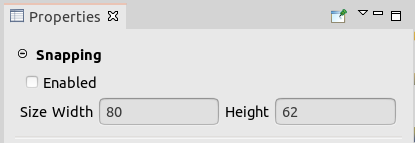
Other way to set the snapping values of the scene is selecting an object and pressing the Snapping button. With that action, the snapping will be enabled and set to the size of the selected object. This is very useful in games where you place a lot of tiles and objects with the same size.
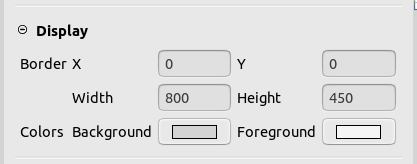
Display properties
The Display sections contain the properties used only by the editor:
- Border: it is used by the editor to paint a frame in the scene. You can use it as a reference of the screen size of the game or as a frame to align objects.
- Colors: the background and foreground colors of the editor scene (not the Phaser scene at runtime).
Assets section
At the moment it just contains a button to re-build the image cache of the scene. You can use that button if you see there is something corrupted in the scene. The images of the scene are updated if you change the files inside Phaser Editor or by any other external program, however, something may happen that the images are not updated.
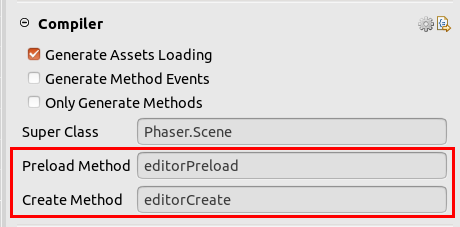
Compiler properties and actions
The Compiler section contains the properties used by the scene compiler. In this iteration, we added new properties. This is an overview of how it works.
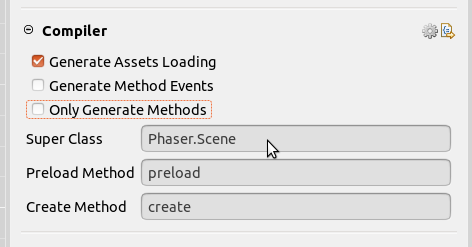
Generate Assets Loading
If you check this parameter, the compiler will generate a preload method with the code to load the asset pack file used by the objects in the scene. This option is selected by default, but probably you would like to disable it and load all the assets in a preview Preloader scene.
Generate Method Events
Phaser v3 ships a new event system that allows you to base your workflow on events. If check this property, then the compiler will generate a code that emits the events -prepreload, -postpreload, -precreate and -postcreate. This is how it looks:
class Level extends Phaser.Scene {

	preload() {


		this.events.emit('-prepreload');

		this.load.pack('section1', 'assets/pack.json');

		this.events.emit('-postpreload');


	}

	create() {


		this.events.emit('-precreate');

		this.add.image(400.00003, 225.0, 'sky');
		var dragon = this.add.sprite(160.0, 240.0, 'dragon', 'dragon/Idle_003');
		dragon.anims.play('dragon - dragon/Moving Forward');
		this.fDragon = dragon;

		this.events.emit('-postcreate');


	}
}
Only Generate Methods
Check this option if you don’t want to generate the code of a complete class, else just the methods to load the assets and create the objects. This is how it looks:
function preload() {

	this.load.pack('section1', 'assets/pack.json');

}


function create() {

	this.add.image(400.00003, 225.0, 'sky');
	var dragon = this.add.sprite(160.0, 240.0, 'dragon', 'dragon/Idle_003');
	dragon.anims.play('dragon - dragon/Moving Forward');
	this.fDragon = dragon;

}
This gives you more freedom to use the scene code with the syntax of your preferences. For example, you can do something like this:
// You can write more code here

/* START OF COMPILED CODE */


function preload() {

	...

}


function create() {

	...

}

/* END OF COMPILED CODE */

MyNamespace.MyScene = {
	preload: preload
	create: create
}
Remember the compiler protects some areas of the code where you can insert your own code like is the case of the MyScene code we inserted at the end of the file.
Super Class
This parameter allows you to change the super-type of the generated Scene class. By default, the generated class extends Phaser.Scene, but you can write an abstract scene class, like MyBaseLevel, that is common to all the levels of your game and provides a set of methods, behaviors, and data, that every scene level can inherit and override.
Preload Method and Create Method
These two properties are really powerful, and you can use it in combination with the Only Generate Method parameter, to get absolute control of the structure of the Scene code you can write. The properties allow using a different name of the preload and create methods. For example, you can set different names like editorPreload and editorCreate, and write your own preload and create methods. Something like this:
class Level extends Phaser.Scene {

	editorPreload() {

		this.load.pack('section1', 'assets/pack.json');

	}

	editorCreate() {

		this.add.image(400.00003, 225.0, 'sky');
		var dragon = this.add.sprite(160.0, 240.0, 'dragon', 'dragon/Idle_003');
		dragon.anims.play('dragon - dragon/Moving Forward');
		this.fDragon = dragon;

	}

	/* START-USER-CODE */

	preload() {

		this.editorPreload();

		this.load.image("MyImage", "http://onlineassets.com/MyImage-20190107.png");
	}

	create() {
		this.editorCreate();

		this.time.addEvent({
			delay: 100,

			callback: function() {
				// spawn an enemy
			},

			callbackScope: this,

			loop: true
		}, this);
	}

	/* END-USER-CODE */
}
Note that we write the preload and create methods manually, to do other stuff that is out of the scope of the editor, but at the same time we can call the code generated by the editor (editorPreload() and editorCreate()).
Scene file wizard
We implemented a new wizard to create a Scene file. It is very simple, it just asks for the name of the scene file and the asset pack section (optional) where you can add the scene as a script entry (like the other Animations and Texture Packer wizards).
Others Scene editor minor features
- Allow dropping animation frames into the scene, to create new objects.
- When renaming many objects at the same time, it appends an index, like
bomb_1,bomb_2,…
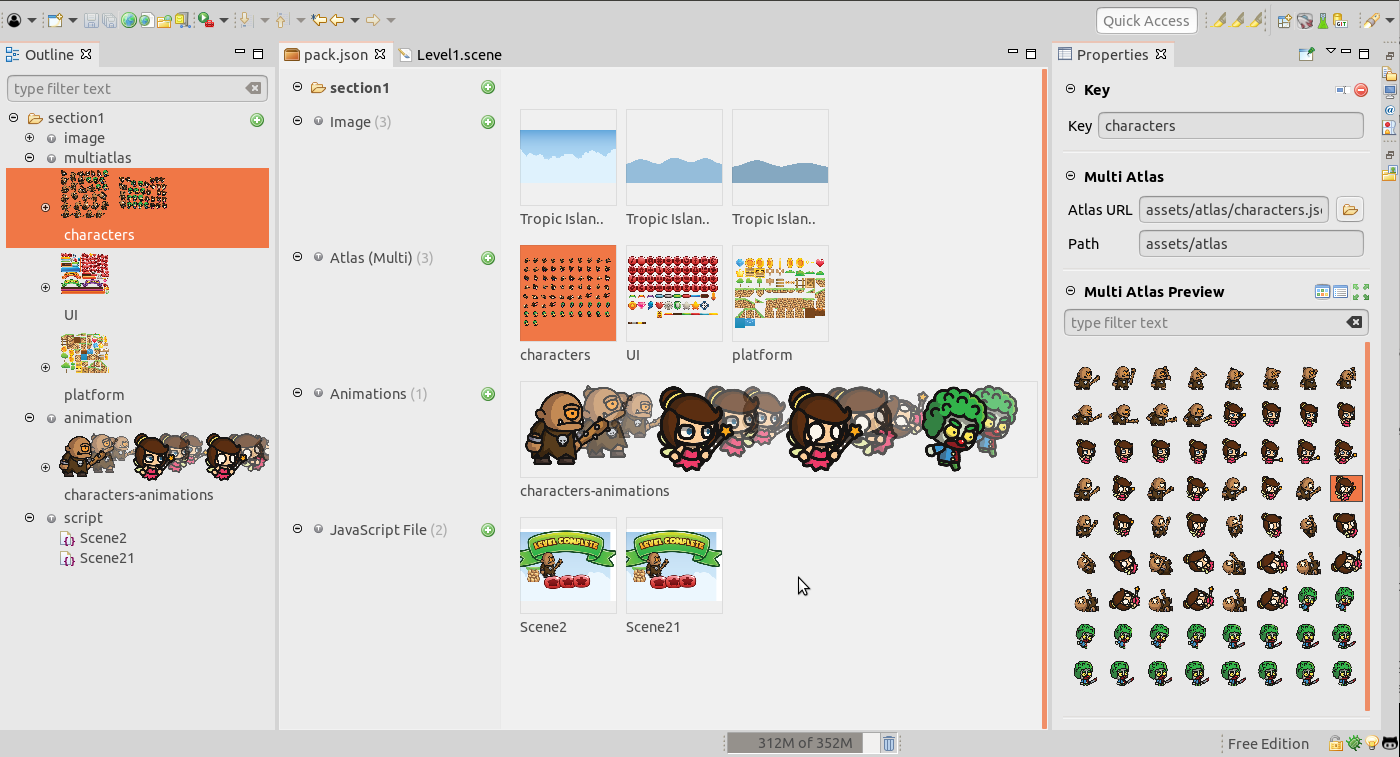
Asset Pack editor
Again, we did a huge re-write of the Asset Pack editor. The completely UI changed, now it has more visuality and we hope it is more friendly. The three columns layout was replaced by a special type of tree, where you can collapse/expand the pack sections but the assets are shown as tiles. You can zoom in/out too, just keep pressing the Shift key when rolling the mouse wheel.
The Properties view shows the asset editors, with the new Form layout, and a preview section. The Outline keeps more or less the same, we just added “plus” to the section rows to add the assets.
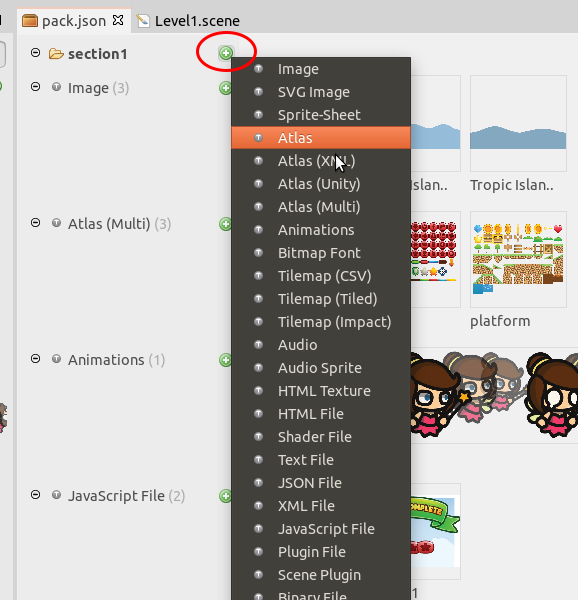
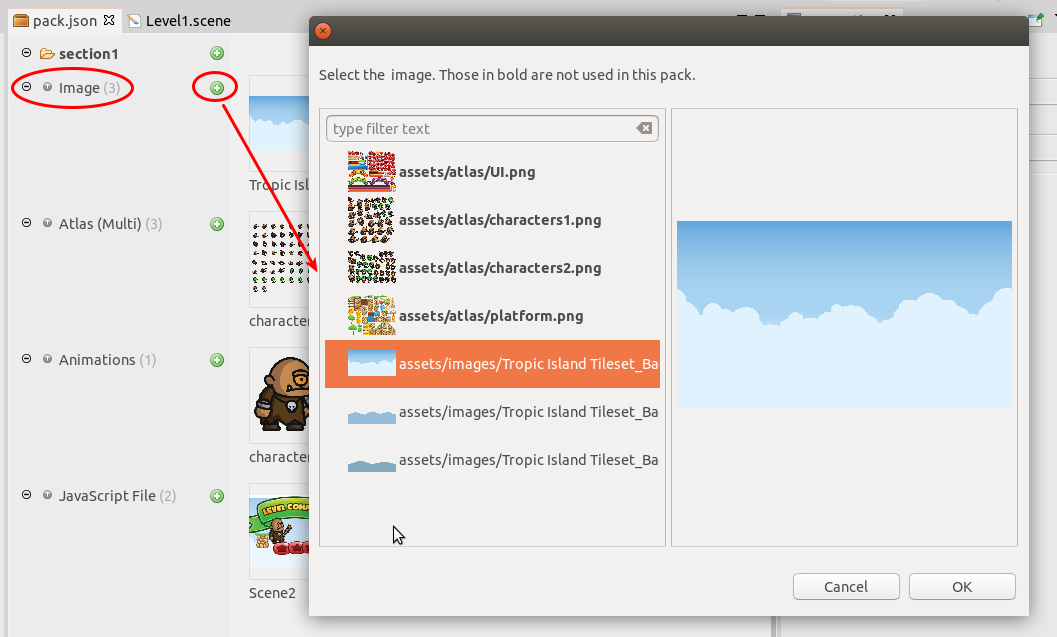
Add assets to the pack
Each section, and type of files inside a section has a “plus” icon that you can click to open a menu with all the type of assets. Select the type you want to add and it will open a dialog to select the files you want to add. It is very similar to how it works in Phaser Editor v1.
If you click on the “plus” button of a file type, it opens the dialog to add the files:
Delete and Rename assets
To delete an asset you can select it and press the Delete key. Also, you can press the “remove” button in the Key section of the Properties view. Like in Phaser Editor v1, it opens a refactoring dialog, that tells you the other files are affected by that delete. All about refactoring is not working very well yet, we have to migrate it to the new file formats.
To rename an asset is pretty similar, you can press the F2 key or click the “rename” button in the Properties view.
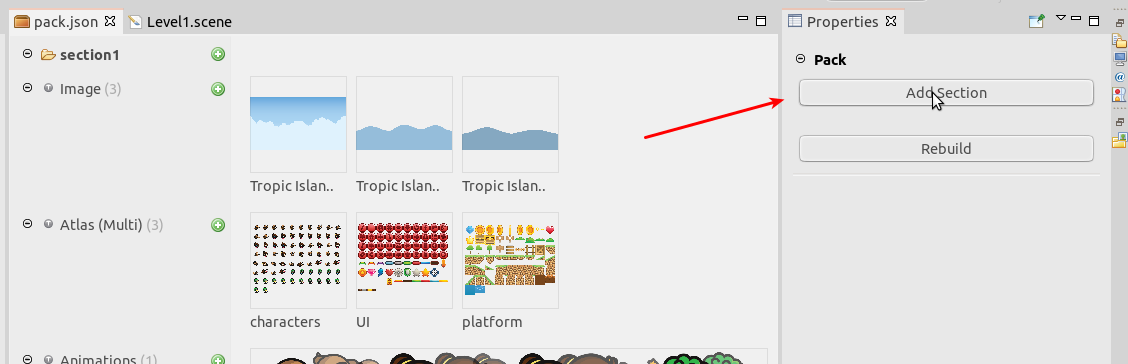
Add sections
Like in the other editors, if you do not select any asset, the Properties view shows the global settings of the Pack editor. In this case, there are not global settings (at least not in this version), else it shows two buttons, one to create a section and other to re-build the projects.
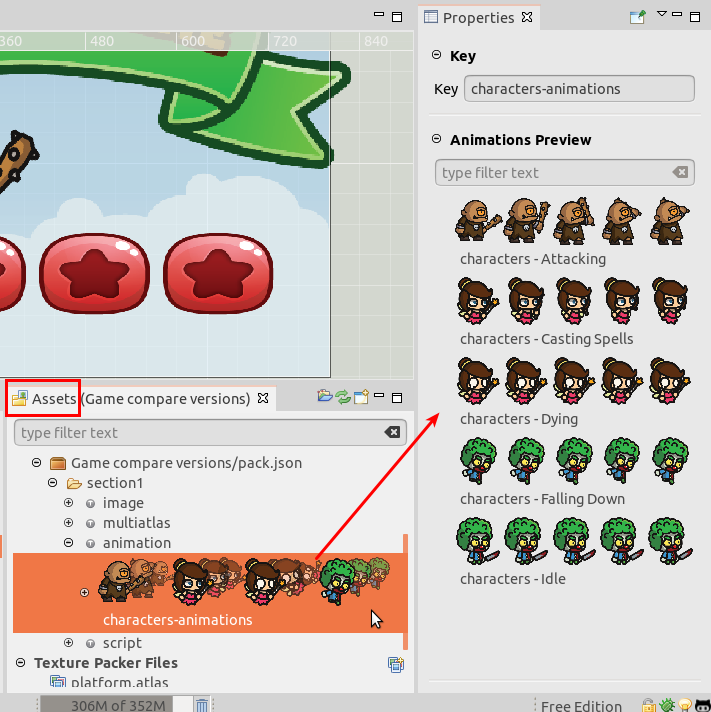
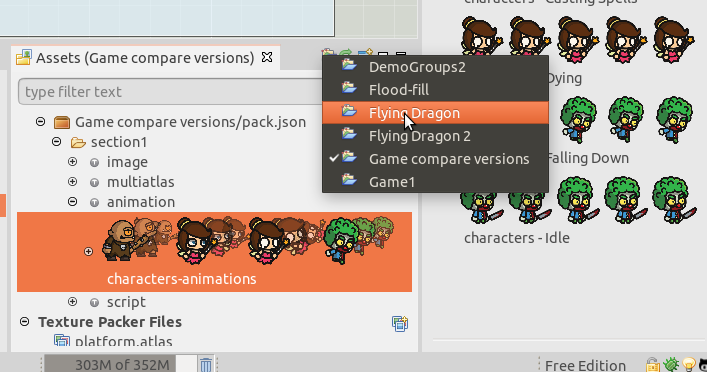
Assets view
The Assets view now is linked to the Properties view. When you select an asset, the Properties view show info about that asset. If the asset is an image or frame, it previews it.
Other nice addition we did is a new button to switch from one project to other. To switch to other project means the Assets view will show the content of the selected project. The Eclipse workspace allows you to work with many projects at the same time. That’s good because we can create projects of the Phaser examples and test/learn the Phaser API, but often you get lost between so many projects. For that reason, we implemented the Assets view to show only the content of a project at the same time.
Animations editor
We migrated the Animations editor to the new Properties with a Form layout. The playback actions were moved to the Animation section. The other stuff remains the same. Internally, we removed the JavaFX dependencies, now we use the Timeline implementation provided by Trident.
JavaScript editor
We use the Wild Web Developer plugin for coding. It is very very experimental (but with huge potential), is like a proof of concept that Eclipse can use some of the toolings that makes VSCode so popular, like the Language Server Protocol. This plugin needs nodejs to run, so now the nodejs executable is included in the editor. Look next to the jre folder (the one with Java), there is the node folder.
Theming
We were doing some theming, but some of them created some problems so we decided to create a simple Phaser Editor theme, that you can appreciate in all the previous screenshots. In macOS, the problem is bigger, so we created a theme just for macOS users.
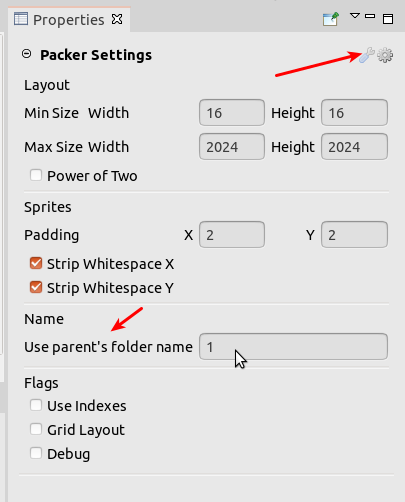
Texture packer
The Texture Packer received an update too. We migrated its parameters editor to the new Form layout. The context menu was migrated too, this means that you build a new atlas, yo have to click the “gear” icon in the Property view. By the way, now the packer uses by default the multi-atlas format introduced in Phaser v3.
We added a new parameter to the packer: User parent’s folder name. By default it is 0, but you can write the number of parent folders you want to include in the name of the frames. This is very helpful to organize your assets. The Animations editor uses an algorithm to create the new animations when you drop frames into it. This simple algorithm just takes in count the names of the frames.
Phaser Project wizard
We finished the Phaser Project wizard. Now it contains a scene and some animations of the Phaser Editor dino. We removed, all the example projects made for Phaser Editor v1 and created a new one:
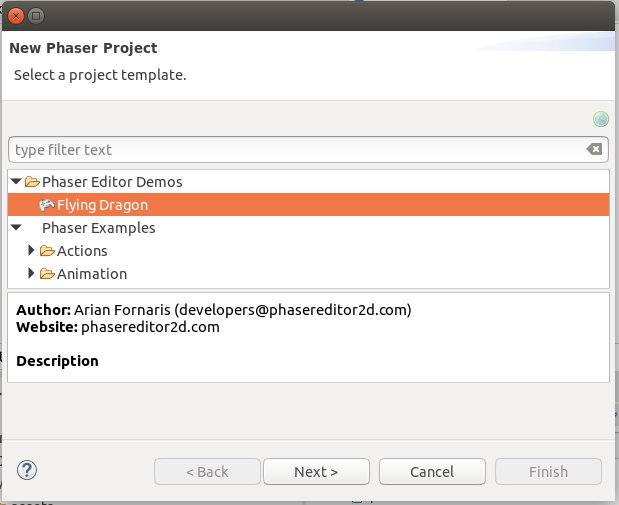
Many of the screenshots of this report were taken from this example project.
Preview zooming
In Phaser Editor v2, all that shows an image (or more than one) can be zoomed in/out. In the first implementation we did, to zoom, you only need to roll the mouse wheel, but we decided to zoom only if the Shift key is pressed because, in some contexts, a simple mouse scrolling provoked a scrolling in the parent of the image preview.
***
This is all for now! We are going to take some hours to sleep and will start preparing the release notes! We should write a very small tutorial to help you start, but the whole documentation will need some time to be written. The good news is that you have all these development reports that can help you, especially if you have the previous acknowledgment of Phaser and the v1 of Phaser Editor.
See you soon!
Arian