Phaser Editor v2 development progress (report 3)
August 27, 2018 - Posted in phaser-editor-v2
Hi,
This was a productive month for the Phaser Editor team! We worked almost every day (and night) on the v2 of the editor, but finally, we completed the task: a brand new tool called the Animations editor.
But we did not stop here. Many other tools were updated: the Texture Packer editor, the Asset Pack editor, the Assets window, the Preview window, the information controls (hover previews) and other “minor” stuff, like the new custom UI controls we introduced.
At the same time, we have been more active on our social channels (Twitter - Facebook - Youtube), sharing thoughts and videos to show how the new editors and modifications are looking. We really enjoyed it and we think some of you too.
Now we are going to pause the v2 development and work to release a new v1.5.2. As we promised, the v1 of the editor will be updated as long as the clients request it, by reporting bugs or asking for new features (relative small new features). So this is time to update v1 with some of those requests.
Yet the v2 of the editor needs a lot of work. The whole scene editor should be updated, and the JavaScript editor needs some love too. But we are working hard, we want to deliver a Preview version in October. It is almost here.
Animations editor
In Phaser 3, animations are global and can be modeled using configuration objects. A configuration object is a plain JSON object that you can write in your game code or store in an external JSON.
In Phaser Editor we created an editor for the Animations JSON configuration when it is stored as an external file.
The workflow is the following:
- Create a new Animations file using the provided wizard (let’s say an
animations.jsonfile). - Open it (this is done automatically when it is created) with the Animations editor.
- Add new animations, by dropping into the editor the textures defined in the Asset Pack.
- Include the
animations.jsonfile in the Asset Pack file (pack.json). - In the game, the animations will be created automatically when the pack file is loaded. Or you can load the
animations.jsonfile manually.
Create the Animations file
These are the step to create an Animations file:
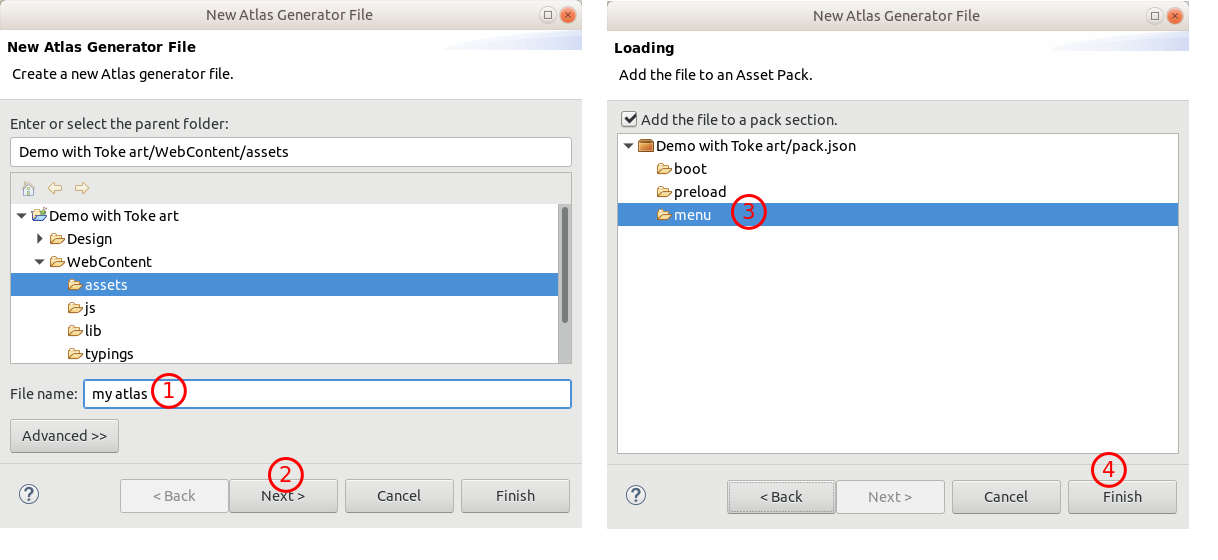
- Open the New Animations File wizard (
File > New ... > Animations File). - Select the containing folder and write the name of the new file. You can omit the
.jsonextension, it will be added automatically. - We encourage to add the animations to an asset pack file, so press the Next button and select pack file and the section where to add the animations.
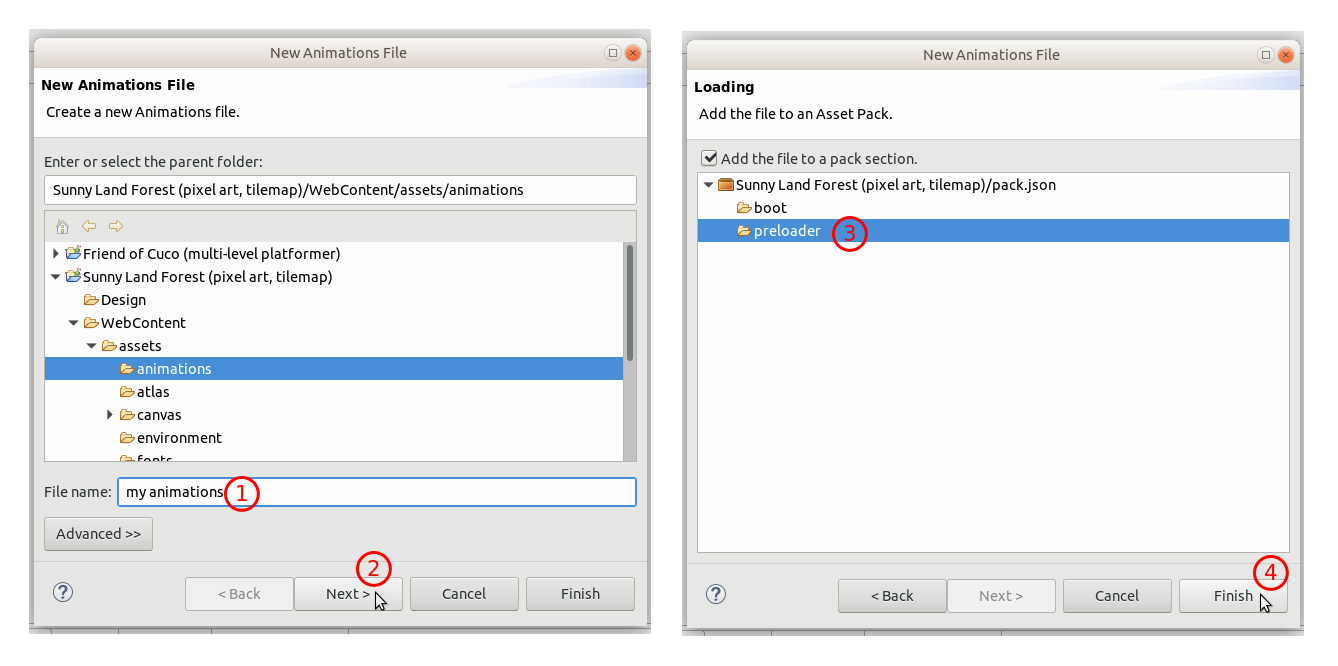
- Press Finish to finally create the animations. The file will be opened automatically in the Animations editor.
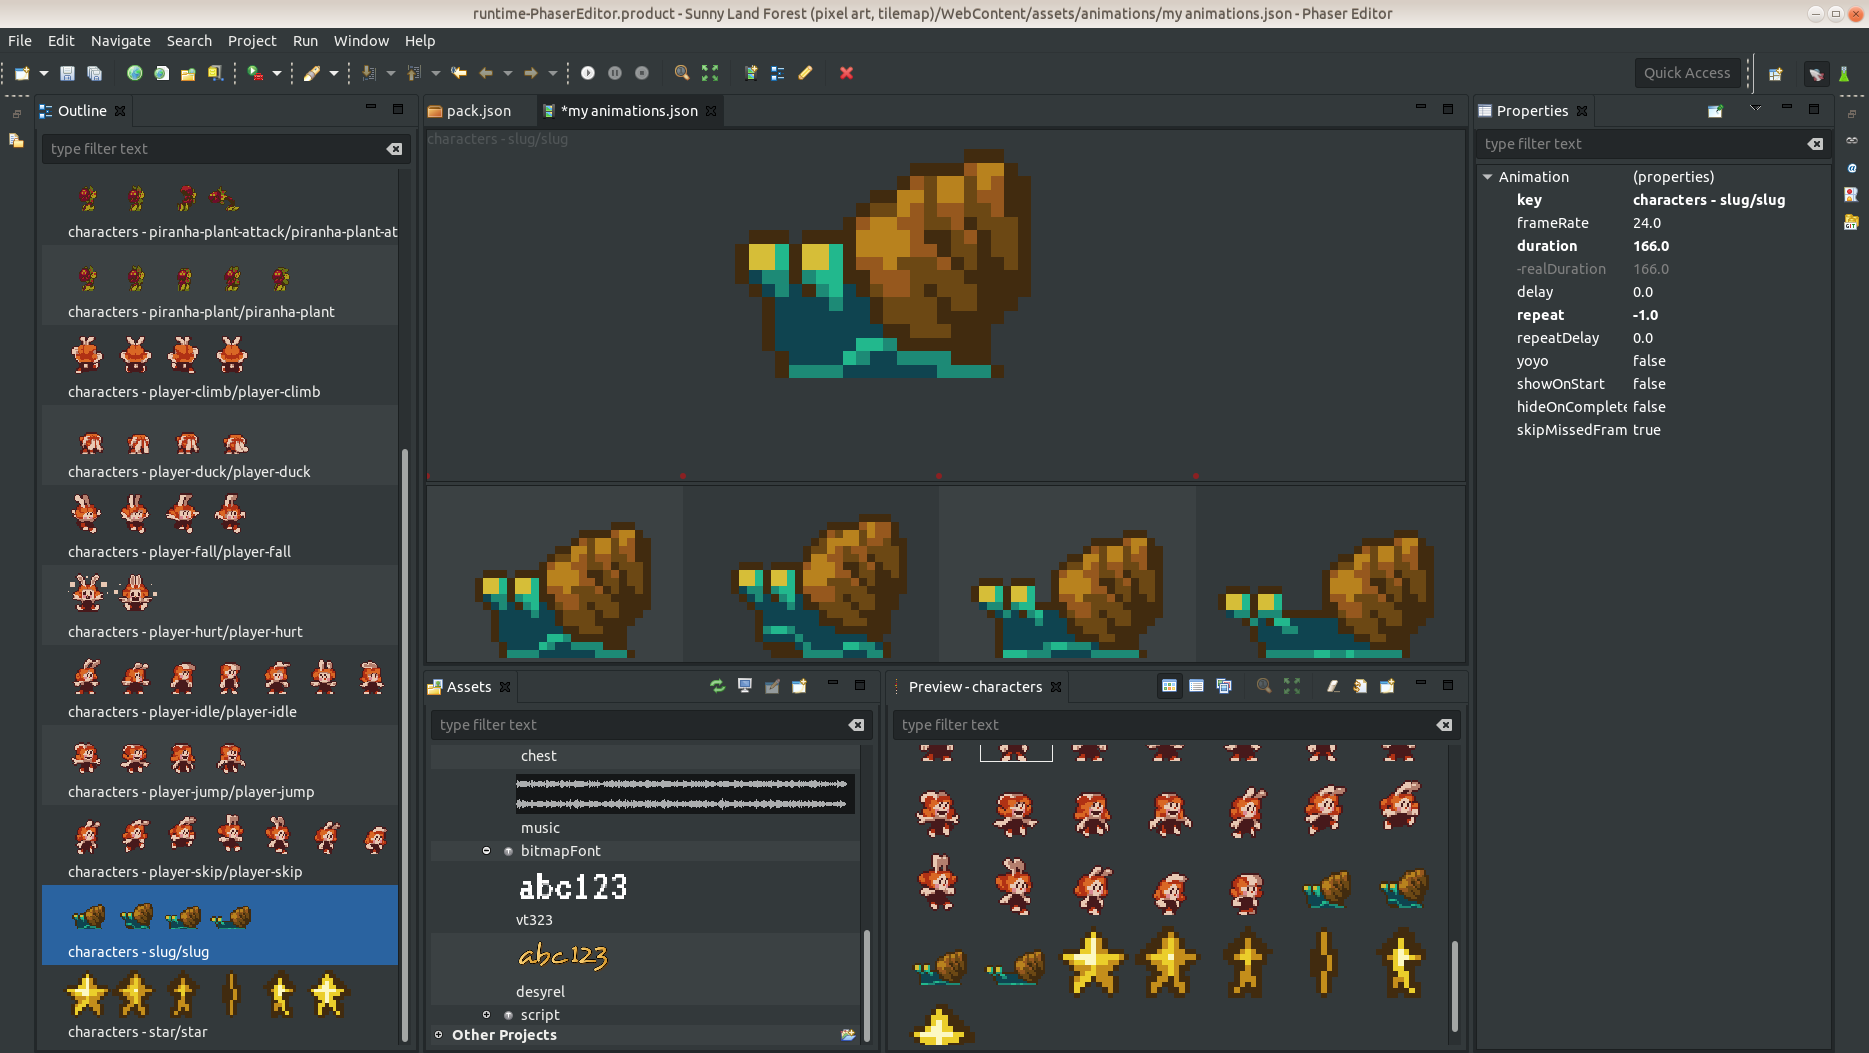
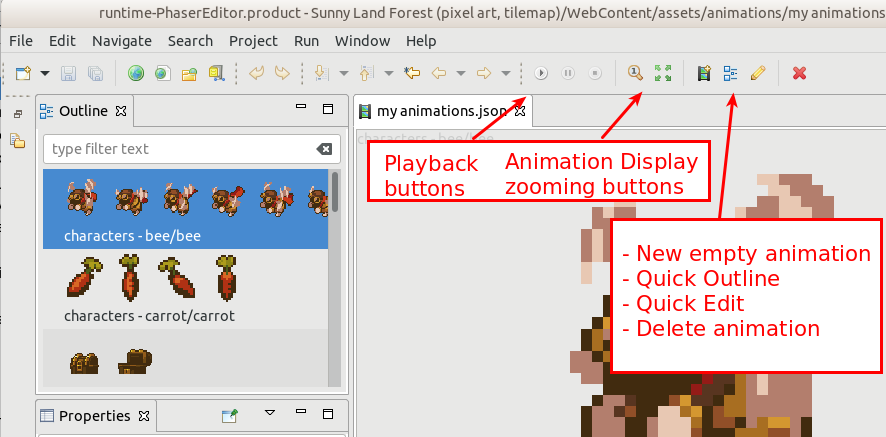
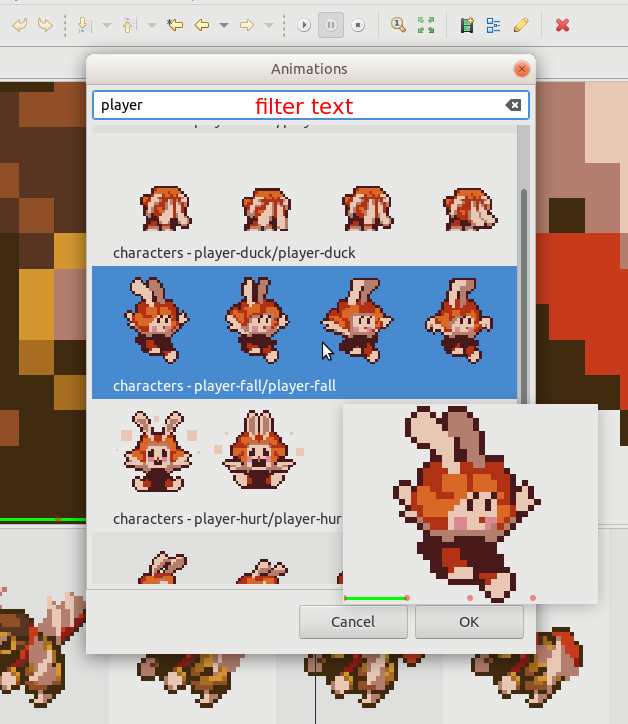
Overview to the Animations editor parts
These are the Animations editor part:
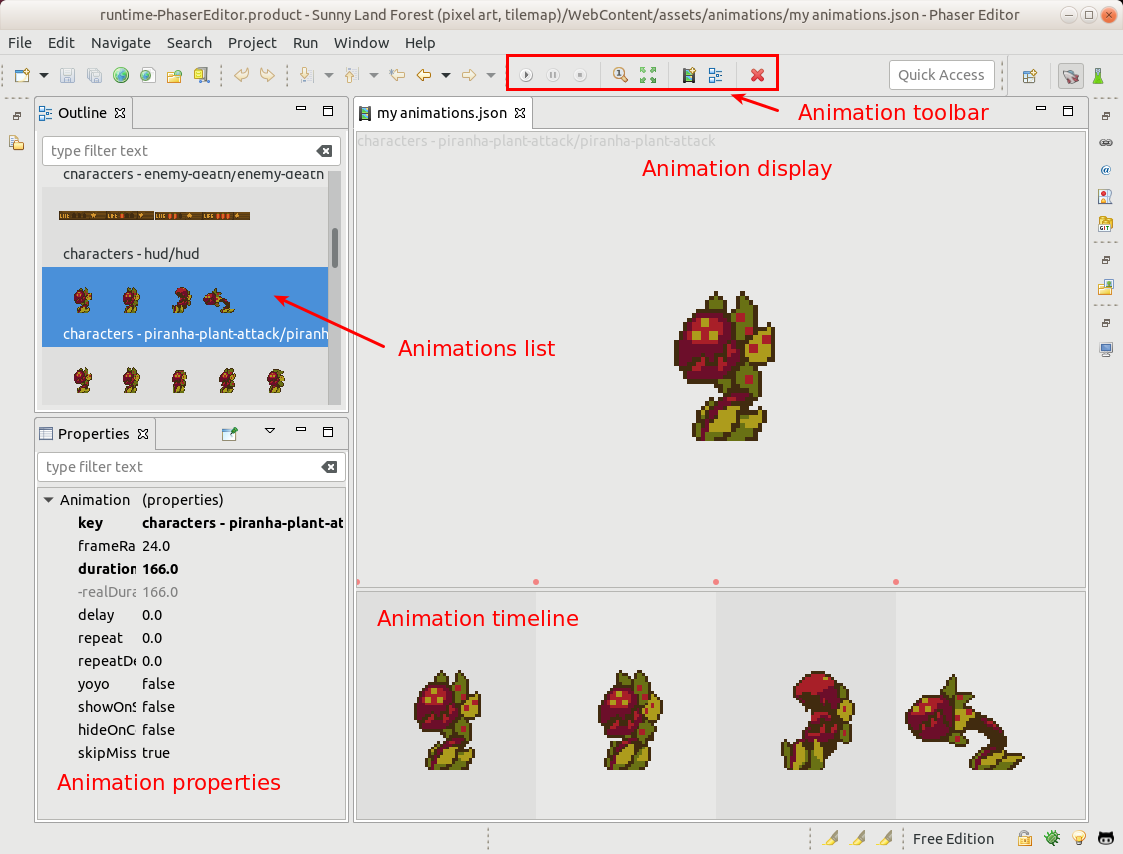
- Animation Display: where the animation is displayed when it is running. If the animation is not running it shows the first frame of the animation (or the last played frame). You can load another frame there, just double-click on a frame in the timeline moving from one frame to other with the arrow keys.
- Animation Timeline: shows all the frames of the animation and allows to add textures or organize the frames.
- Animations Toolbar: like the other editors, it has a toolbar with useful commands.
- Animations Outline (or list): the list of all the animations. Following the philosophy of the other editors, the “outline” of the content is shown in the Outline window.
- Animation Properties: like the Outline window, the Properties window is linked to the active editor, in this case, it allows to edit the selected animation properties or the selected frame properties.
The Animation Display
- The Display component, as the name indicates, shows the animation when it is running, or a single frame of the selected animation.
- There are other ways to preview an animation, for example, you can hover the mouse in the Animations Outline and it opens a small “tooltip” window with animation. However, the Display gives you a wider space and full control to zoom in/out the images. Like in other image-based preview components, you can zoom with the mouse wheel and drag the image with the middle button.
- The Animation Display serves as a drop-in area to create new animations. If you drop some textures in the Display area, a new animation will be created. In a next section, we explain how animations are automatically created.
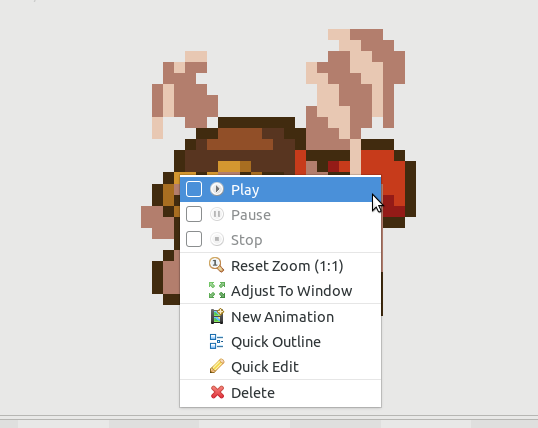
- If you right-click on the Display it shows a context menu with a set of useful commands.
- When you click on the Display, I mean, when the display has the focus, the Properties window allows editing the properties of the displayed animation.
The Animation Timeline
This component shows the frames of the animations. It allows you to:
- Add more frames to the animation. Just drag a texture or texture frame from the Assets window (or the Preview or any other window with asset pack elements) and drop it in the timeline.
- Sort the animation frames by dragging them around.
- Show a particular frame in the Display, by double-clicking it.
- Shift the selected frame with the arrow keys. It creates an effect of step-by-step animation because the next frame is loaded in the Display.
- Play/pause the animation by pressing the
Spacekey. - Select a frame to edit its properties in the Properties window.
- Zoom in/out the timeline images, by rolling the mouse wheel.
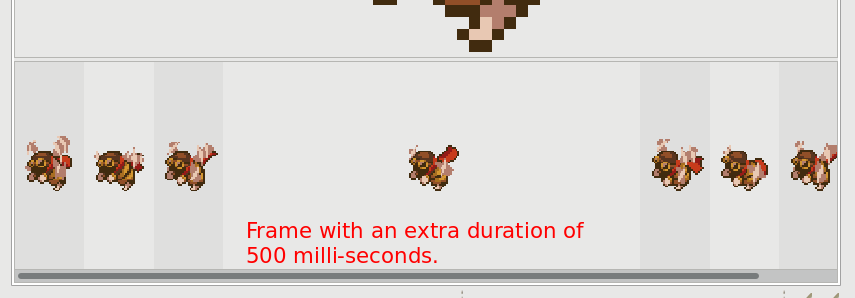
- The frame’s width is proportional to the frame’s duration. If you add a
durationvalue to a frame, it will get more space in relation to the other frames.
The toolbar and context menu
In Phaser Editor (that is based on Eclipse IDE), the editor toolbars are located in the main toolbar of the application. The content of the main toolbar changes according to the active editor.
These are the commands contributed by the Animations editor:
The same commands are available in the context menu, just right-click on the Display area:
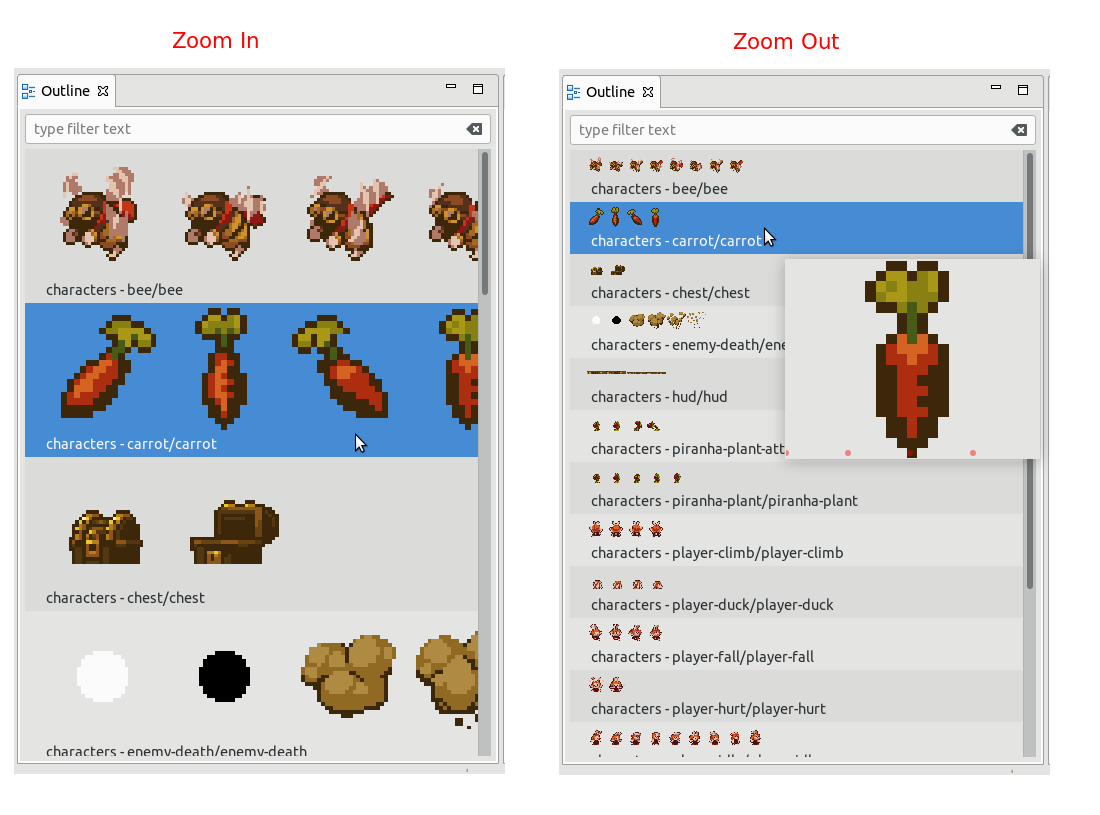
The Animations Outline
The Outline window is a separate window that shows a content overview of the active editor. In the case of the Animations editor, it shows all the animations, and you can:
- Load an animation in the Animations editor, just select (click on) it.
- Preview an animation, just hover the mouse on it.
- Delete the selected animation. Just press the Delete key or press the Delete button of the editor’s toolbar.
- Create new animations by dropping textures from the Asset Pack.
- Filter by name the animations.
- Zoom in/out the rows. Since it is a scrollable component, to zoom it you should roll the mouse wheel and keep pressing the
Shiftkey.
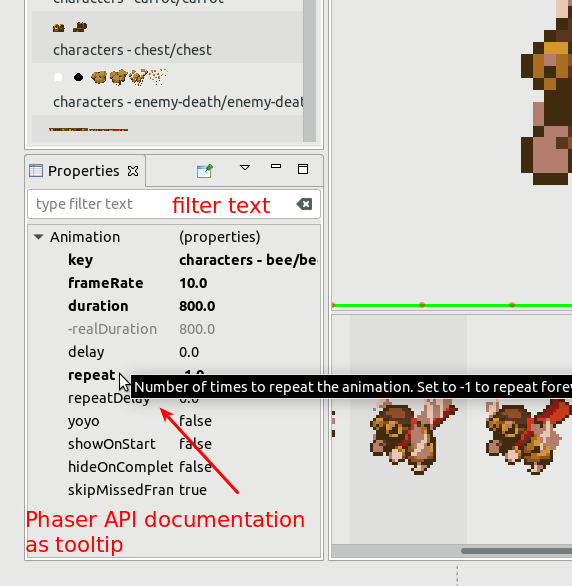
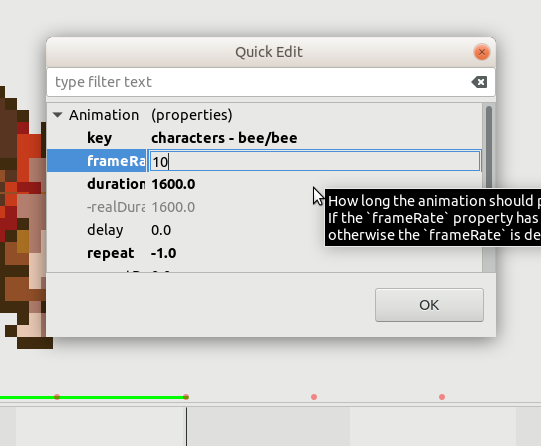
The Animation Properties
Like the Outline window, the Properties window is linked to the active editor and shows field editors for the selected object.
- Allows editing the properties of the selected object.
- The field editors show tooltips with the related Phaser API documentation.
- The properties can be filtered by name.
- Supports editing many objects at the same time.
Removing distractions (maximize, quick outline and quick edit)
Something important in editors is to provide a full-screen mode. In Phaser Editor you can maximize any editor or window by pressing Ctrl+M. When the Animations editor is maximized, the Outline and Properties windows are not shown, however, you can do a Quick Outline (press Ctrl+O) and a Quick Edit of the selected object (press Q). the context menu shows all these options and more.
Quick Outline:
- Opens with
Ctrl+O. - The animations can be filtered by name.
- You can zoom in/out the images of the animations.
- You can hover the mouse in an animation to preview it.
Quick Properties:
- Opens with
Q. - Allows editing the selected animation or frame, one or many of them.
Automatic animations creation
To create an animation you can click on the New Animation button in the toolbar or context menu, write the animation name and then drop some textures into the Timeline.
However, if you are careful with the naming of your textures, you can create the animations quickly, by dropping all the textures in the Display or Outline area.
The automatic animation creation process is simple, this is the algorithm:
- All the dropped textures will be split into different groups.
- A group is formed by taking the textures with the same name prefix.
- The prefix of a texture name is computed by removing all non-alphabetic characters at the end of the name. for example, the prefix of
player-walk_001isplayer-walk, the non-alphabetic characters_001were removed from the end of the name. - A new animation will be created for each group, with the textures of each group as frames.
- Each animation will be named by joining the name of the asset (image, atlas, sprite-sheet) with the prefix of the group. For example, if the atlas
characterscontains the framesplayer_walk_001…player_walk_010, then a new animationcharacters - player_walkis created.
We think it is not too hard for the art designer to follow an Animations-editor-compatible naming convention. Even it should be compatible with many assets made for other engines or general game development.
If all the animations share some common properties, like the frameRate or repeat, you can select all of them and edit those properties at the same time, in the Properties window.
Take a look at this video: Animations workflow: auto create animations and multi-edit.
This other video shows the automatic creation with more details, just some UI has the “old style”: Creating animations automatically
Create the animations in your game
The JSON animations file that creates Phaser Editor is fully compatible with Phaser, so you can load it using the this.load.animations() method or adding it to the pack.json file, that is loaded via the this.load.pack() method.
In Phaser Editor we recommend you to add it to the pack.json file, using the Asset Pack editor, it allows other editors inside the IDE to use the animations, especially, the Canvas (scene) editor.
Texture Packer editor
We updated the Texture Packer editor, these are the main changes:
- The Outline UI was changed, from a native tree control to a custom painted control. This allows faster filtering and zoom in/out.
- Like the New Animations wizard, the New Texture Packer wizard provides a page where to select an Asset Pack section, so the generated atlas JSON file will be added automatically to that pack section.
- In Phaser 3 there is a new atlas format: the multi-atlas. It allows mapping many output images in a single JSON file. We are setting this format by default in our Texture Packer, and probably, we are going to make it the only one output format. Our texture packer is not a general purpose tool, it is just designed to be used for Phaser games, so it is fine if we output a single Phaser format. It is not the same with the Asset Pack editor, that has to support all kind of atlas formats supported by Phaser.
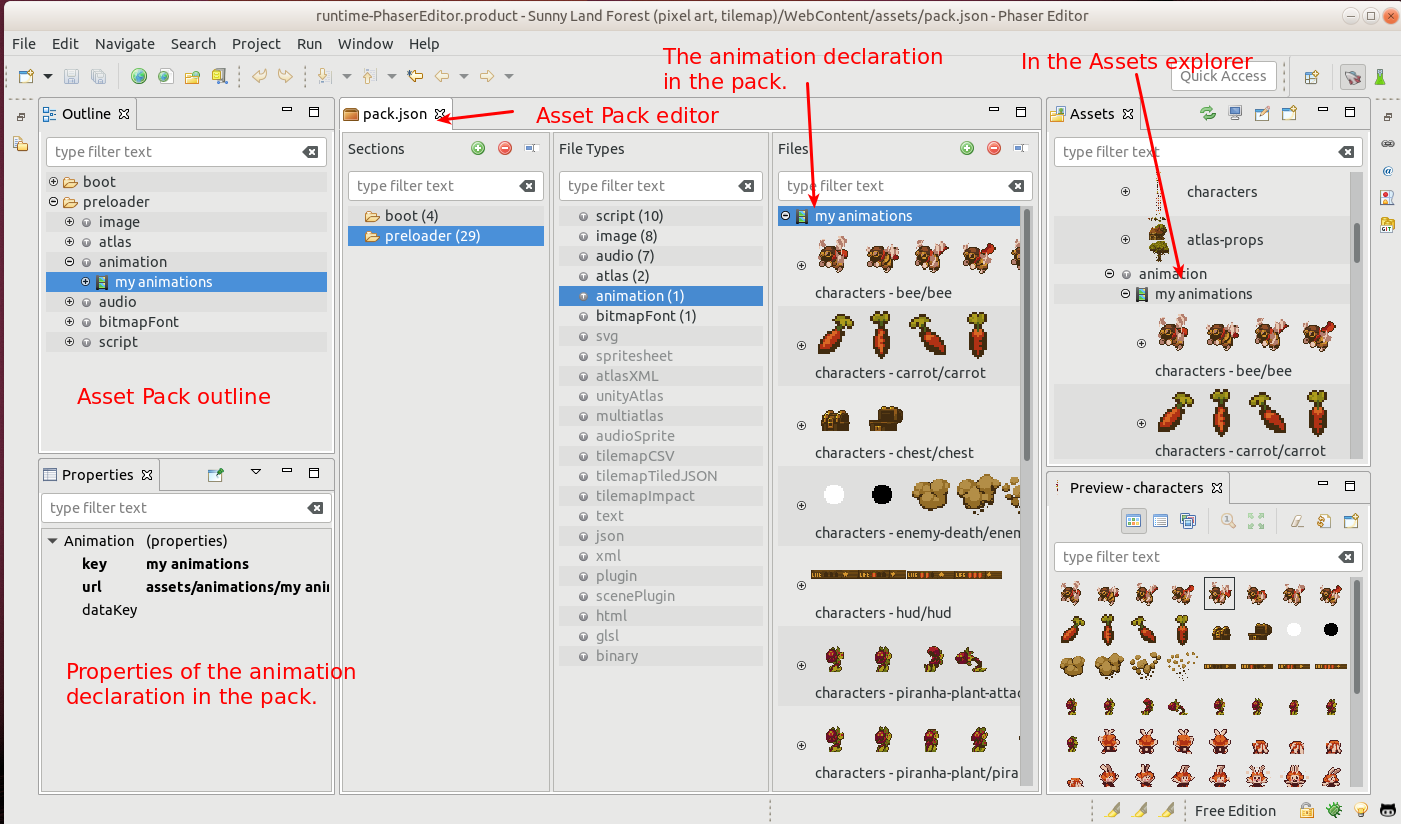
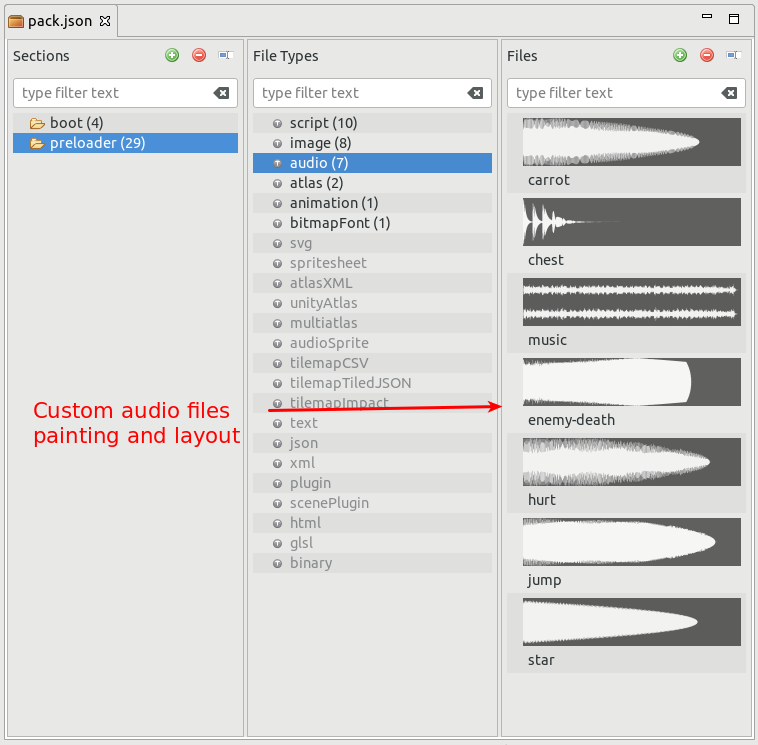
Asset Pack editor
We updated the UI of the pack editor too, with the new custom-painted controls. The advantage is faster filtering, faster loading, the zoom in/out ability and custom layouts for the different type of assets.
Assets window
The Assets window received a huge improvement. This is a very important piece of the IDE, it allows to navigate all the assets of the game and drag-drop them into the different editors.
A new look
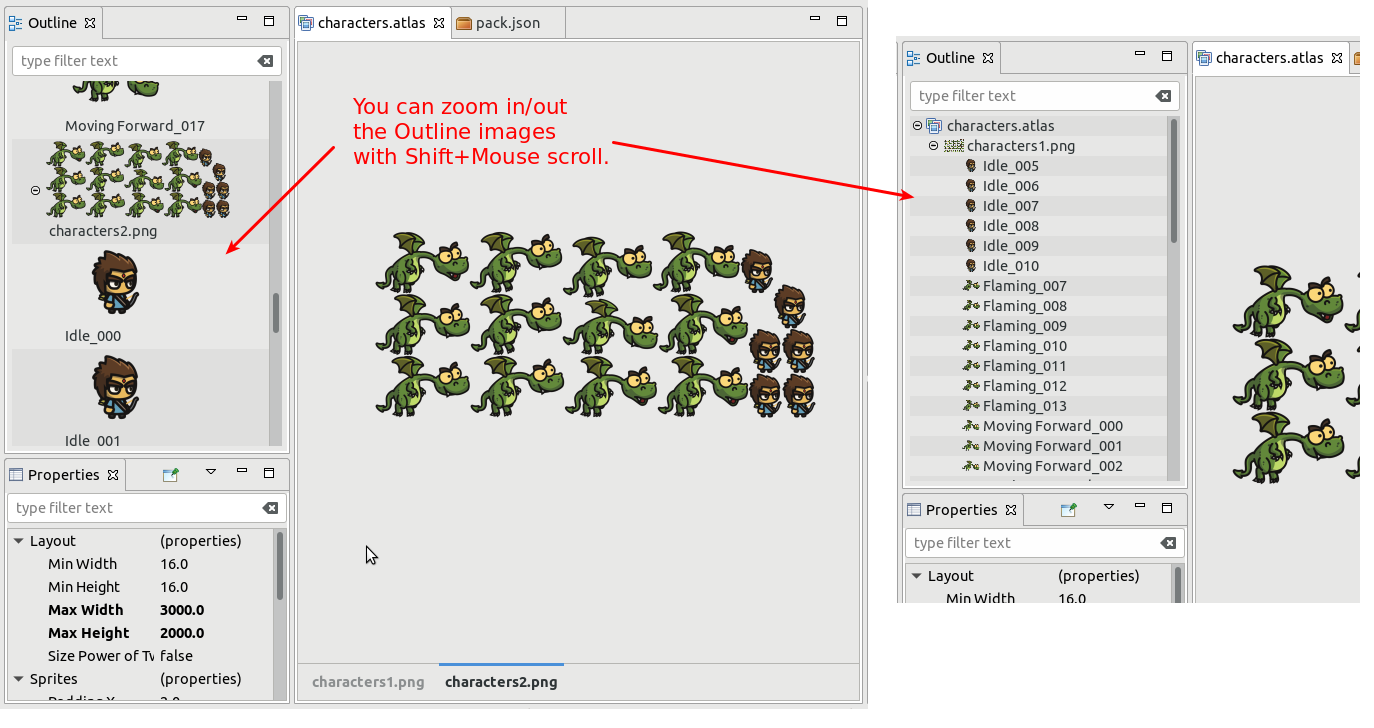
Like the other tools mentioned in this report, the native tree control used for the Assets window was replaced by a custom painted tree. Note in the following screenshots how the images, animations, bitmap fonts, atlas, spritesheet and audio assets are presented in a more readable layout. The new UI allows to zoom in/out the images and the other operations like drag and drop, preview the assets with a mouse hover, etc…
Something very important is that now filtering by the asset name is a lot faster. The native tree control is not very good for filtering, the icon images caching strategy we were using makes it too slow -in the cases of frames inside textures, like atlas/spritesheet frames-, however, with the new UI, the same image cache is shared by many other “preview” components and does not require to create reduced versions for icons.
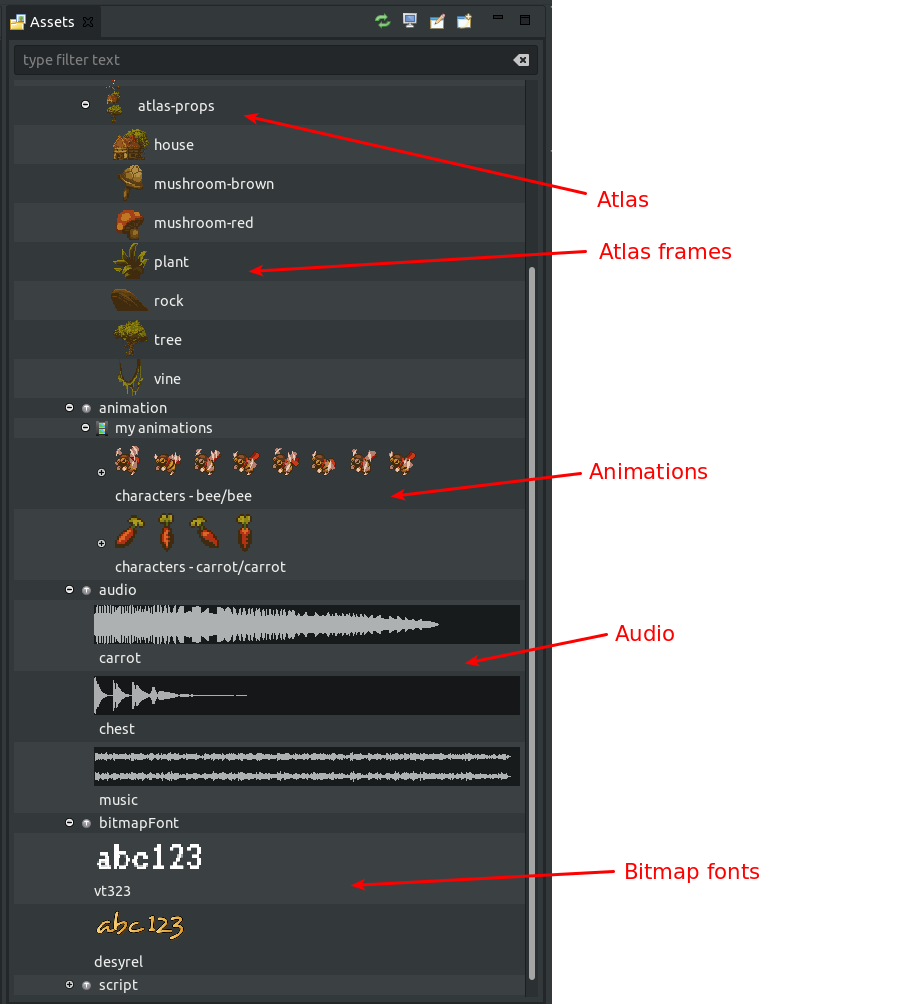
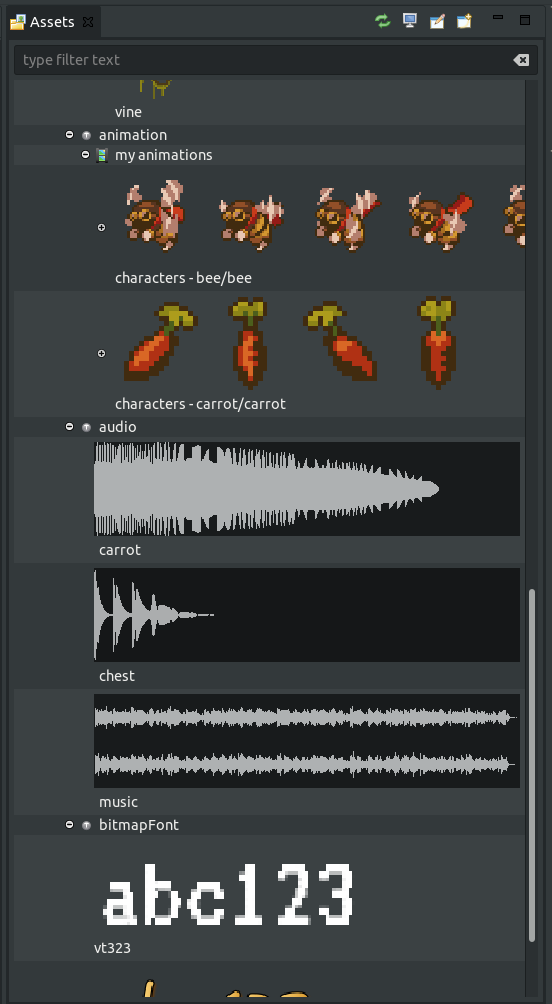
This is how it looks if you zoom it:
New content and inline buttons
Until now, the Assets window just displayed the content of the Asset Packs of a project plus the Canvas (scene & prefab) files. But now we are following the philosophy of showing all the files with a format supported by the editor: Texture Packer files, Asset Pack files, Canvas files, Animations files and the projects.
We think it is good because one of the roles of the Assets window is to provide shortcuts to the most important assets. In addition, we introduced a new element, the “action toolbar”, that is inlined together with the content. we are going to talk more about it now.
So, the Assets view now have these root elements:
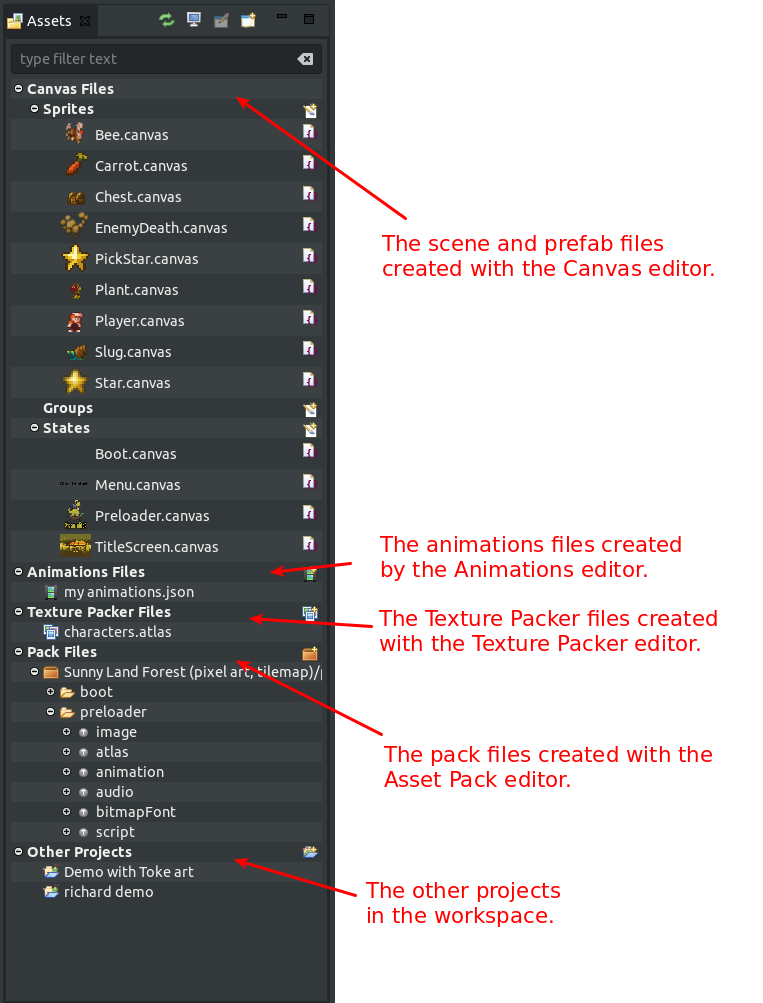
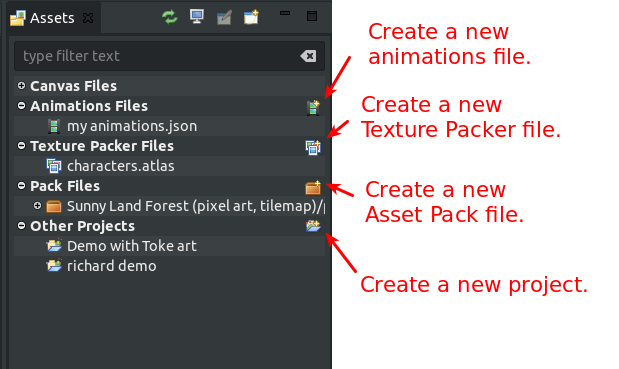
Something new with the content is that, as you can see, in the same line of some items there are icons. Those are buttons with special functions.
The icons with a star, are buttons to create new files. For example, the icon in the toolbar of the Animations Files line is a button that launches the New Animation File wizard. It is an alternative way to create new files, that we think is a good one because it could be a shortcut, instead of going to the main File menu.
We are going to make more buttons, like buttons to open an asset in the asset pack or open the file that generated that asset, or buttons to compile a particular scene or prefab.
Improved the content switching
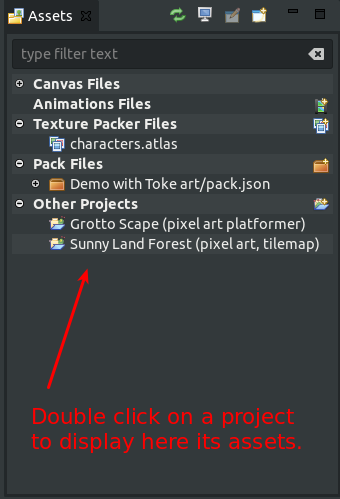
Unlike other IDEs, Phaser Editor -that is based on Eclipse IDE- supports to work on many projects -games- at the same time (they all placed in the Workspace).
However, for the sake of simplicity, we decided to show in the Assets window only the content of one project. The project to be shown, until now, was selected automatically, following the rule “we show the content of the project of the active editor”, but now, we allow to switch from one project to other, so it makes easier to find and edit the content of the whole workspace.
To switch from one project to another, just double-click the project under the Other Projects section:
Filtering by keywords
This is a new functionality we added to the Assets window. Now we assign some predefined keywords to certain asset types, so you can filter by that keywords will be tested when you filter the Assets window. This is something that can help in larger games with a lot of assets.
These are the keywords for now:
- image: the
imageassets. - texture: all the asset types with textures:
image,spritesheet,atlas,atlasXML,unityAtlas,multiatlas. - frame: all the assets with texture frames: atlas frames and spritesheet frames.
- animations: all the animations.
- pack: all the pack files.
- project: all the projects.
This is an initial work, we have to do more with keywords. Maybe we are going to extends the Asset Pack format to support adding custom keywords to the assets, or maybe we are going to create a keywords.json and make something more flexible. The Asset Pack JSON file (like the Atlas and Animations JSON files) is a file that is included in the runtime of the game, and we are not friends of add design info (like keywords) into runtime files, then a separated keywords.json file seems to be a better option, because you can cut away that file from the final game.
Preview windows
The Preview windows received a nice update with the new UI style.
Preview of the animations
The Animation is a new asset type introduced in Phaser 3, we created a new preview UI for them. As you can see, it is pretty similar to the Animations editor:
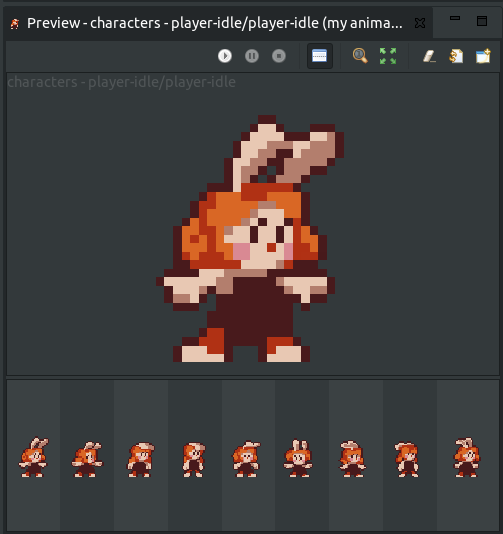
Here you can see the animations Preview in action. Some tree-UI elements use the old style but the animations part is the same.
Preview of the sprite-sheets
The Preview of the spritesheets now uses the new UI controls. It has three modes: texture, grid, and list. The animations mode was removed, since now the recommended way to create and preview the animations of your games is using the new Phaser 3 animations format.
![]()
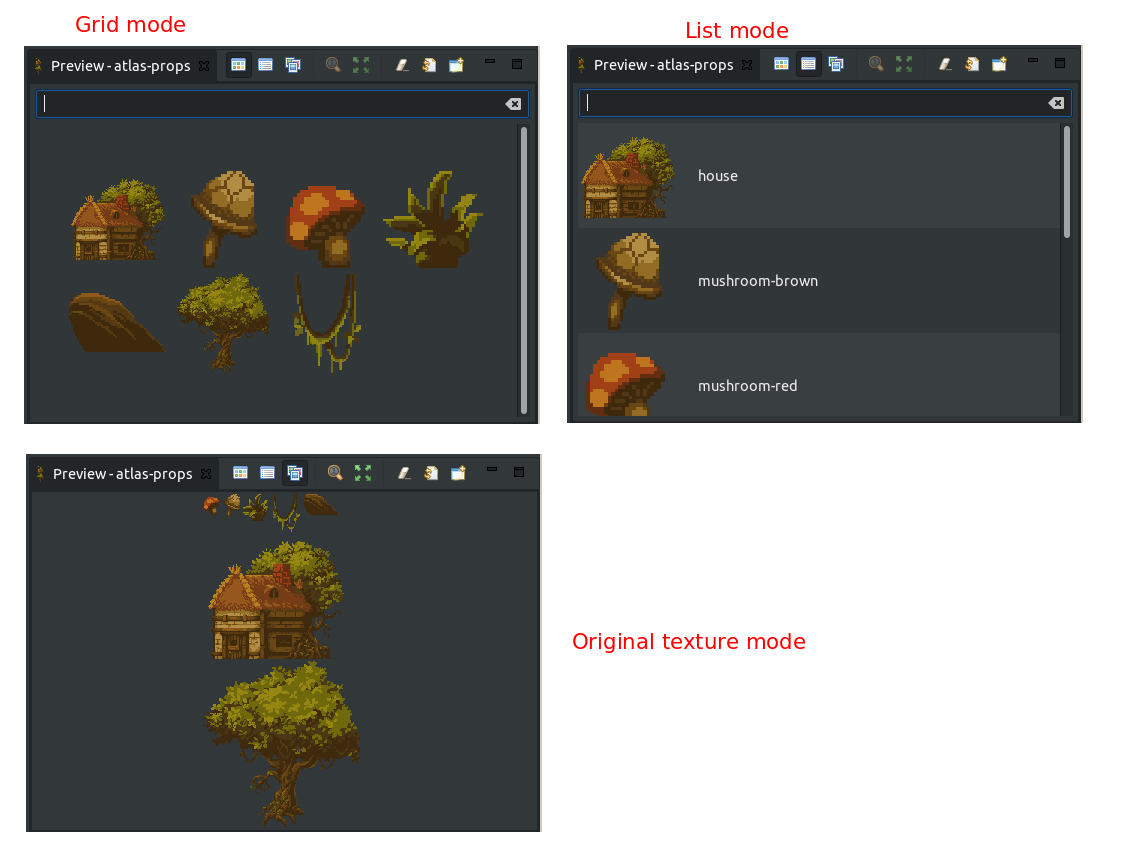
Preview of the atlases
The same, now the preview of the atlas assets does not use native widgets, else the new tree-UI. The list and grid mode can be zoomable and filtered -and filtering is faster-.
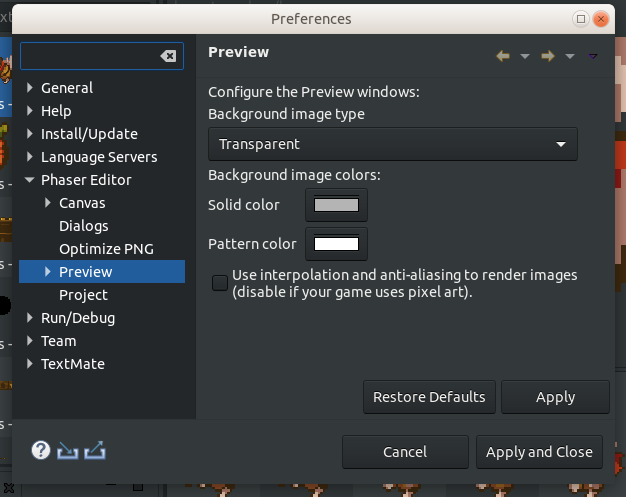
Pixel art rendering
We added a new parameter to enable/disable antialiasing and interpolation. Pixel art based should disable this parameter.
See the Preview preferences page:
Improved Drag and Drop
Until now, the image used by the the drag and drop of textures was set by default, taking the icon of element (when it is in a tree). We changed that, now we build a new image with a bigger size and certain transparency, so you can see it better, and it works in native widgets and the new custom UI.
The new UI widgets
Well, we was talking about it. We are replacing all assets navigators native UI with a custom-home-made UI. The reason is that the native UI is a bit limited, it depends on the operating system and things like zoom or custom layout are hard to implement.
- This new UI can be zoomed.
- The rows can be custom-painted. It is the case of the animations, bitmap font, audio assets.
- The filtering and loading is super fast: it uses the global image cache.
- The drag and drop uses bigger images.
- It provides the same functionalities of the native UI and we have full control to improve it in the feature, its limit is the imagination.
Keep in touch! Arian
Tags: animations, asset, pack, preview, report