Phaser Editor v2 development progress (report 2)
July 26, 2018 - Posted in phaser-editor-v2
Hi, this is a new report of the Phaser Editor v2 development process. As you may know, the main goal of this version is to support Phaser v3. In the past month we worked mainly on migrate the Asset Pack editor to the new Phaser v3 Asset Pack format, but at the same time, we improved other parts of the editor, especially the Examples stuff.
New Asset Pack editor
The Asset Pack file (pack.json) is a key element on the Phaser Editor workflow. This file contains a manifest of all the assets to be loaded in your game. Other tools, like the Canvas (scene) editor, use these asset models to create the visual objects.
A new Asset Pack format
The Asset Pack format is built-in on Phaser since version 2. In version 3, it keeps the same purpose but with a new syntax, so the first we did was to update the Asset Pack parser, that recognizes tricky constructions based on default types, default extensions or default paths. Here you can learn more about this type of file in the Phaser 3 docs.
At the same time, Phaser 3 supports new file types (atlasXML, unityAtlas, multiatlas, tilemapImpact, html, svg, glsl, plugin, scenePlugin, animation) and we had to create new parsers (like the unityAtlas and multiatlas parsers) internal models, field editors and in some cases preview components.
A new Asset Pack editor layout
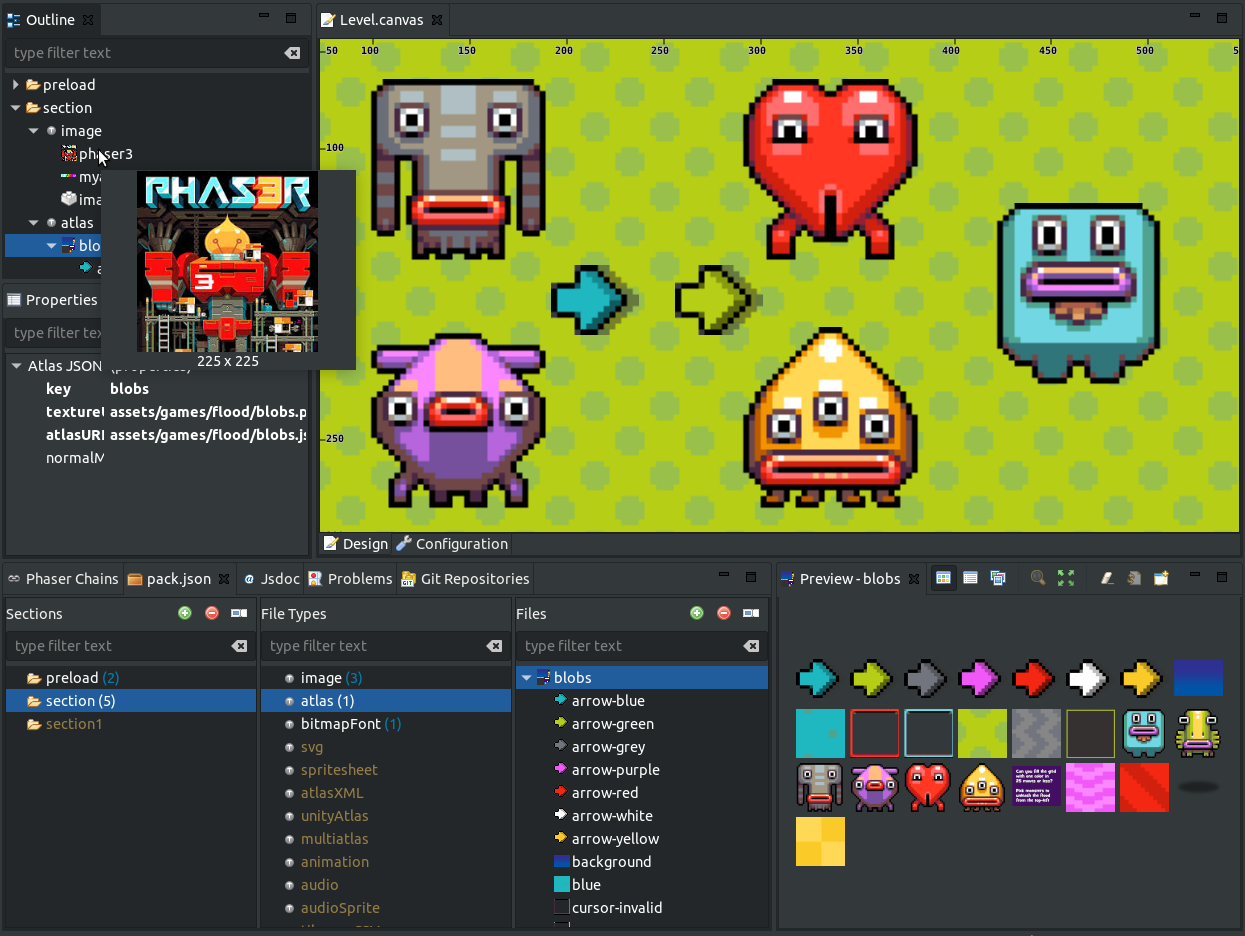
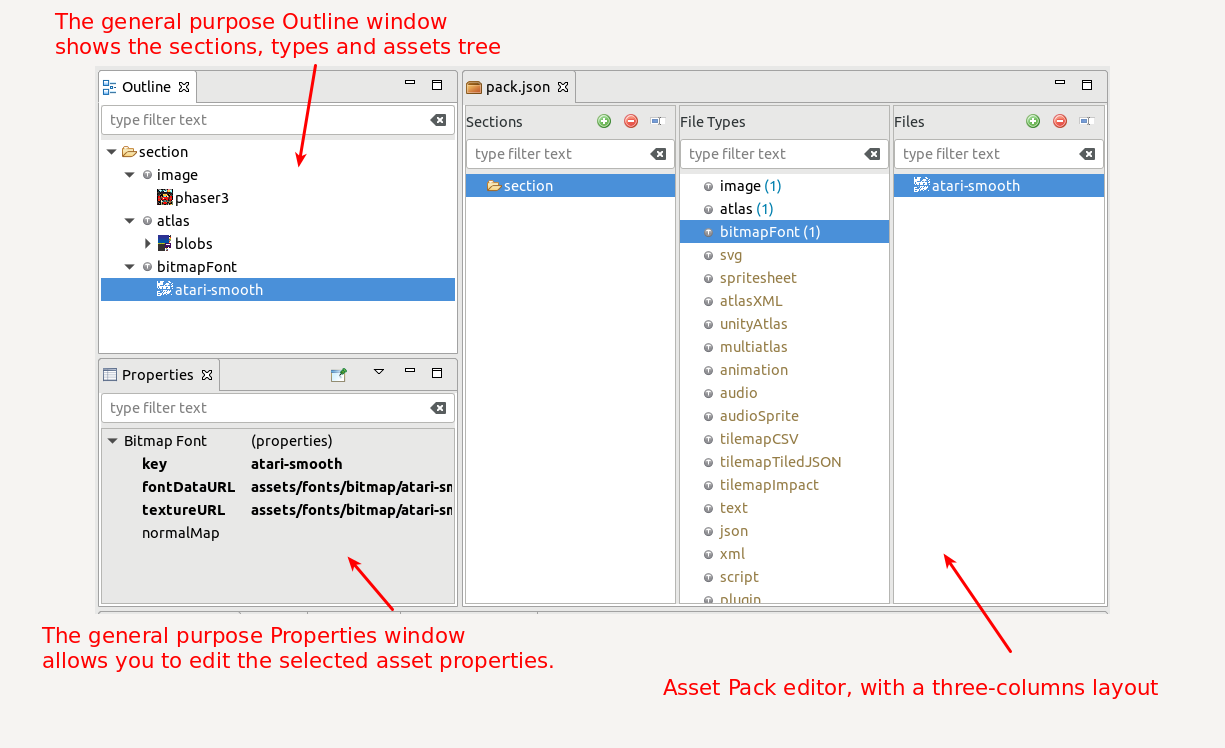
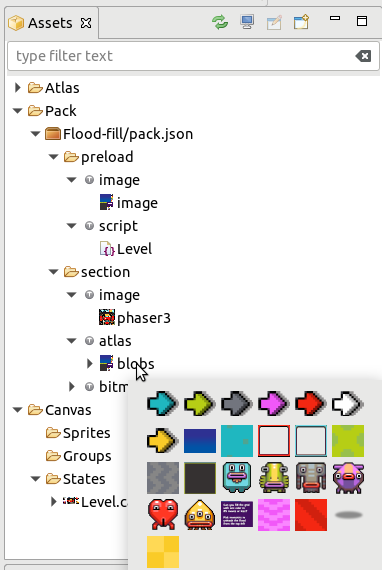
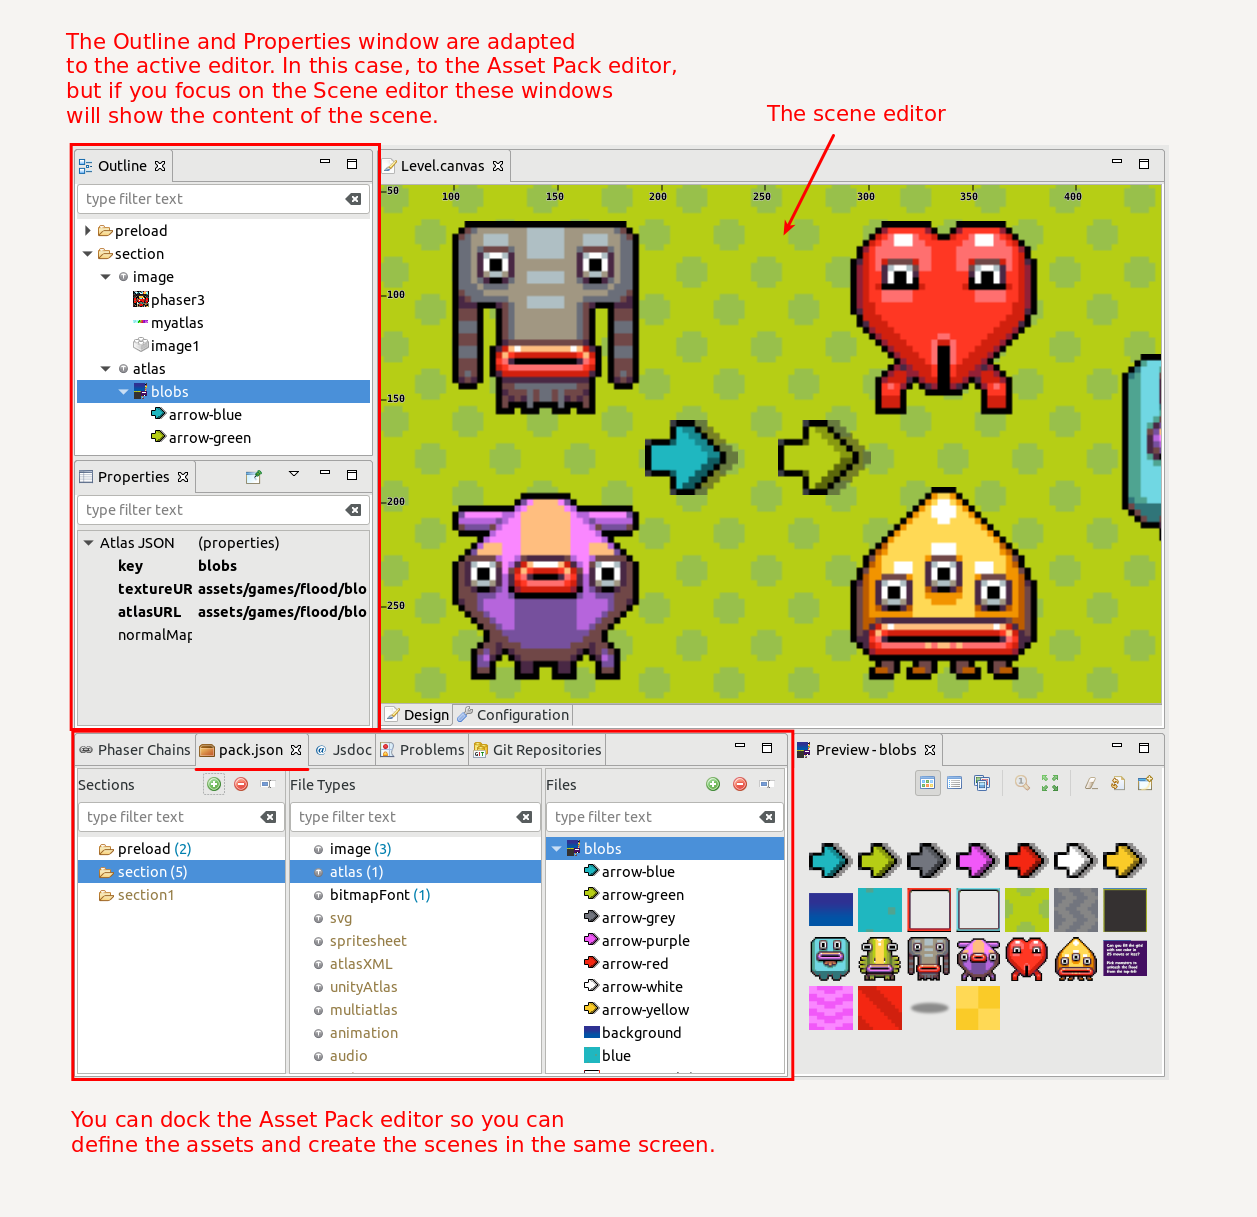
In Phaser Editor v2 we are introducing a new way to navigate and edit objects. Now all editors will be connected with an Outline and Properties windows. In Report 1, we showed the Texture Packer editor, you can see how the Outline window shows the hierarchy of the textures and the frames, and the Properties window shows the properties of the selected texture or frame. In the new Asset Pack editor, it is the same, the Outline window shows the hierarchy of the assets and the Properties window allows you to edit the properties of the selected asset.
The other main change is that now the editor has a new layout, instead of showing a tree formed by the sections, file types, and assets, it now shows three columns: one for the sections, one for the file types and other for the files or assets. We think this is a more straight design and is complemented by the navigation provided by the Outline window.
Create, edit, rename, move and delete the elements
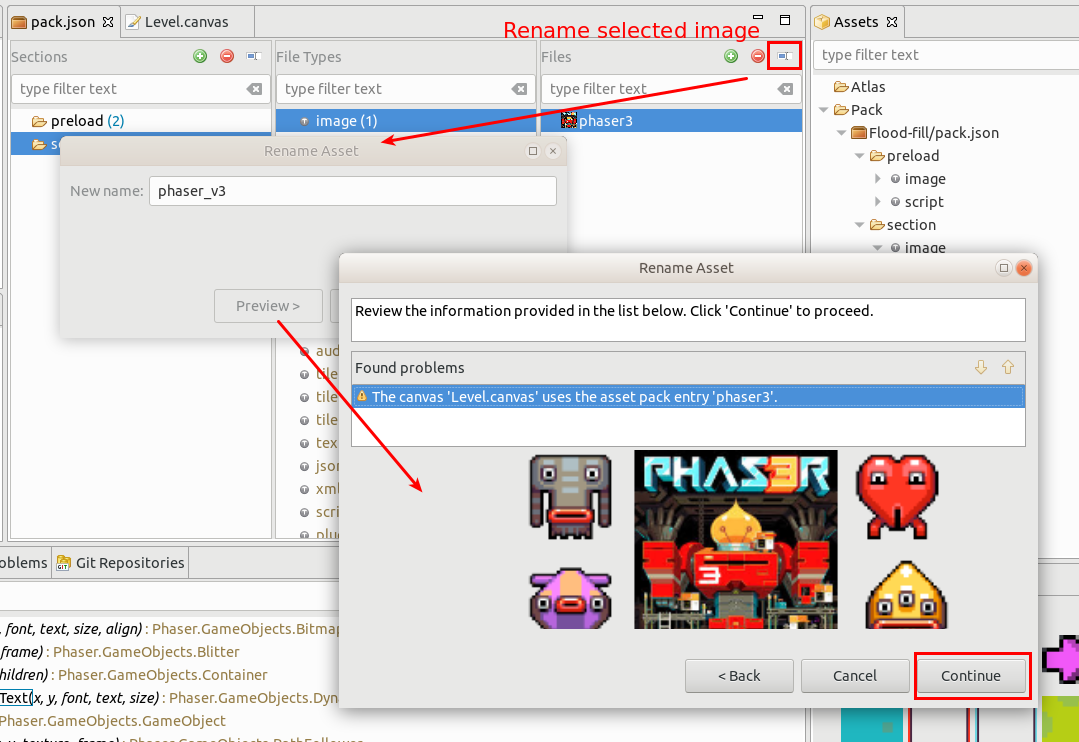
Note the Sections and Files columns contains a toolbar with three buttons: Add, Delete and Rename. In addition, you can use the DELETE key to delete an element, and the F2 key to rename an element.
When you press the Add button in the Files column, it will create a new asset inside the selected section (in column 1) with the selected type (in column 2). By default, it will try to fill some fields automatically, by taking unused files from the containing folder tree of the pack.json file.
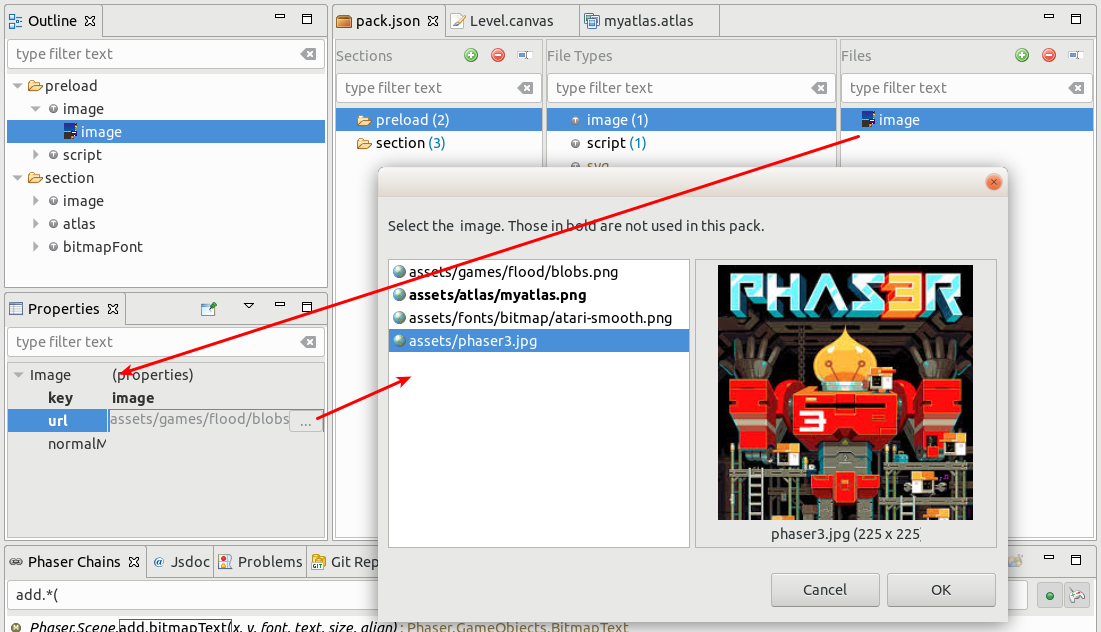
As in the previous version, some property editors provides specialized UI, like the images URL editors, that shows a dialog where you can select an image file and preview it.
When you delete or rename an element, it opens the refactoring dialog. This dialog shows you the other files in your project that are affected by the change you pretend to do. For example, it shows all the scene files that are using the elements to be changed. In case of a rename or a move, the Canvas files are updated with the new names.
To move an asset from one section to other, drag the asset (or many of them) and drop it in the new section. Like in the Delete and Rename operation, a refactoring dialog opens to show the affected files in the workspace. All refactoring operations are undoable.
Like in version 1 of the editor, all the assets declared in the Asset Pack file are shown in the Pack section of the Assets window.
Something we really like from the Eclipse IDE (the base of Phaser Editor) is that you can minimize, maximize, detach and dock the views and editors. Look in the next image how you can dock the Asset Pack editor so you can work on the scene and define the needed assets all in the same windows, without the need to switch tabs, and the Outline and Properties windows are adapted to the active editor so here you can reuse the same space.
Improved the computing of the Examples metadata
The Phaser examples metadata we use in the editor is formed by the hierarchy of the examples and the categories plus a mapping of an example and the assets used by it. We use this mapping to create a project for a specific example. To create a project from an example is a really powerful feature, it allows you and me to learn Phaser and experiment with its API and formats. In this iteration, we did a better job to create that example-assets mapping. Before, we parsed the sources to extract the files, but that algorithm got too complex because there are assets that are not “referenced” in the source code, else inside other assets like atlases or packs. So we created a new way of map the examples: now we are running all the examples one by one, in a headless browser -thanks JavaFX WebEngine!-, and catching all the assets loaded by the browser. This new method just works! Now we can create more accurate examples-based projects. Not all the examples work because not all the examples are right, actually, we did some pull requests to fix some of them, but this is a huge step towards a more powerful tool.
By the way, now when you visit an example in the Examples Local Website of the editor, it shows a list of the files involved in the example, so you can open those assets in the browser or download them. We think the more information you have the more you can hack and learn. Yet a better styling of this website is missing.
Remember in Phaser editor you can launch an example from the selection in the Phaser Chains window, the Phaser Examples window or the Phaser Examples Project.
Update to Eclipse IDE Photon and Java 10
In this iteration, we updated to the latest Java (JDK 10) and Eclipse IDE (Photon) versions. This is always a challenge, Java is evolving fast and certain things get incompatibles or an extra work should be done, like the JavaFX and Eclipse SWT bridge. Yet we have some issues with Linux. We had to expend some time trying with the OpenJDK distribution of Java and finally, we realized that JavaFX is not included there and the best is to use the Oracle JDK. The good with all of these is that Phaser Editor is packaged together with Java so at the end the user does not have to deal with it.
The last Eclipse IDE version included a lot of improvements, you can read about it here.
What’s next?
Now that the Asset Pack editor and related components are ready we can start working on the Animations editor. In Phaser 3, the animations are a bit different, they are global and there is a format for them, so you can load the animations as assets. With this new Animations editor, you will be able to create the animations with the images, sprite-sheets, and atlases defined in the pack and generate a Phaser 3 Animations JSON file that you can load in your game.
We are closer to release a preview version of Phaser Editor. Only is missing to implement the Animations editor and to migrate the Canvas (scene) editor. Maybe in two months or three, the preview version will be ready.
See you soon, keep in touch!
Tags: asset-pack, examples, asset pack