Phaser Editor v1.5.0 released
April 02, 2018 - Posted in release
Hi,
This is an important day for Phaser Editor, we are releasing Phaser Editor v1.5.0 with a lot of new features, but what is more important, with a new licensing concept that will make the editor more accessible for many users.
Between the new features, there are the BitmapText and Tilemap support in the scene editor, two new type of objects that are many times used in Phaser games and now to create and edit them is just easy in our editor. Other important changes are the new transformation manipulators and shortcuts pane.
At the end of the article, we talk a bit about our plan to support Phaser 3.
(The images shown in this article are screen-shots of Phaser Editor v1.5.0 running on Ubuntu 17.04, with the DarK theme of the Gnome desktop)
The Free and Premium modes
In this release, we implemented a “freemium” model that we hope is going to help to create a bigger community around the editor. When you download the editor, by default, you will use it in a “free” mode. This mode allows you to use all the features of the editor, but you are limited in the number of scenes (canvas files), tilemaps and texture atlases.
Canvas files: limited to 15. Tilemaps: limited to 5. Texture atlases: limited to 3.
In the bottom/right corner you will see a Free Edition message:

The “premium” mode removes that limits, so you can use the editor in all its potential, just like before. To go premium, you have to purchase a license and activate the editor.
In the bottom/right corner you will see a Premium Edition message:

We think that lot of games fit in that “free” limits, our goal is to provide a free alternative that you can use to create a Game Jam entry, a school project, a prototype of a game and similar projects. We just hope this is going to rise the community, something that is going to impact in the editor quality and will be very useful for the professional game developers, who will get more references and trust.
Important: if you activated the editor days before, and you want to work with v1.5.0, you will need to activate it again. We implemented a stronger license verification but unfortunately, it is not compatible with the old data. All that you have to do is to activate the editor again, just once. If you find any issue or you don’t have the license key at hand, please contact us.
BitmapText support
BitmapText (Phaser.BitmapText) is a type of object that you can use to add texts to the game. These objects use an image with the characters and a descriptor file. This is very used in games and the main advantage in comparison with the Text objects is that you don’t need to load a complete font (web font, TTF, etc…) and its rendering is exactly the same in all platforms, so it is a portable alternative.
Create a BitmapText
To create a BitmapText object in a scene, first you have to add the BitmapFont asset to the asset pack, then drop that asset into the scene. Let’s do it step by step, using the VT323 bitmap font of the new Sunny Land Forest project template.
Add a new bitmapFont asset to the pack:
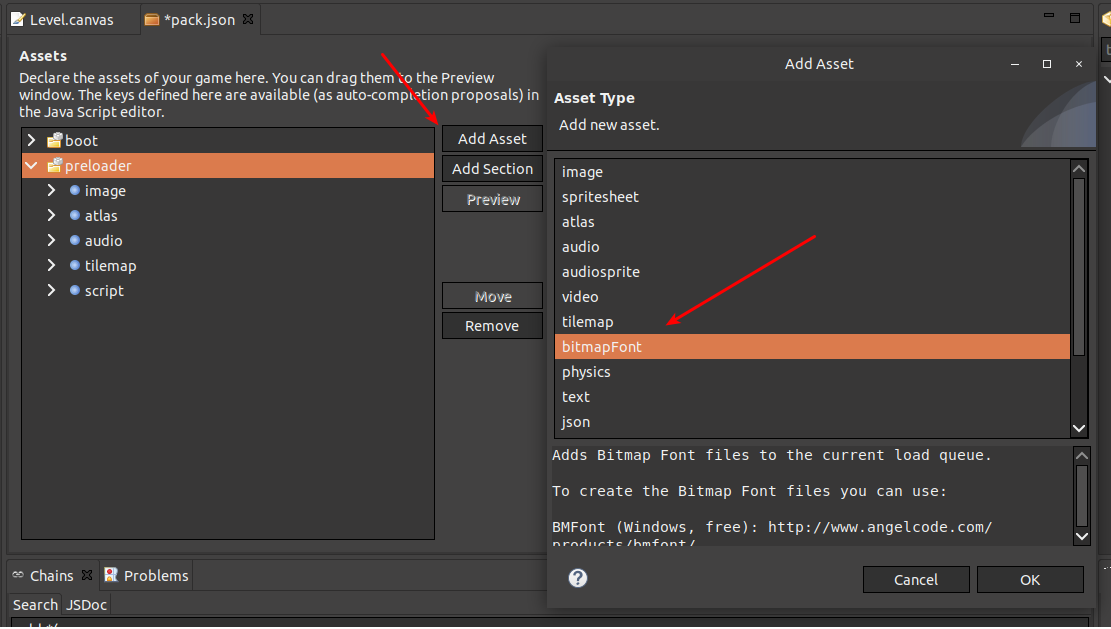
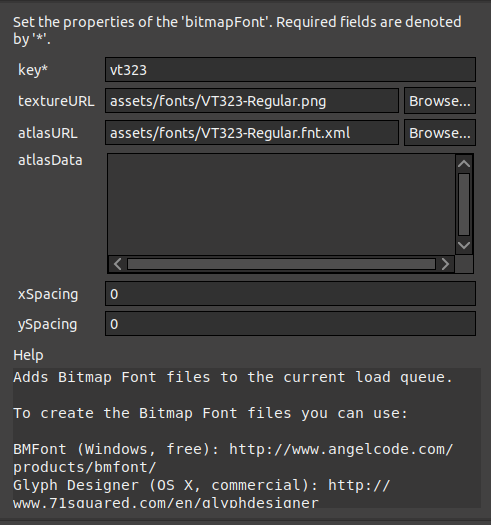
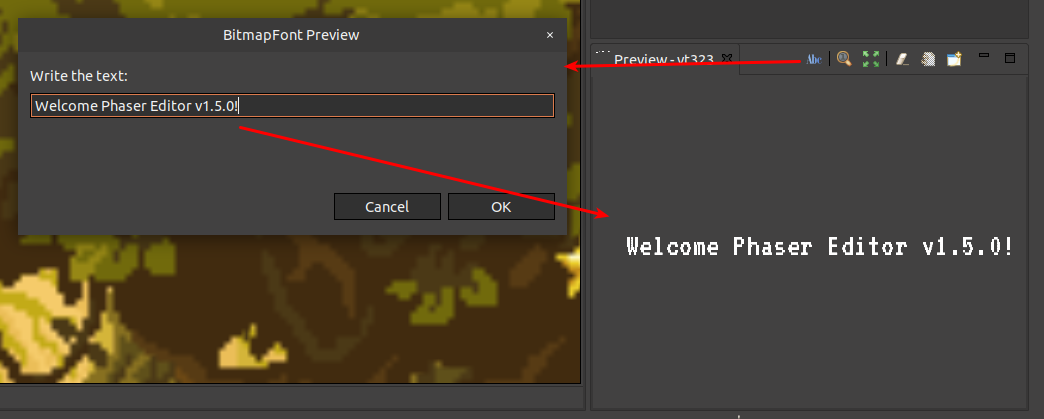
By the way, you can preview how a BitmapFont asset renders by opening the asset entry in the Preview window, then click on the “Set demo text” button on the toolbar and write a line:
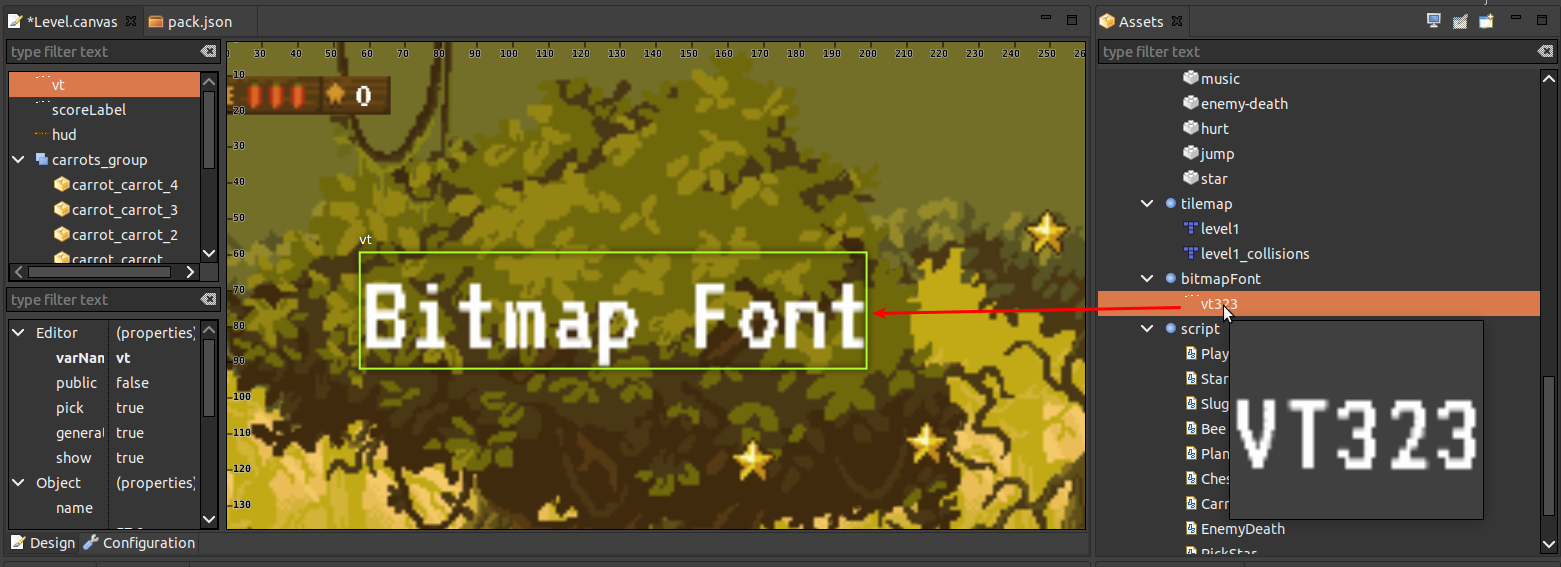
The BitmapFont asset is ready, so drag it from the Assets view and drop it to the scene:
To change the text you can press the key X, or change it (and other properties like size) in the Property Grid.
Create Bitmap Text prefabs
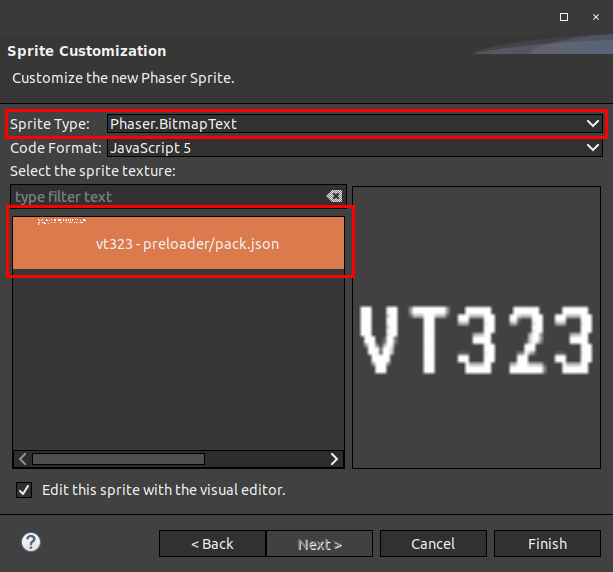
Another way to add bitmap texts to the scene is to create a BitmapText prefab. The advantage of a BitmapText prefab is that you can set properties and behaviors that will be shared by all the instances. To create a BitmapText prefab open the New Sprite Prefab wizard dialog and select in the Sprite Type field the Phaser.BitmapText type:
Morph into Text or change the bitmap font
You can morph a bitmap text object into a text object (Phaser.Text) and morph a text into a bitmap font (actually, you can morph into any other sprite type or from any sprite type, it just will ask for the new texture). This helps to start making a game when all the art is not complete, so when the bitmap text art is ready then it is easier to change the texts of the scenes or the images used as texts. In addition, you always can change the BitmapFont of a BitmapText object, right click on the object and select in the context menu Text > Change Font, it shows a dialog with all the available BitmapFont assets.
To help font updates you can run the command Text > Select all texts with the same font.
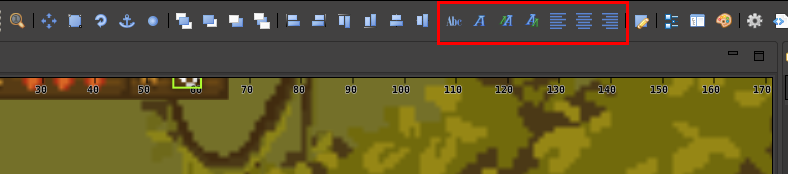
Toolbar actions
Just take a look at the new buttons in the scene toolbar, they are about to change the font, the size or align Text and BitmapText objects:
Tilemap support
Tilemap support is something that we wanted to add a long time ago and finally is coming to Phaser Editor. Now you can add a Tilemap object to the scene and change key properties like collision indexes, tile size and tileset image. Only the CSV format is supported, the Tiled JSON format will be included in the future.
(Try the new Sunny Land Forest Phaser Editor Example project template, it contains a tilemap showcase)
Add a Tilemap asset to the asset pack
As usual, the first step to add an object to the scene is to define the asset of that object in the asset pack. Remember, only CSV tilemaps are supported by the scene editor:
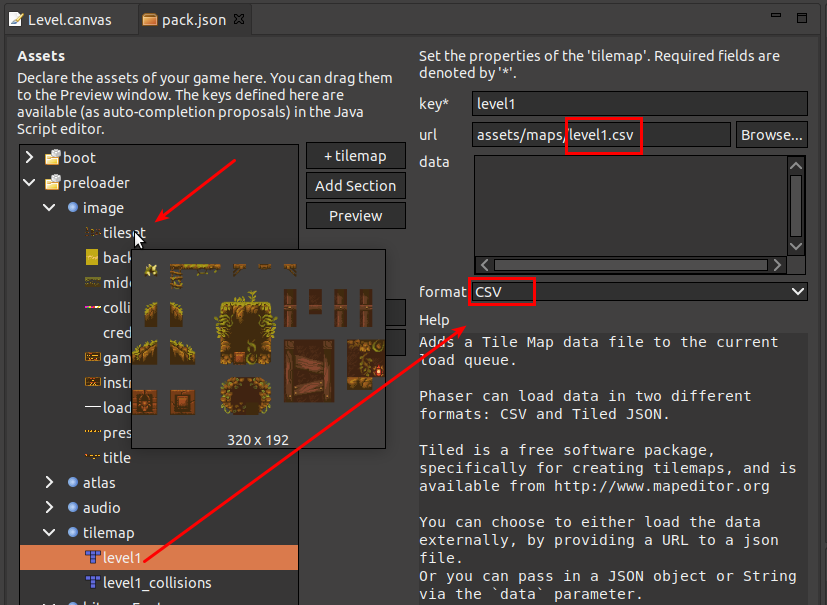
Note in the above image that we point to a tileset image, each CSV tilemap needs a tileset image to render the tiles.
Tilemap preview
You can open a CSV Tilemap in the Preview window, just drag it from the Assets view and drop it in the Preview window:
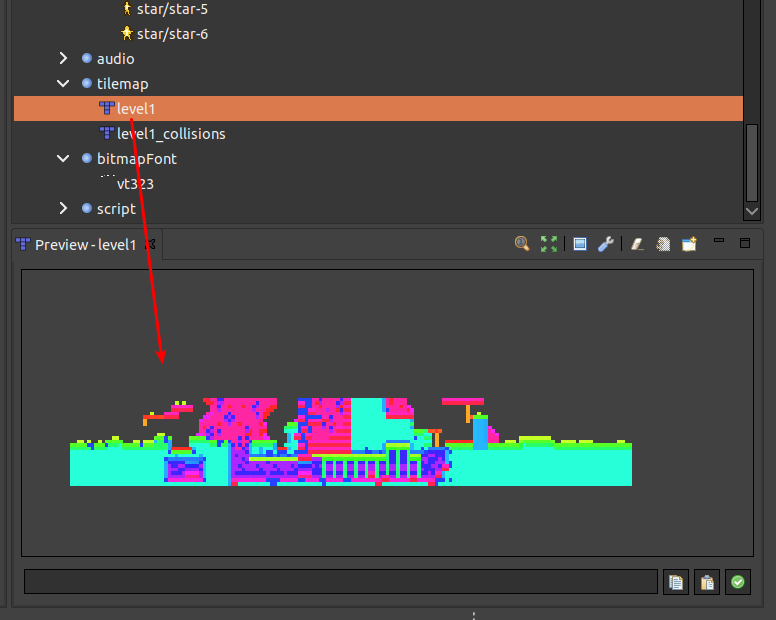
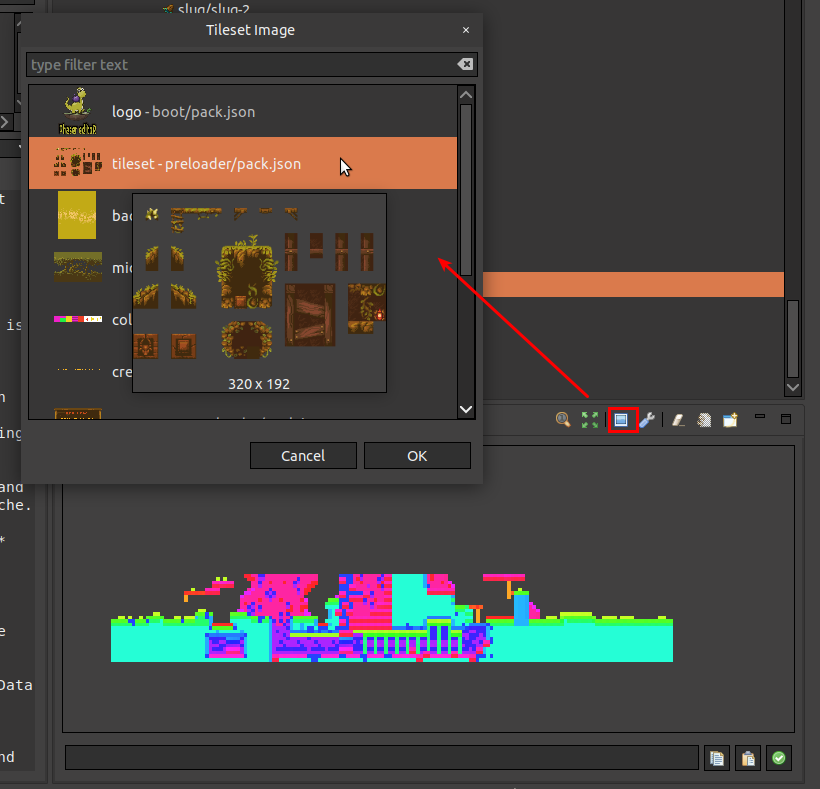
As you can see, it shows strange colors. It is because the CSV format of a tilemap does not provide any information about the tileset, so it assigns a different color to each tile ID. The next step is to assign the right tileset image and tile size to the map. Click on the “Select tileset image” button, it opens a dialog with all the images defined in the asset pack, then select the right one:
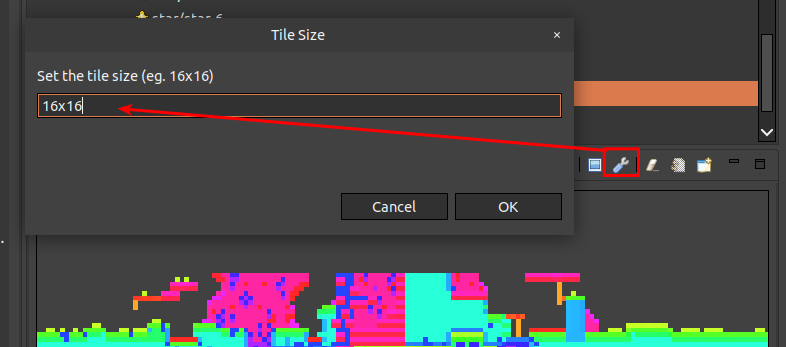
By default, it uses a 32x32 tile size. To change this value click on the “settings” button:
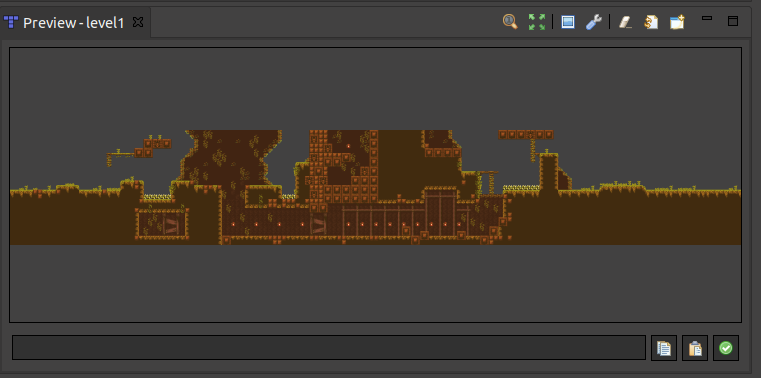
If you set the right values then the map will render well:
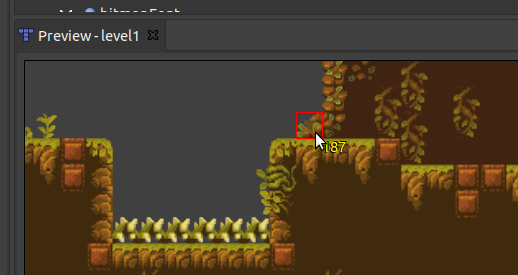
As any other preview based on images, you can zoom in/on with the mouse wheel, and drag the image by holding the mouse middle button. Note that when you hover the mouse in the map, it displays a little label with the ID of the pointing tile. This is very useful to implement game actions that depend on the tile ID:
Another nice feature is that you can select all tiles of the same ID, and build a list of IDs (tileset indexes) that you can use in your game to set collisions or any other kind of testing. To select a single tile, click on it. To select all the tiles with the same ID of the pointing tile, double-click or press the SPACE key:
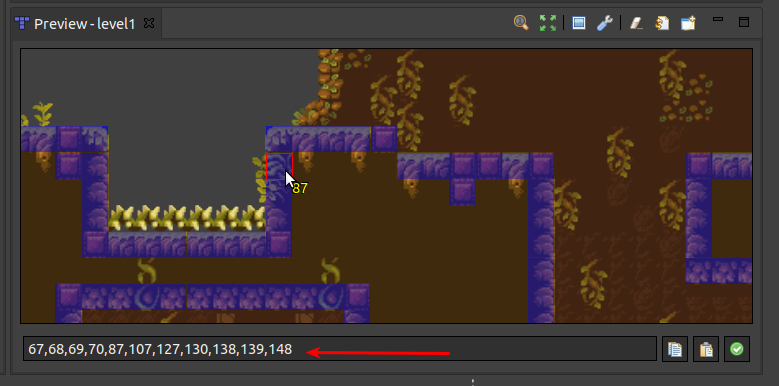
Look there is a text field where the list of ID is written. You can copy that list or even change the list by writing the numbers directly, then press the “check” button to update the selection in the image. A common workflow is to paste that ID list into your game code or copy a list from your game code and paste it into the preview window, to see where the IDs are placed in the map.
Add a Tilemap object to the scene
To add a tilemap to the scene is like any other object, drag it from the Assets window and drop it into the scene. Like in the Preview window, at the first time you have to set the tileset image and the tile size. Just look into the properties under the section Tilemap of the Property Grid:
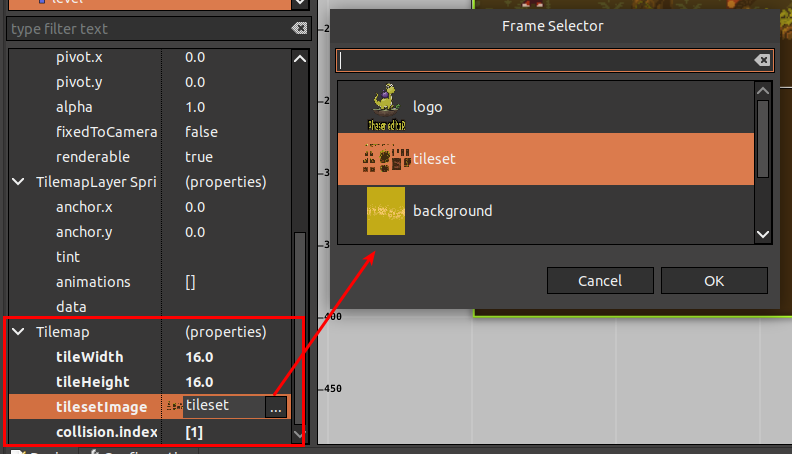
Note you can change the tile size, tileset image, and collision indexes.
The Phaser code generated by the editor and associated with a tilemap scene object looks like this:
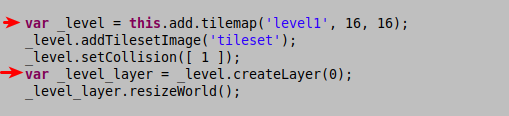
Note there are generated two variables for the “level” object: one for the tilemap (_level) and other for the tilemap layer (_level_layer). CSV based tilemaps only need one tilemap layer, so you do not have to create that layer manually. If you set the tilemap as public, then both vars will be assigned to the fields fLevel and fLevel_layer, so you can use all the methods provided by the Phaser Tilemap API.
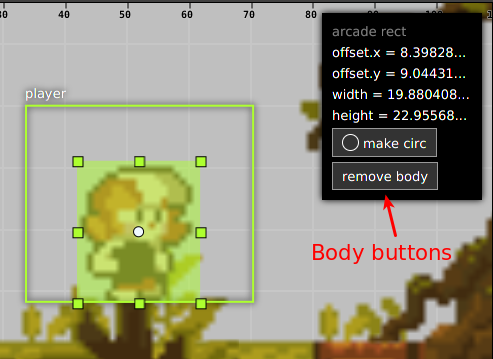
Transformation manipulators
We did an effort to give a better look and make more useful the transformation manipulators: translate, scale and rotate; and other manipulators like pivot, anchor and arcade bodies.
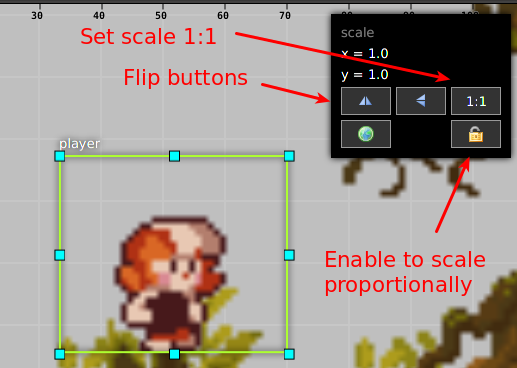
We introduced the Shortcuts pane. It is a small pane that is shown together with the transformation manipulators, and contains useful shortcuts like set the scale 1:1, or change the value of X, or set the transformation in the local or global coordinates.
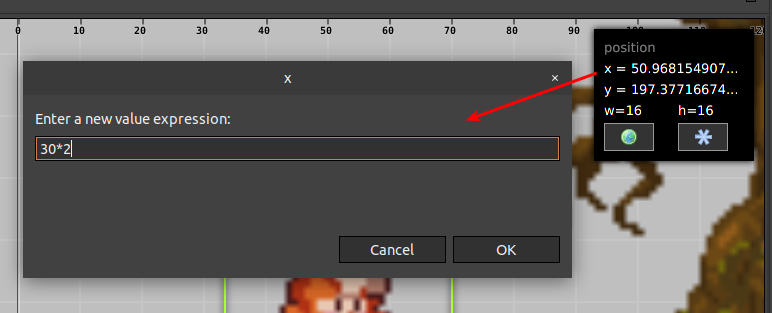
The translate manipulators:
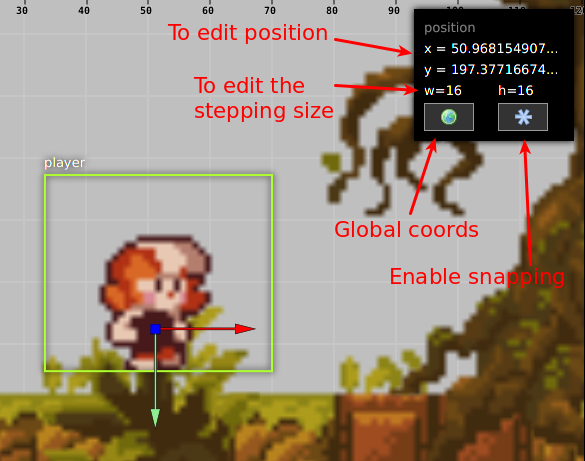
You can click on any of the shown fields (position X, Y or stepping W, H) then an editor dialog is opened. In that editor, you can write the value or a expression (JavScript syntax) that is evaluated and the result is set to the field:
The scale manipulators:
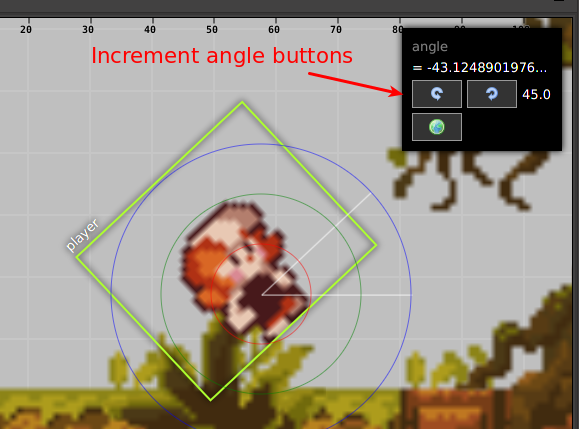
The rotation manipulators:
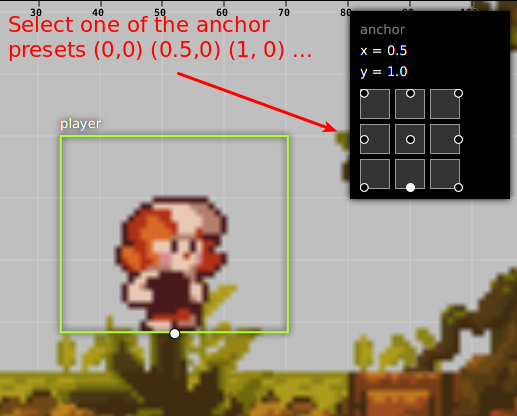
The anchor manipulator:
The pivot manipulators are pretty similar to the anchor one.
Arcade physics body manipulators:
Tile sprite manipulators:
![]()
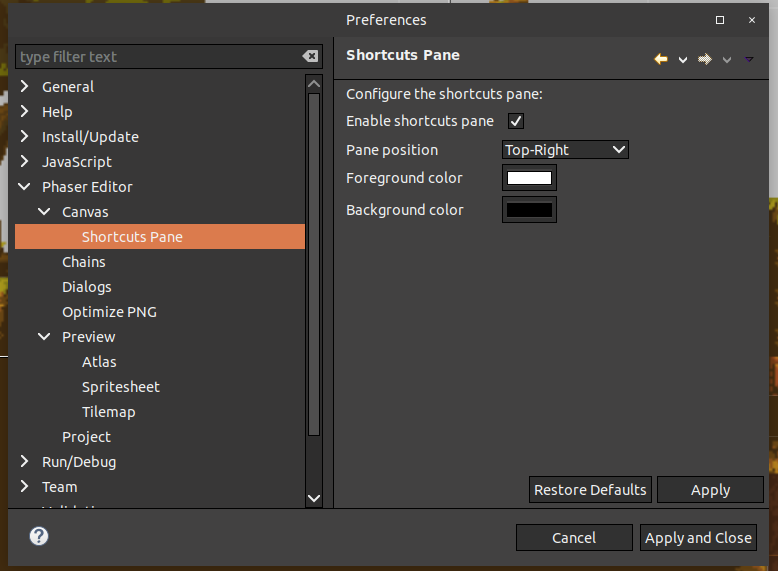
User preferences
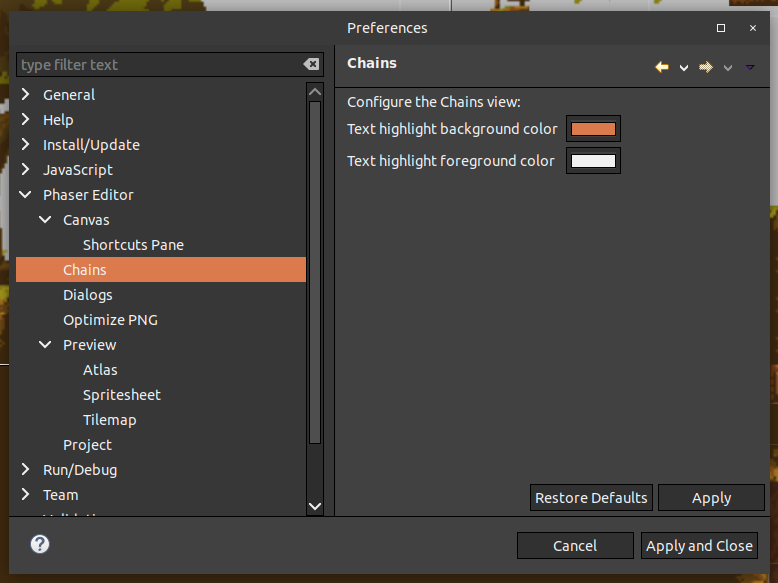
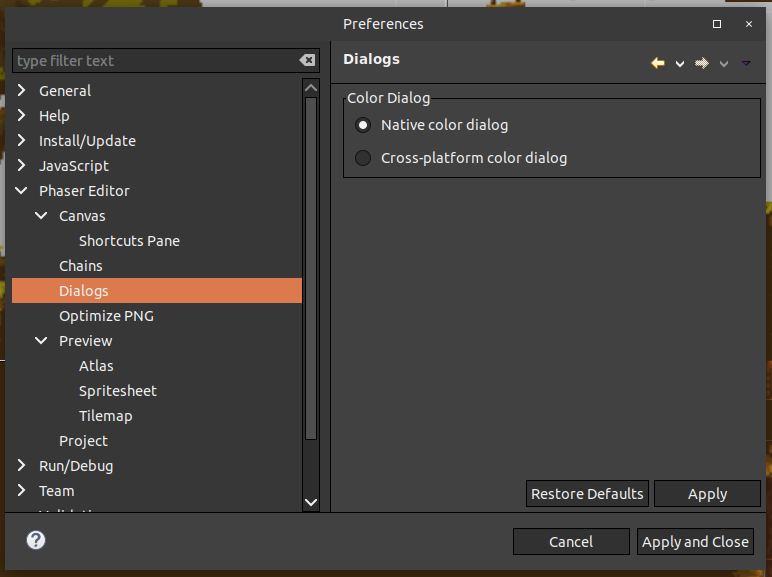
We added some preferences to make it more customizable the editor, and eventually, we are going to add more. To change a preference (setting), open the Preferences dialog by clicking on the menu option Help > Window > Preferences, then go to the Phaser Editor category.
Chains
Change the highlighting colors, very helpful in dark themes. See https://github.com/PhaserEditor2D/PhaserEditor/issues/44
Dialogs
These preferences allow you to choose between the native color dialog or a multi-platform color dialog provided by Java. We recommend the multi-platform color dialog in Windows since it allows to set hex colors. See https://github.com/PhaserEditor2D/PhaserEditor/issues/55
Preview
These preferences affect all preview components that show an image. Before, all images were rendered with a pattern background, now you can change that background to transparent, solid or with a pattern.
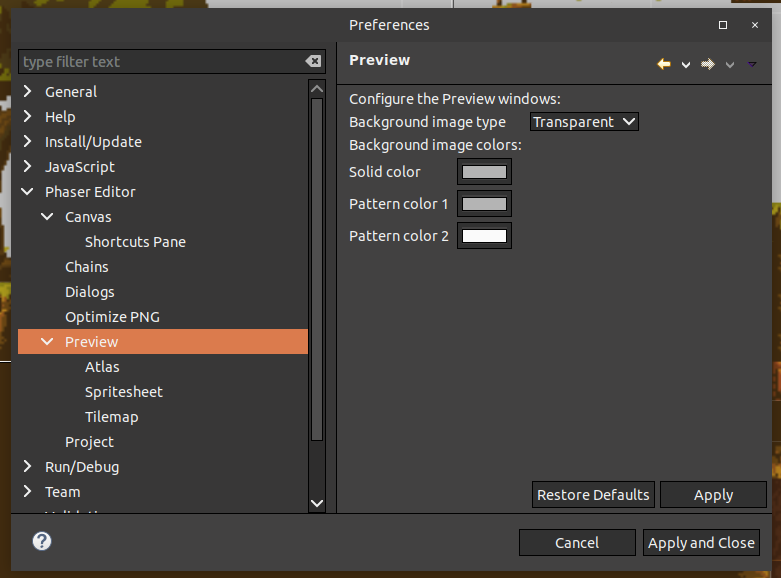
Now, by default, the background of images is transparent, like this:
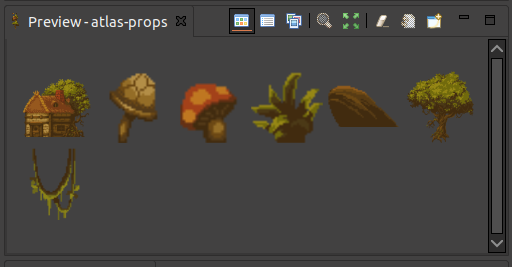
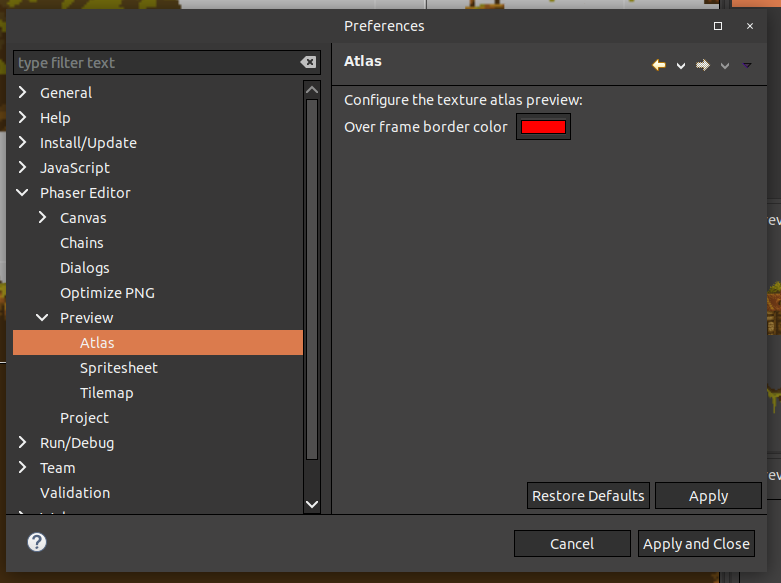
Preview of Atlas
Preview of Spritesheet
![]()
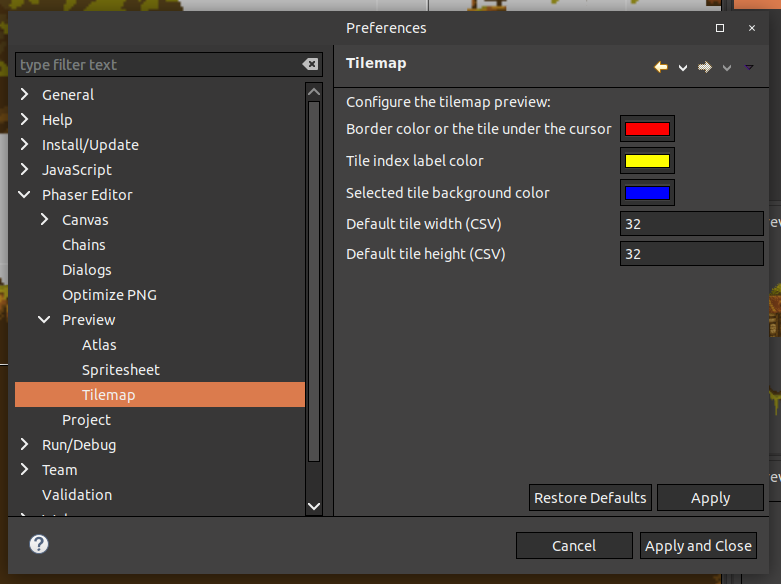
Preview of Tilemap
Project
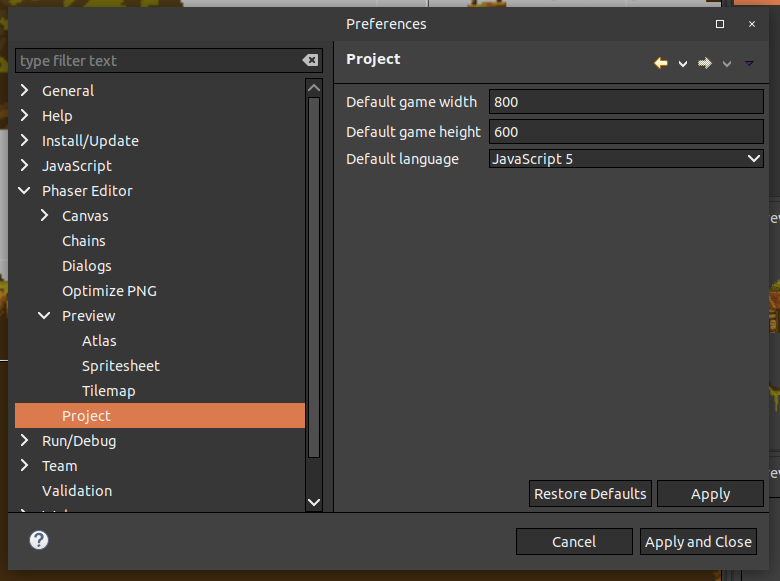
Miscellaneous
- Now the command
Edit bodycan be executed on objects without a physical body, in that case, it shows a menu to select the type of body you want to add to the object: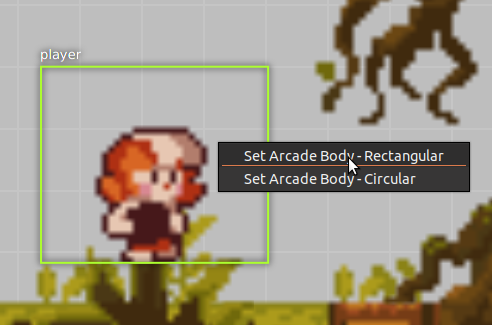
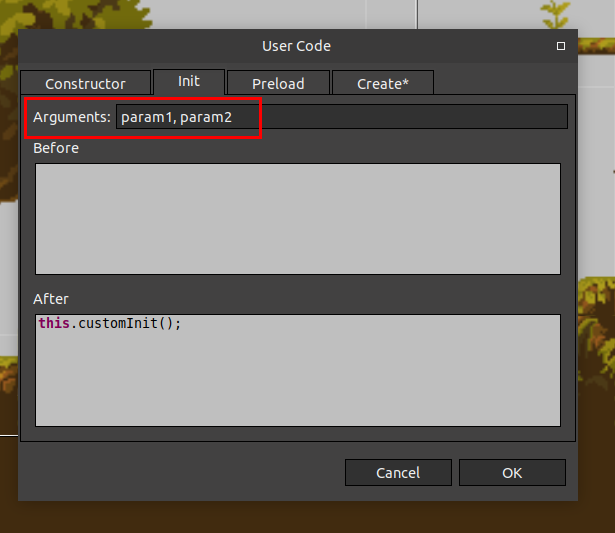
- Added a new command (
F2) to rename an object in the scene. - #69 Set the arguments to the generated init method (scene editor):
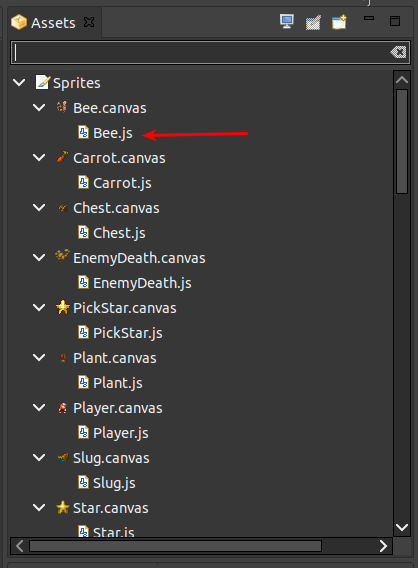
- The Assets window shows the scene generated files, so you can open them quickly:
- Now the Linux version will use the JavaFX WebView in the internal game player. SWT (the toolkit behind Eclipse/Phaser Editor) does not support, in Linux, to embed the native web browser into the application, so the JavaFX WebView is used. This WebView is slow, has a bad performance and is based on an old version of WebKit, but it can be useful for some cases like static scenes or presentations. We hope when we update to Java 9 the new WebKit will work better.
- Added a new Phaser Editor Example template, based on the Sunny Land Forest demo from Ansimuz. This new template is a great resource to learn how to use tilemaps with the scene editor, as well as prefabs.
- Updated to Eclipse Oxygen.3. Read the notes.
Phaser v3
Phaser v3 is just here! Congratulations to the Phaser team! As we mentioned in our 2018 Development Roadmap, we wanted to deliver a last major version of Phaser Editor v1.*, and then start developing Phaser Editor v2, that will support Phaser v3. That moment is now, the development of a Phaser Editor to support the last Phaser started :) We have a plan of 3 months of development before the first release. We think it is a fair amount of time considering there are deep changes we want to do in the editor, that are not Phaser related, else UX related. At the same time, Phaser v3 is very fresh and things could be changed or added, so at the end, the waiting is good for us because we will work on a more stable Phaser API.
The Phaser Editor v1.*, that supports Phaser v2.6.2, now enters into a bug fixing mode. We are going to update it with bug fixes until Phaser v3 gets fully ready. If you purchased a license you can request a certain feature, and we are going to evaluate if we can add it with a relatively short time.
If you purchase (or purchased in the past) a license, it will be valid for both products, Phaser Editor v1 and v2.
See you soon!
Arian
Tags: bitmaptext, bitmapfont, tilemap, freemium, transformations