[Tutorial] A day in the beach. A demo of buttons based on components.
August 19, 2020 - Posted in tutorials
![[Tutorial] A day in the beach. A demo of buttons based on components.](https://phasereditor2d.com/blog/content/images/20200818130633-Aday-beach-tutorial.png)
Hi,
A day in the beach is a very simple point-and-click game. Some starfishes pop into the screen and you have to click on them.
We did this game to demonstrate how you can create some common buttons in the game by using reusable components. These components can be reused in different places of the game or even in different games.
User Components is a recently added feature of Phaser Editor 2D. It allows you to create parametrized behaviors and connect them to objects of different types. For example, the OpenURLOnClick behavior can be set to an Image object, a Text object, or multiple objects with different URLs. Another advantage of components is that you can add a different combination of components to an object, without the need to create a complicated class hierarchy, like could be the case of prefabs. In an ideal project, it may be possible to allow the level designer to build the game levels only dragging images and setting user components.
Learn more about User Components
In this very short article, we are going to explain, in general, how we used components to make the buttons of the game. This is not a step by step, fully explained tutorial. This is just about to motivate you to do a deeper study of the User Components feature.
Running the demo project
The game code is hosed in the repository github.com/PhaserEditor2D/one-day-in-the-beach-demo-button-components. Clone it and copy its content in the Phaser Editor 2D workspace. By default, the workspace is in the {HOME}/PhaserEditor2D_Projects folder.
The quickest way to see and play with the files of the game is by creating an account in Play Phaser Editor 2D. It is an online service that allows you to run Phaser Editor 2D without the need to install it on your PC. It contains the A day in the beach project template, so select it and create a project. This online service is perfect for taking the first look to the editor, but for professional game development, we recommend to use the offline version.
Overview of the game
As we explained, the game is very basic. It has a first Welcome (or menu) screen that shows a couple of options: mute the background music or the sound effects, click on a social network link or start the game.
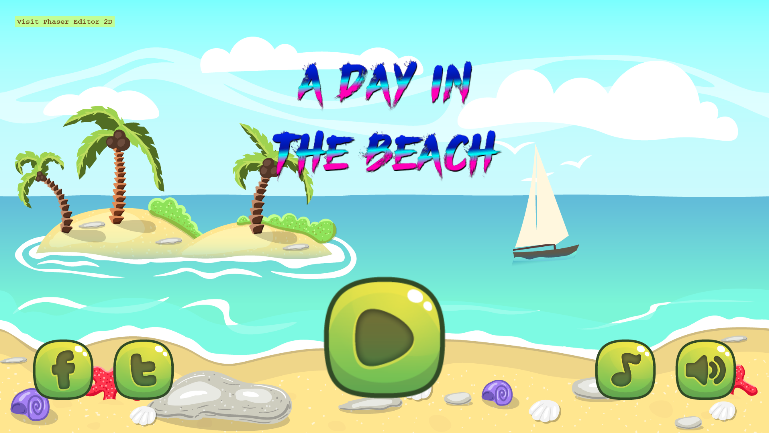
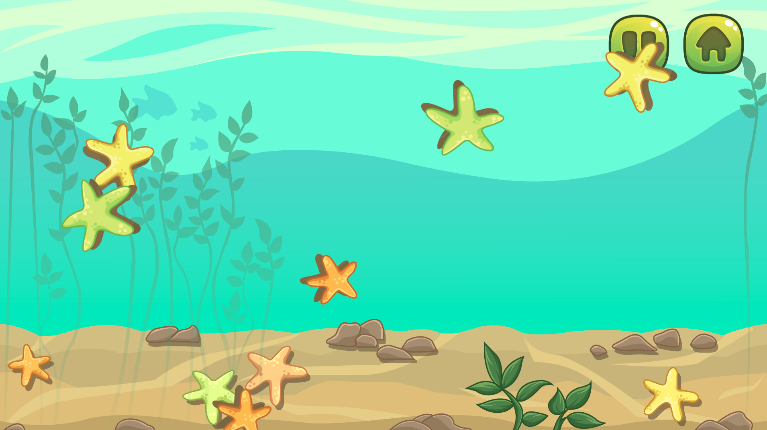
The other screen is the level, where the action happens. It shows an underwater scene where the starfishes are popping from time to time and you can click on them. When you click on a starfish it disappears and plays a water effect sound.
Also, this scene shows a button to pause the game and a button to return to the welcome screen.
Overview of the project structure
The structure of a project in Phaser Editor 2D is very similar to the structure of any other Phaser project. You can use any project structure. The only important recommendation is to keep in the project only the files that are relevant to the game. It means you should avoid placing server files or any other file that is not used directly by the editor tools or the game, like the un-packed, original images of a textures map. Phaser Editor 2D loads all the (or many) project resources in memory so it is important to process a relatively low number of files.
Learn more about resources filtering
In the next table we do a brief explanation of each folder and files:
/index.html Is the entry point of the game.
/assets/ This folder contains all the game assets, like images, sounds, and scenes.
/assets/asset-pack.json This is the Asset Pack File of the project. It is a manifest file used by Phaser to load the files used in the game.
/assets/atlas/ Contains the texture maps.
/assets/audio/ Contains the audio files.
/assets/fonts/ Contains the Bitmap Font files.
/assets/images/ Contains the images.
/assets/scenes/ Contains the scene files (*.scene) used by the Scene Editor. It also contains the JavaScript files created by the scene compiler.
/assets/components Contains the User Components file (like Behaviors.components). This file has a definition of the components. The folder also contains the JavaScript files compiled by the User Components compiler.
/lib/ This folder contains the Phaser runtime (phaser.js).
/types/ This folder contains the phaser.d.ts and matter.d.ts files. It is used by the editor (or external editors like Visual Studio Code) to provide intellisense when editing the JavaScript/TypeScript files.
/jsconfig.json A Visual Studio Code configuration file. Added to the project for better integration with VS Code. We recommend using that third party editor to write the game code.
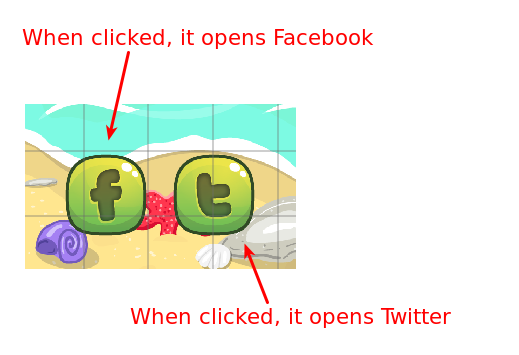
The social buttons case
Let’s focus on the social buttons to get a better idea of the problem. The problem is that we want to create a small framework of components that allows us to assign buttons-like behaviors to the images of the social buttons. A social button is a logo image that, when is clicked (or touched) it opens in the browser the URL of an account on Twitter or Facebook.
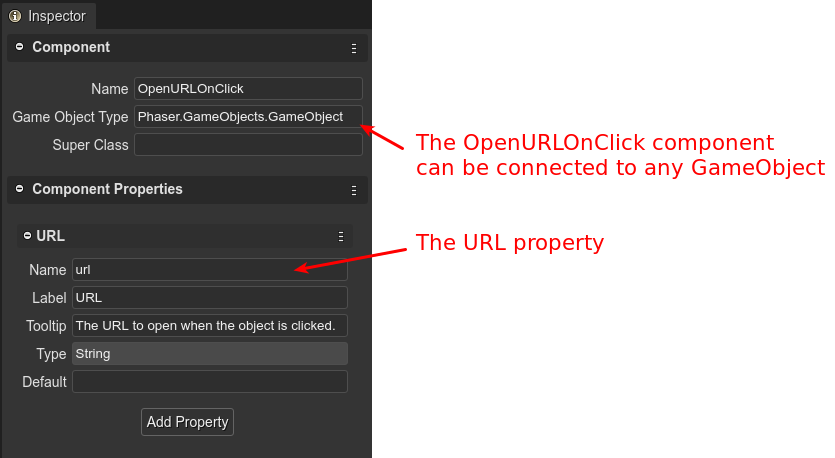
To do this, we created an OpenURLOnClick user component. This component has an URL parameter (or better said, a property) that contains the value of the URL we want to open.
This is the definition of the OpenURLOnClick component, in the Behaviors.components file:
This is the code generated by the User Components compiler. As you can see, in the constructor, the component registers a "pointerup" event listener to the object, that opens the URL set by the user:
class OpenURLOnClick {

    constructor(gameObject) {
        gameObject["__OpenURLOnClick"] = this;

        /** @type {Phaser.GameObjects.GameObject} */
        this.gameObject = gameObject;
        /** @type {string} */
        this.url = "";

        /* START-USER-CTR-CODE */

        this.gameObject.on("pointerup", () => {

            open(this.url);
        });

        /* END-USER-CTR-CODE */
    }

    /** @returns {OpenURLOnClick} */
    static getComponent(gameObject) {
        return gameObject["__OpenURLOnClick"];
    }
}
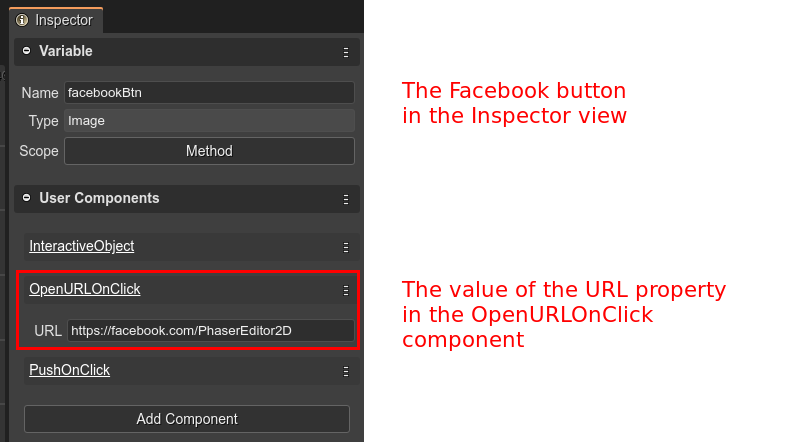
So, we add the OpenURLOnClick component to the Facebook button, and set the URL property to https://twitter.com/PhaserEditor2D. With the Twitter button it is the same, but setting the URL property to https://facebook.com/PhaserEditor2D.
The following image shows the Facebook button properties in the Inspector view. Look the User Components section contains the OpenURLOnClick component but also the InteractiveObject and PushOnClick components, that are used here but also in another type of buttons.
The Scene compiler will generate the code to create an instance of the component and set the value to the properties:
const facebookBtnOpenURLOnClick = new OpenURLOnClick(facebookBtn);
facebookBtnOpenURLOnClick.url = "https://facebook.com/PhaserEditor2D";
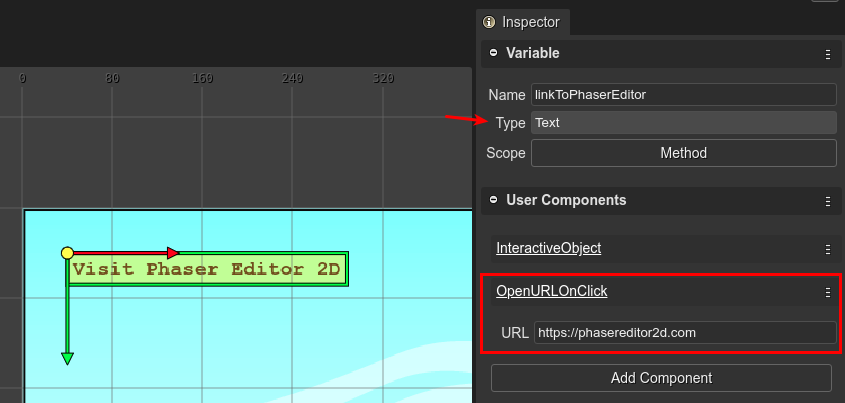
We can do the same with a prefab. We can create a prefab with an URL user property and an object with an image. Then, we create the prefab instances and override the texture and URL. However, what about if we want to create a button that is just a Text object? You cannot do it with the same prefab because it is an Image.
However, you can add an OpenURLOnClick component to a Text object, like is the case of the “link” in the top/left corner of the Welcome scene:
The components used in the game
The User Components of the game are in the Behaviors.components file. You can open it in the User Components Editor.
The editor shows the components so you can select them and see the properties in the Inspector view:
(Each component is compiled into JavaScript code, so you can open the generated file by double-clicking in the component)
Following there is a table with the User Components we created for the game and a small explanation about it. You can see the code for a better understanding of how they work.
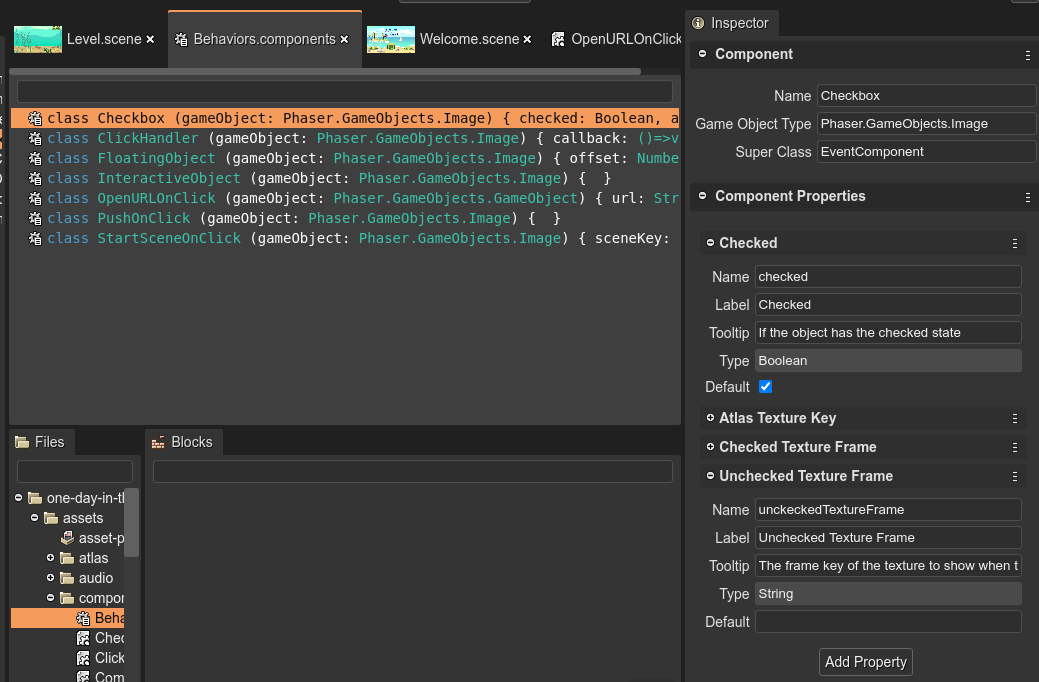
Checkbox
This component adds a checkbox-like behavior to an image object: it has an ON/OFF state and displays an image when it is ON and another image when it is OFF.
Properties
- Checked: It is a boolean property to keep the ON/OFF state.
- Atlas Texture Key: it is a texture atlas key. This atlas contains the images to be used by the button.
- Checked Texture Frame: it is the name of the atlas frame to be shown when the button is ON.
- Unchecked Texture Frame: it is the name of the atlas frame to be shown when the button is OFF.
References
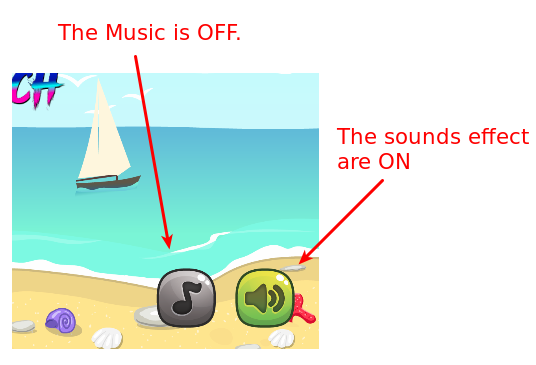
This component is used by the Music and Sound Effects buttons of the Welcome scene:
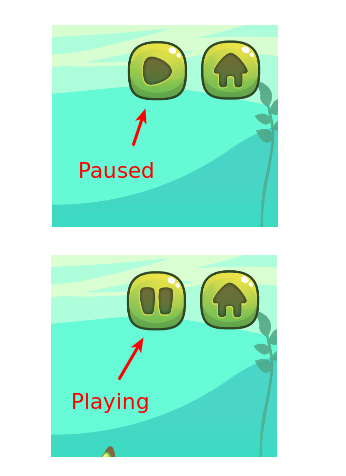
It is also used in the Level scene, in the pause/play button:
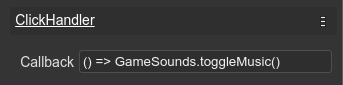
ClickHandler
This component adds a clickable (touchable) behavior to an object. It registers a "pointerup" event to the object, and when it is fired, the component calls a user callback.
Properties
Callback: Allows the user to write the code to handle the pointerup event. For example, the Music button sets the () => GameSounds.toggleMusic() code:
References
In the Welcome scene, the Music and Sound Effects buttons use it to call a method in the GameSounds global class.
In the Level scene, it is used in the Pause button to call a onPauseClicked() routine of the scene.
FloatingObject
This component adds a floating behavior to an object. It means, the object is moved vertically at a certain given distance or offset.
Properties
Offset: the distance to move the object.
References
It is used by the “A day in the beach!” text on the welcome screen. It is a BitmapText instance.
Also, in the Level scene, it is used in the Pause and Home buttons.
Note that this component is connected to objects of different types, BitmapText, and Image.
Interactive Object
This is a simple component with the only purpose of enabling the input (gameObject.setInteractive()) in the object. It is applied to all buttons.
OpenURLOnClick
This component has the behavior of open an URL in the browser, when the object is clicked (touched). The URL is set in the URL property.
Properties
URL: the URL to be opened when the object is clicked.
References
Used by the Facebook and Twitter buttons. And by the “text link” at the top/left corner of the Welcome scene.
PushOnClick
A simple component with no properties, that scales down the object when it is clicked, simulating a pushing visual effect. It is used by all buttons based on images.
StartSceneOnClick
This component starts a new Phaser scene when it is clicked. The scene key is set in the Scene Key property.
Properties
Scene Key: has the scene key to be started when the object is clicked.
References
This object is used by the Play button of the Welcome scene (to go to the Level scene) and the Home button in the Level scene (to return to the Welcome scene).
Bottom line
That’s all. We invite you to look into the code of each component and scene. We recommend you to read the documentation and contact us in the Phaser Editor 2D Discord server if you have any doubt or question.
Keep in contact!
Arian